Joined: Mar 13, 2006 Posts: 1079 Location: Richburg, SC
Posted: Wed Nov 15, 2017 10:33 am Post subject:
Yeah, I know - that's what I was thinking too. There was very little (or no) circulation at the filler neck. I can't remember if I changed the thermostat when I replaced the water pump and hoses or not. I might just go ahead and replace it anyway. I was thinking that there was no thermostat in it because the head was running so cool, but I distinctly remember a thermostat in the housing and the was no flow at the filler neck, so that can't be.
I guess I'll pick one up while I'm in town this evening and install it tomorrow.
Thanks for confirming that for me Brian! _________________ Matt
1953 M38a1
1964 USMC M38a1
'51 USMC M100 trailer, '54 M100 trailer, '90 M101a1 trailer
Http://wilfreeman.wordpress.com (M38a1 build blog)
http://m38a1usmc.wordpress.com (USMC M38a1 rebuild blog)
Joined: Mar 13, 2006 Posts: 1079 Location: Richburg, SC
Posted: Wed Nov 15, 2017 11:26 am Post subject:
I got a 25% off coupon from Advance Auto Parts today, so I went ahead and ordered a Stant 160deg thermostat and rear Monroe shocks (they didn't have the fronts in stock or I would've ordered them too!). Will pick them up this evening when I go to town. Cost me $48 with tax. I also ordered through eBates, so I got another 2% cash back with them. _________________ Matt
1953 M38a1
1964 USMC M38a1
'51 USMC M100 trailer, '54 M100 trailer, '90 M101a1 trailer
Http://wilfreeman.wordpress.com (M38a1 build blog)
http://m38a1usmc.wordpress.com (USMC M38a1 rebuild blog)
Joined: Mar 13, 2006 Posts: 1079 Location: Richburg, SC
Posted: Thu Nov 16, 2017 7:53 pm Post subject:
I pulled the hub puller out of the box this morning. It had one casting that was wide enough, but not deep enough to thread the lug nuts on. The other casting was deep enough, but not wide enough to reach across the studs! I also checked O'reilly and Harbor Freight for something that would work - came up with nothing. I am now checking with friends and friends of friends for one to borrow.
I reinstalled the rear diff cover and filled it with GL4 and the friction modifier. Then I moved to the front diff, pulled the cover, cleaned the internals, blasted and painted the cover. I scuffed and painted the shocks while I was painting. I let the cover dry while I ran to town to return the puller kit. When I got back I reinstalled the cover and filled the diff. I also installed the driver side shock.
I changed the thermostat and ran it for a little while then ran it up and down the driveway a couple of times until the temp started to rise. I went back to the shop and refilled the radiator. That cured the problem! Now I have the oil pressure, temp volt meter (sort of - if you tap on it) and spedometer (it is jumping though - needs cleaning and greasing).
Now the only thing left to do is get that hub/drum pulled, brakes changed on both sides of the rear and the right rear wheel cylinder changed. _________________ Matt
1953 M38a1
1964 USMC M38a1
'51 USMC M100 trailer, '54 M100 trailer, '90 M101a1 trailer
Http://wilfreeman.wordpress.com (M38a1 build blog)
http://m38a1usmc.wordpress.com (USMC M38a1 rebuild blog)
Joined: Mar 13, 2006 Posts: 1079 Location: Richburg, SC
Posted: Wed Nov 22, 2017 12:56 am Post subject:
Nobody I knew had a hub puller, so I ended up browsing eBay and found a good quality one cheap - it will be here Saturday. Then I can get back to the rear brakes.
I crawled under to adjust the clutch turnbuckles. They were covered with so much crap that I couldn't even get the nuts loose, so I decided to remove the assembly and clean it. The P.O. put bolts through the turnbuckles - one of them was actually so large that it was THREADED through the turnbuckle and double nutted on the end. The other one was just double nutted. After I got it out, I noticed that both turnbuckles were bent because of the tightening of the nuts and the rod itself was bent. After straightening, cleaning and lubing everything, I made a couple of pins for the turnbuckles on my mini lathe out of stainless bolts. Then I reinstalled it in the Jeep and adjusted for 1/2" play. During the test drive I realized why it was adjusted so tight - it was slipping! I can put it in 2nd gear, release the clutch and still not kill the engine. Guess that means a clutch replacement in the near future!
After I finished the test drive, I drained and changed the engine oil and filter. I used plain ol' Tractor Supply brand straight 30wt. The reason I did this is because I know the oil was thin and black - it needed new oil and I didn't know when the filter was last changed. Using cheap oil is not how I usually do it, but I also haven't run this engine enough to know if the fuel pump is leaking either. I will change out to better stuff after I am sure of what I have.
Between the test drives and oil change, I tested the last light switch I bought at the rally and ALL of my exterior lights work (except the right front BO marker which is a ground problem)! The panel bulbs are also burnt out, so they didn't work either. So I scuffed it down and sprayed a couple of coats of 24052 on it. The last thing I did for the day was to install the switch and hook it up - everything still worked and now it looks like it should.
I think I will get the manual out on Friday (the next day I'm off) and adjust the clutch by the book before I go ordering a new clutch kit. _________________ Matt
1953 M38a1
1964 USMC M38a1
'51 USMC M100 trailer, '54 M100 trailer, '90 M101a1 trailer
Http://wilfreeman.wordpress.com (M38a1 build blog)
http://m38a1usmc.wordpress.com (USMC M38a1 rebuild blog)
Joined: Mar 13, 2006 Posts: 1079 Location: Richburg, SC
Posted: Wed Nov 22, 2017 7:27 pm Post subject:
Thanks Brian - I'm trying to get this puppy finished up ASAP so that I can take her to the Denton rally in April next year. I also want to get my M100 finished up and take it too - a LOT to do in 4 months!
Guess that could be the problem then! Where the he** did I get 1/2" from? I'm at work right now but we are really slow over the holiday, so I'm getting ready to download it for a good read tonight! I found it kinda odd that it didn't seem to be slipping when I was driving it a little before I got it running right. But then again, there's the thing I forgot to mention in the last post (below).
When I got back from the last test drive (when I noticed it slipping so much), I saw oil running from under the side valve cover and PCV bell. I also noticed a good bit of smoke coming from the oil filler tube when changing the oil. So I started questioning the side fording valve. I turned it the opposite direction and the engine idle increased and smoothed out! That's when I noticed the wiper tee was no longer plugged too (which I taped up right then - idle got even better). I went around to the other fording valve and noticed that it had a line on the lever shaft. That made me wonder, so I took that one off and checked that it DID mean that when the line is in line with the body of the valve, it is OPEN - when it is up and down it is CLOSED. So I went back to the side valve and saw that it also had a line on the lever shaft and it ran best when in line with the valve.
I didn't take it off to double check because there was too much stuff to disconnect to do it. I haven't cleaned the PCV valve yet, so I'll be checking the fording valve soon when I do that.
Anyhow, I looked back at one of my earlier pictures and saw that the side fording valve lever was on the BOTTOM in that pic, but was on the TOP after I put everything back together - only problem there is that I didn't remove that valve when I was working on the exhaust manifold - WEIRD! So, I removed the lever, straightened it and reinstalled it facing the bottom. _________________ Matt
1953 M38a1
1964 USMC M38a1
'51 USMC M100 trailer, '54 M100 trailer, '90 M101a1 trailer
Http://wilfreeman.wordpress.com (M38a1 build blog)
http://m38a1usmc.wordpress.com (USMC M38a1 rebuild blog)
Joined: May 30, 2014 Posts: 3478 Location: Texas Hill Country
Posted: Thu Nov 23, 2017 8:56 am Post subject:
Hi Matt!
Yes Wes has mentioned many times checking the actual position of the fording
valves when dealing with oiling and rough running. I think there is a TM
instructing the boys to wire the valves open to prevent closing by accident.
Course over on the G our favorite poster says to remove them because who's going fording anyway...
😳
You've had a virtual cornucopia of things you've run through to get this guy running right! Might be a good reference to have handy!
Joined: Mar 13, 2006 Posts: 1079 Location: Richburg, SC
Posted: Thu Nov 23, 2017 6:32 pm Post subject:
I need to find that TM on how to wire them closed - you know, because I'll never be fording in it! I want to leave them on there for authenticity purposes though. Another thing I thought about today was that I never hooked the vent line back up to the master cylinder the other day. I'll bet that's affecting the idle too! Man, once I get everything adjusted, opened up and re connected, it will REALLY run like a sewing machine!
I can't wait to get back on it. I'll be off tomorrow and Saturday, but back to work Sun-Thursday, but the family is in town. So I guess I won't get much time to work on it this weekend. Hoping I can still get out there and get that hub and brake drum off so I can clean everything up and finish the rear brakes up!
Hope everyone had a Happy Thanksgiving and didn't stuff themselves! I stopped by the in-laws house and had a small plate before I came in to work and brought another small plate for dinner tonight. _________________ Matt
1953 M38a1
1964 USMC M38a1
'51 USMC M100 trailer, '54 M100 trailer, '90 M101a1 trailer
Http://wilfreeman.wordpress.com (M38a1 build blog)
http://m38a1usmc.wordpress.com (USMC M38a1 rebuild blog)
Another thing I thought about today was that I never hooked the vent line back up to the master cylinder the other day. I'll bet that's affecting the idle too!
Actually the vent line from the master cylinder goes to the air cleaner and has no effect on idle.
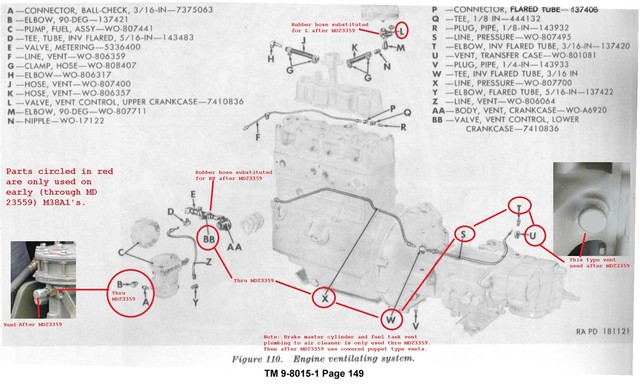
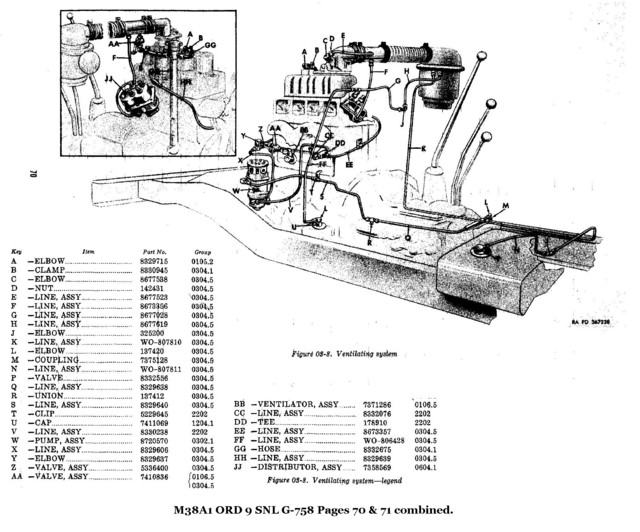
Engine related vent & fording system.
Combined drawing. Here you can see both the master cylinder and the gas tank are only connected to the air filter housing. _________________ Wes K
45 MB, 51 M38, 54 M37, 66 M101A1, 60 CJ5, 76 DJ5D, 47Bantam T3-C & 5? M100
Joined: Mar 13, 2006 Posts: 1079 Location: Richburg, SC
Posted: Fri Nov 24, 2017 12:47 pm Post subject:
Yep - you're right. I guess I can cross that one off the list. It's running pretty well already. I guess I can go ahead and readjust the timing and carb now that I have all of the major stuff worked out. I just gotta get that clutch readjusted first thing!
I'm hoping my hub puller will get here today instead of tomorrow so that I can work on the brakes in the morning after I adjust the clutch.
EDIT: Speak of the devil - the mail lady just dropped the puller off! By looking at the box, I'm surprised all of the pieces were still in there though! Got a $135 puller for 1/3rd of the price and it looks just like he described it - used once. Guess I'll be adjusting the clutch AND doing the brakes tomorrow for sure now. _________________ Matt
1953 M38a1
1964 USMC M38a1
'51 USMC M100 trailer, '54 M100 trailer, '90 M101a1 trailer
Http://wilfreeman.wordpress.com (M38a1 build blog)
http://m38a1usmc.wordpress.com (USMC M38a1 rebuild blog)
Joined: Mar 13, 2006 Posts: 1079 Location: Richburg, SC
Posted: Mon Dec 04, 2017 11:53 am Post subject:
I was able to get out and work on the Jeep yesterday. I installed the puller, beat on the dog bone a couple of times, tapped on the center bolt a few times to relieve the pressure and repeated 3 times. The third time, the drum/hub popped right off! Took less time to pull it than it did to install the puller. It's amazing how quickly you can do a job when you have the right tools to work with!
After I got it off, I had to beat on the hub center to separate it from the drum! Then I removed all of the old brake parts, cleaned everything, installed a new wheel cylinder and shoes and put the hub back on - much easier to do brake work with the hub out of the way! When I went to grad the washer and hub nut, IT WASN"T THERE! I looked everywhere but didn't find it. So I did the next best thing - I stole one off my other Jeep to keep the progress going. I'll have to order one to replace it.
I got everything back together, jacked up the rear end and put it on jack stands (both sides, because it has a posi in it). Then I adjusted the shoes. I repeated the process on the front (posi in it too). Then I called my daughter outside to push the pedal while I bled the brakes. I was able to bleed all but the right rear - no fluid. So I pulled the line off and blew 90psi through it until some gunk popped out like a BB gun going off! I cleaned it with some PBblaster and blew it out real good - reinstalled and bled it using a makeshift pedal holder.
I took it for a test drive and it stops well, but still won't lock them up on the dirt drive. So I guess I have a little more work to do on them yet.
I re adjusted the clutch to 1 1/4" free play and made a new pin for the clutch cable yoke. Yes, there was a bolt in it just like the other 2. Only this one was about 1/2" too long, so it had 7 washers on it with a hole drilled and cotter pin in the end!). Anyhow, the clutch is still slipping, but is holding enough to be able to drive it around to where I need it to work on it. It will get replaced before too long though.
I received my front shocks that I ordered from Advance (with a 25% off coupon also). I painted them and installed them the other day.
I am pretty much done with the mechanical stuff now. I am planning on pulling the rear springs and refurbing them this week. Then I will get back on the body work. _________________ Matt
1953 M38a1
1964 USMC M38a1
'51 USMC M100 trailer, '54 M100 trailer, '90 M101a1 trailer
Http://wilfreeman.wordpress.com (M38a1 build blog)
http://m38a1usmc.wordpress.com (USMC M38a1 rebuild blog)
Joined: Mar 13, 2006 Posts: 1079 Location: Richburg, SC
Posted: Wed Jan 31, 2018 8:46 am Post subject:
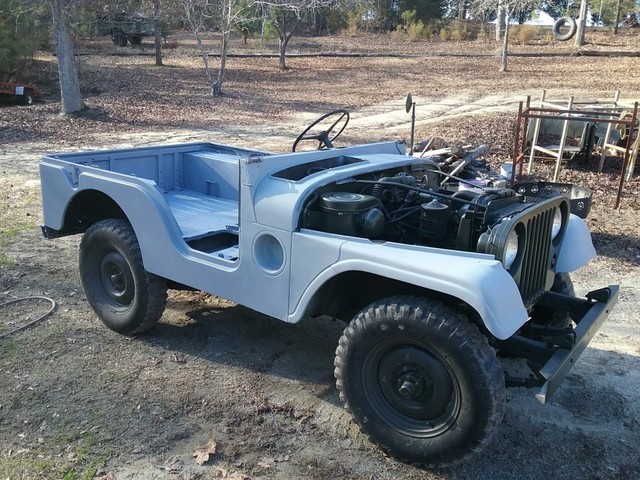
One step closer. I finally got around to doing the body work and stripping the interior this week off. I was able to get a couple of coats of primer on her and got the interior sanded back down to smooth it up.
I am hoping to get the hood dent straightened today and get the whole hood (inside and out) sanded down today. Then tomorrow I can get the last coat of primer on the interior and the hood. Then I will be ready for paint (hopefully) the next time I'm off!
As far as mechanical, I will be replacing the clutch assembly soon. I have the parts - just have to get around to it. I sent the carb out to have it professionally restored byhttp://oldjeepcarbs.com. He did a great job on my last one at a great price - and offers a 10% veteran discount! I bought a gas tank sealer kit from KBS Coatings because I am still getting some trash in the fuel filters and the inside of the tank is rusting again. Other than that, I think I am good to go for the rally in April. I will be building a new wiring harness from an M35a2 harness that I bought dirt cheap a while back after the rally. _________________ Matt
1953 M38a1
1964 USMC M38a1
'51 USMC M100 trailer, '54 M100 trailer, '90 M101a1 trailer
Http://wilfreeman.wordpress.com (M38a1 build blog)
http://m38a1usmc.wordpress.com (USMC M38a1 rebuild blog)
Fuel tank sealer/coatings applied in the field do not have the most reliable results. Without removing the tank and having a radiator shop hot tank it clean, and if surface rust is still in excess, cut it open and remove the rust completely, you will always have flaking of the field applied liner/sealer and clogging of the filter. Do not place a lot of faith in all the personal testimonies for tanks they have done in the field that are only a year or two old. _________________ Wes K
45 MB, 51 M38, 54 M37, 66 M101A1, 60 CJ5, 76 DJ5D, 47Bantam T3-C & 5? M100
You cannot post new topics in this forum You cannot reply to topics in this forum You cannot edit your posts in this forum You cannot delete your posts in this forum You cannot vote in polls in this forum