Create an account Home  ·  ·  Forums  ·  ·  Articles  ·  ·  Downloads  ·  ·  Photo Gallery  
Login
Nickname

Password

Don't have an account yet? You can create one here.

Navigation
· Home
· Article Archive
· Article Submit
· Downloads
· FAQ
· Forums
· Members List
· Photo Gallery
· Private Messages
· Web Links
· Your Account

Search Articles


Forums

WTB M38 distributor breaker plate tabs
Hodakaguy M38 Misc Thread
1950 M38 no reading on the dash amp meter
Transfer Case rebuild issues
Zerks causing trouble.
1952 M38 converting to 12V
M38A1 Slave Bucket location
M274 A3 Mule For Sale
flywheel advice
conversion from a 12 volt system back to a 24 volt system

Willys M Jeeps Forums


willysmjeeps.com :: View topic - M38 : OK, Boomer
 Forum FAQForum FAQ   SearchSearch   UsergroupsUsergroups   ProfileProfile   Log in to check your private messagesLog in to check your private messages   Log inLog in 

M38 : OK, Boomer
Goto page Previous  1, 2, 3 ... 10, 11, 12 ... 19, 20, 21  Next
 
Post new topic   Reply to topic    willysmjeeps.com Forum Index -> Jeep Project Threads
View previous topic :: View next topic  
Author Message
Naugha
Member


Joined: Apr 01, 2020
Posts: 409
Location: Ocala, Florida

PostPosted: Mon Mar 28, 2022 11:27 am    Post subject: Reply with quote

Brian.
Yes. I bought the ‘Greek’ tail light harness.
https://www.ebay.com/itm/171257498909

So, would using the older ‘two plug’ light switch allow me to use this tail light harness ??

Let’s also talk turn signals.

In the past Wes mentioned ‘Saturn Surplus’ as a source for the end plugs needed to build the turn signal harness that was later used in the retrofit of solid state turn signals to M jeeps..... sorry, I will need to go back check all the ID numbers.

The thing is, Saturn says they no longer carry those turn signal harness plugs.
Any idea where I could find the plugs or the harness?

I have the switch and just ordered a flasher but need the harness.
_________________
Don Alvarez
Retired HS Teacher
Central Florida
M38 Project
Back to top
View user's profile Send private message
Naugha
Member


Joined: Apr 01, 2020
Posts: 409
Location: Ocala, Florida

PostPosted: Mon Mar 28, 2022 11:45 am    Post subject: Reply with quote

Ron. The head stud length and other issues have been added to my ‘things to worry about’ list. Smile

I really, really want to put the radiator back on, drop in the tub and bolt on the gingerbread. Cool

April’s jeep looks like a jeep. My jeep looks like a skeleton. Shocked
_________________
Don Alvarez
Retired HS Teacher
Central Florida
M38 Project
Back to top
View user's profile Send private message
RonD2
Member


Joined: Oct 02, 2014
Posts: 1910
Location: South Carolina, Dorchester County

PostPosted: Mon Mar 28, 2022 11:56 am    Post subject: Reply with quote

Naugha wrote:
The thing is, Saturn says they no longer carry those turn signal harness plugs. Any idea where I could find the plugs or the harness?

This one? https://www.eriksmilitarysurplus.com/elcocplfor3l.html
_________________
Ron D.
1951 M38 Unknown Serial Number
1951 M100 Dunbar Kapple 01169903 dod 5-51

“The only good sports car that America ever made was the Jeep."
--- Enzo Ferrari

Back to top
View user's profile Send private message Send e-mail
Naugha
Member


Joined: Apr 01, 2020
Posts: 409
Location: Ocala, Florida

PostPosted: Mon Mar 28, 2022 12:31 pm    Post subject: Reply with quote

Ron.
Here is a thread that mentions the plugs needed to build the solid state wiring harness along with all the details.

http://www.willysmjeeps.com/v2/modules.php?name=Forums&file=viewtopic&t=12548

Still struggling with wiring harness version & turn signal mod decisions.

Some say that an indecisive mule, when presented with two identical containers of oats (or whatever mules eat) will starve to death.

RickG may be able to tell us more about the phenomenon. Very Happy
_________________
Don Alvarez
Retired HS Teacher
Central Florida
M38 Project
Back to top
View user's profile Send private message
RonD2
Member


Joined: Oct 02, 2014
Posts: 1910
Location: South Carolina, Dorchester County

PostPosted: Mon Mar 28, 2022 12:43 pm    Post subject: Reply with quote

Pretty sure Erik also has those smaller connectors here

https://www.eriksmilitarysurplus.com/comsfortusis.html

https://www.eriksmilitarysurplus.com/cofortusiflc.html

Along with other military turn signal stuff.

Can't help with the mule. Maybe he's constipated. Shocked
_________________
Ron D.
1951 M38 Unknown Serial Number
1951 M100 Dunbar Kapple 01169903 dod 5-51

“The only good sports car that America ever made was the Jeep."
--- Enzo Ferrari

Back to top
View user's profile Send private message Send e-mail
RICKG
Member


Joined: Aug 31, 2010
Posts: 1740
Location: SO IDAHO

PostPosted: Mon Mar 28, 2022 2:30 pm    Post subject: Reply with quote

Naugha wrote:
Ron.

Some say that an indecisive mule, when presented with two identical containers of oats (or whatever mules eat) will starve to death.

Very Happy


A smart mule will eat both..
_________________
keep 'em rollin'
RICKG MC 51986 DOD 01-52, '50 CJ3a
Back to top
View user's profile Send private message Send e-mail
wesk
Site Administrator
Site Administrator


Joined: Apr 04, 2005
Posts: 16250
Location: Wisconsin

PostPosted: Mon Mar 28, 2022 9:12 pm    Post subject: Reply with quote

Don,

Quote:
I bought studs that were ‘supposed’ to fit the M38 head including the two very long ones. I am bad about trusting too much in ad descriptions and not checking the manual.

Maybe the nuts can be torqued another thread or so ????
Maybe add some thread lock????


Best always is to first use the ORD 9 and determine the applicable ORD part number, Manufacturer's part number, Federal Stock Number and if listed the dimensions.

Then shop for the needed part.

The industry standard of a MINIMUM of 1 1/2 threads showing after the nut is for safety reasons and should always be followed. People new to the mechanical world and it's rules often try to rationalize their deviations from these rules. These folks eventually pay dearly for their deliberate deviations.

The industry standards include requirements for thread locker in certain situations. But threadlocker is not a license to ignore physical limitations and prohibitions.
_________________
Wes K
45 MB, 51 M38, 54 M37, 66 M101A1, 60 CJ5, 76 DJ5D, 47Bantam T3-C & 5? M100

Mjeeps photo album: http://www.willysmjeeps.com/v2/modules.php?set_albumName=Wes-Knettle&op=modload&name=gallery&file=index&include=view_album.php


Last edited by wesk on Tue Mar 29, 2022 11:46 am; edited 1 time in total
Back to top
View user's profile Send private message Send e-mail Visit poster's website
4x4M38
Member


Joined: May 30, 2014
Posts: 3447
Location: Texas Hill Country

PostPosted: Tue Mar 29, 2022 6:45 am    Post subject: Reply with quote

Here’s the connector for the military flasher:
https://www.ebay.com/itm/165279683000
_________________
Brian
1950 M38
MC11481
http://www.willysmjeeps.com/v2/modules.php?set_albumName=album372&op=modload&name=gallery&file=index&include=view_album.php
Back to top
View user's profile Send private message Send e-mail
4x4M38
Member


Joined: May 30, 2014
Posts: 3447
Location: Texas Hill Country

PostPosted: Tue Mar 29, 2022 6:51 am    Post subject: Reply with quote

Here’s the flasher that connector screws into:
https://www.ebay.com/itm/165115119367
_________________
Brian
1950 M38
MC11481
http://www.willysmjeeps.com/v2/modules.php?set_albumName=album372&op=modload&name=gallery&file=index&include=view_album.php
Back to top
View user's profile Send private message Send e-mail
4x4M38
Member


Joined: May 30, 2014
Posts: 3447
Location: Texas Hill Country

PostPosted: Tue Mar 29, 2022 7:13 am    Post subject: Reply with quote

Don,
In answer to your earlier question. Yes, if you use the two plug Bendix light switch you plug the “Greek” harness into the smaller socket and that is all the wiring for the rear lights and trailer. Less the trailer connector itself with pigtails and connectors.

Assuming no turn signals.

That’s how she came from the factory.

Turn signals. Remember the M38 and A1 did not come from the factory with turn signals. They were a retrofit if installed at all. So the factory wiring did not account for turn signals.

As Wes mentions on his Turn Signals pages there were three types of signals installed. If you want them it will be your call as to which system you put in. They all have advantages and disadvantages.

If it were me, I would build/buy the front wiring harness and other necessary wiring to put it back factory. You have the rear harness. That way you can get the vehicle up and running.

When you get ready to install signals, just follow the directions the Army supplied to do so with the version you pick. They did not take the vehicle apart to install them, so it’s not terribly difficult.

That’s what I would do.

Just my two cents.

Take care,
_________________
Brian
1950 M38
MC11481
http://www.willysmjeeps.com/v2/modules.php?set_albumName=album372&op=modload&name=gallery&file=index&include=view_album.php
Back to top
View user's profile Send private message Send e-mail
45auto
Moderator
Moderator


Joined: Apr 06, 2005
Posts: 148
Location: Georgia

PostPosted: Tue Mar 29, 2022 11:14 am    Post subject: Reply with quote

I had the same problem with the longest head stud. Unless you are buying NOS hardware, the dealer's stock "off the shelf" hardware. The military uses lengths that are not industry standards. I'm not looking at the manual, but I believe the studs are measured to something like a 16th of an inch. Bolts and studs off the shelf are to 1/4, 1/2 and 3/4 of an inch. in smaller sizes you can get 3/8 and 5/8 sizes.

I bought grade eight studs to the nearest size longer and cut it down to size. The hardest part was getting the dome and sight taper on the end of the stud. I practiced on some lesser bolts before cutting the stud to size.

What's needed to make the studs are:
A ruler for measuring thread length on bolts. I used a machinist ruler just for measuring thread length.
A sanding disc to make the bevel dome on the end of the stud. I used a 4 1/2-inch grinder with a fine grit pad.
A sharp hacksaw blade.
A 1/2" drill to spin the stud to give the dome a consistent and finish look.
A die to smooth and blend the threads at the end of the stud.

Its a bit of trouble and work but the end results was spot on!
_________________
Harold W.
MVPA #6833
1945 GPW
1950 CJV-35/U
1951 M38 1952 M38
1962 USMC Contract M38A1
1953 Strick M100 1967 Johnson M416
1968 CJ5 4-Speed 1969 CJ5 V6
Back to top
View user's profile Send private message Send e-mail
wesk
Site Administrator
Site Administrator


Joined: Apr 04, 2005
Posts: 16250
Location: Wisconsin

PostPosted: Tue Mar 29, 2022 12:08 pm    Post subject: Reply with quote

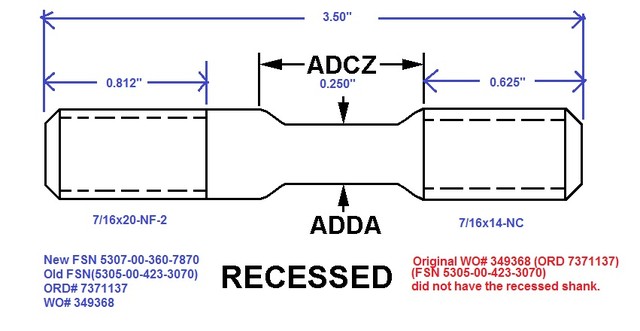
As mentioned above there are slight variances between studs producured by Willys during L134 manufacturing and the military ORD#/FSN studs used in the military logistics system as spares. Here are the dimensions of the Willys produced studs:


Original Willys short stud. Keep in mind there is a second short stud in the ORD 9 that was only used on a short batch of L134's.


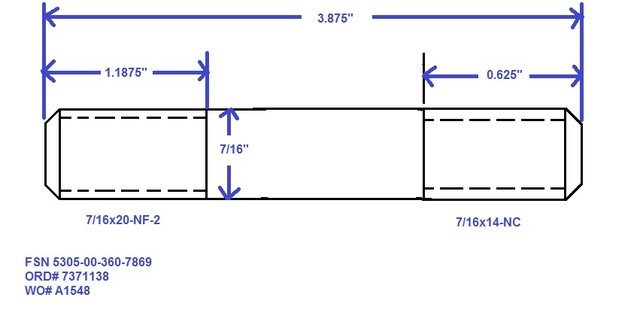
Original Willys long stud.


ORD 9 listing for the studs
_________________
Wes K
45 MB, 51 M38, 54 M37, 66 M101A1, 60 CJ5, 76 DJ5D, 47Bantam T3-C & 5? M100

Mjeeps photo album: http://www.willysmjeeps.com/v2/modules.php?set_albumName=Wes-Knettle&op=modload&name=gallery&file=index&include=view_album.php
Back to top
View user's profile Send private message Send e-mail Visit poster's website
Naugha
Member


Joined: Apr 01, 2020
Posts: 409
Location: Ocala, Florida

PostPosted: Wed Mar 30, 2022 12:46 pm    Post subject: Reply with quote

I count seven short studs that need to be replaced with something two or three or four threads longer. I will not worry about the other studs that may be a tad longer than mil spec.

After cooling down a bit, Twisted Evil, I accepted the situation, resolved to pull the head, take the risk of screwing up something, measure the studs I used, source some slightly longer studs and make it all go away. Far away.

But then, being a sucker for shortcuts, I opened a can of internet worms by reading about how some folks replace unwanted studs one at a time without removing the head. I began having the fantasy of an ‘easy fix’ but thought it best to check in with HQ before I venture into yet another disaster.

I have the socket tool that grabs a stud and helps torque it into the block but I think that gizmo is usually used at the midpoint ridges of the stud. Not sure if that tool works on the upper most part of a stud, especially concerned I can damage the new stud when seating it into the block.

Thread sealer would probably be re applied to the new studs. No problem.

The big debate is over possible damage to the head gasket.

Some say if the head is flat (my head & block were decked) there should be no problem.

Some say pull the head, replace the studs & head gasket or you will be replacing the HG soon.

Some say, “So what. If it works it works. If not, later you replace the HG, no bigly.”

Question Question Question Question
_________________
Don Alvarez
Retired HS Teacher
Central Florida
M38 Project
Back to top
View user's profile Send private message
RonD2
Member


Joined: Oct 02, 2014
Posts: 1910
Location: South Carolina, Dorchester County

PostPosted: Wed Mar 30, 2022 1:18 pm    Post subject: Reply with quote

Naugha wrote:
I have the socket tool that grabs a stud and helps torque it into the block but I think that gizmo is usually used at the midpoint ridges of the stud. Not sure if that tool works on the upper most part of a stud, especially concerned I can damage the new stud when seating it into the block.

Don,
Studs (by themselves) aren't torqued into the block. The nut on the stud is what gets torque. Pretty sure the tool you describe is a stud REMOVER. Not for installing them. Studs (with sealer) are simply hand threaded into the block until they bottom out. I presume before you put the head on you inspected the threads in the block (not worn or wobbly), and chased them?

I see no reason why you can't remove one or two studs at a time and either install the correct stud or swap a long for a short without damaging the gasket. As I said before, just make sure to seal them in the block again and torque the nut to spec before moving on to the next one. Torque value in the manual for the nut on the stud is given dry.

Now is the time to do this. The block never had coolant in it for the corrosion process to start, so they should come out pretty easy. It may help getting them out by going to the hardware store and buying a couple of thin "jam" nuts to double-nut the stud out.
_________________
Ron D.
1951 M38 Unknown Serial Number
1951 M100 Dunbar Kapple 01169903 dod 5-51

“The only good sports car that America ever made was the Jeep."
--- Enzo Ferrari

Back to top
View user's profile Send private message Send e-mail
Naugha
Member


Joined: Apr 01, 2020
Posts: 409
Location: Ocala, Florida

PostPosted: Wed Mar 30, 2022 1:59 pm    Post subject: Reply with quote

The block had a snapped stud or two removed, was decked and passed rebuild shop inspection for no cracks.... I think the threads are OK.

Will give it a go. Cool
_________________
Don Alvarez
Retired HS Teacher
Central Florida
M38 Project
Back to top
View user's profile Send private message
Display posts from previous:   
Post new topic   Reply to topic    willysmjeeps.com Forum Index -> Jeep Project Threads All times are GMT - 6 Hours
Goto page Previous  1, 2, 3 ... 10, 11, 12 ... 19, 20, 21  Next
Page 11 of 21

 
Jump to:  
You cannot post new topics in this forum
You cannot reply to topics in this forum
You cannot edit your posts in this forum
You cannot delete your posts in this forum
You cannot vote in polls in this forum

Powered by phpBB © 2001 phpBB Group
Forums ©


PHP-Nuke Copyright © 2005 by Francisco Burzi. This is free software, and you may redistribute it under the GPL. PHP-Nuke comes with absolutely no warranty, for details, see the license.