| View previous topic :: View next topic |
| Author |
Message |
4x4M38
Member

Joined: May 30, 2014
Posts: 3447
Location: Texas Hill Country
|
|
| Back to top |
|
 |
cabinfever
Member

Joined: May 14, 2013
Posts: 201
Location: Between Crosslake and Emily, Minnesota
|
 Posted: Sun Apr 30, 2017 8:52 am Post subject: Re: Copper Head Gasket Posted: Sun Apr 30, 2017 8:52 am Post subject: Re: Copper Head Gasket |
 |
|
| G740 wrote: | Midwest Military stocks the copper head gaskets for the L and F head engines.
John |
Check your email, JB. I ordered one yesterday. 
_________________
Steve Stark - 1955 M38A1 MD #85388
Member - MVPA #35153
Member - Red Bull Historic Military Vehicle Association |
|
| Back to top |
|
|
cabinfever
Member
Joined: May 14, 2013
Posts: 201
Location: Between Crosslake and Emily, Minnesota
|
| Posted: Fri May 05, 2017 8:12 am Post subject: |
|
|
UPDATE: I got my cylinder head back from the machine shop.
They dipped it, so it looks almost new....put now I will have to repaint it.
They magnafluxed the head and found no cracks.
The mating surface was quite uneven, however. The shop machined the surface to make it flat again. (Perhaps the uneven surface was the reason for the coolant leak?)
Today, I will be painting the head being very careful not to get any point on the top or bottom of the head. Also, wire brushing the head bolts and chasing the threads in the engine block with a tap. And, prepping the mating surface on the engine block.
The copper gasket has arrived from Midwest Military.
_________________
Steve Stark - 1955 M38A1 MD #85388
Member - MVPA #35153
Member - Red Bull Historic Military Vehicle Association |
|
| Back to top |
|
|
oilleaker1
Member
Joined: May 14, 2009
Posts: 971
Location: South Dakota
|
| Posted: Fri May 05, 2017 8:19 am Post subject: |
|
|
| When you seal the bolt threads, I've found it helps to put sealant on the block threads and bolt threads. The bolt sometimes gets cleaned off by the block threads and still leaks. John |
|
| Back to top |
|
|
cabinfever
Member
Joined: May 14, 2013
Posts: 201
Location: Between Crosslake and Emily, Minnesota
|
| Posted: Fri May 05, 2017 8:56 am Post subject: |
|
|
| oilleaker1 wrote: | | When you seal the bolt threads, I've found it helps to put sealant on the block threads and bolt threads. The bolt sometimes gets cleaned off by the block threads and still leaks. John |
How do you get the sealant into the threads without getting it all over the mating surface of the engine block? Do you use a Q-tip?
_________________
Steve Stark - 1955 M38A1 MD #85388
Member - MVPA #35153
Member - Red Bull Historic Military Vehicle Association |
|
| Back to top |
|
|
oilleaker1
Member
Joined: May 14, 2009
Posts: 971
Location: South Dakota
|
| Posted: Fri May 05, 2017 9:16 am Post subject: |
|
|
| That would work. A little that gets out won't hurt much since you will be installing and torqueing. The hole in the gasket itself would provide space too. |
|
| Back to top |
|
|
wesk
Site Administrator


Joined: Apr 04, 2005
Posts: 16256
Location: Wisconsin
|
|
| Back to top |
|
|
cabinfever
Member
Joined: May 14, 2013
Posts: 201
Location: Between Crosslake and Emily, Minnesota
|
| Posted: Fri May 05, 2017 4:04 pm Post subject: |
|
|
| wesk wrote: | | Try to use thread chasers not thread dies & taps when cleaning threads. One is made to clean and the other takes more metal away. Especially head bolt threads and spark plug threads. |
Wes, it's too bad I didn't see your advice earlier.
The bad news is, I used a regular thread tap. The good news is (I think), I only used my fingers to screw it in. If there was resistance, I backed it out moved on.
_________________
Steve Stark - 1955 M38A1 MD #85388
Member - MVPA #35153
Member - Red Bull Historic Military Vehicle Association |
|
| Back to top |
|
|
cabinfever
Member
Joined: May 14, 2013
Posts: 201
Location: Between Crosslake and Emily, Minnesota
|
| Posted: Sat May 06, 2017 5:54 pm Post subject: |
|
|
Had a bit of a setback today. I should have listen to both oilleaker1 and John Bizal. Both suggested that no sealer is needed on the copper gasket.
Well, thought I'd do a little research (I tend to over think things) and found the website of the gasket maker. The manufacturer recommended using copper gasket sealant on both sides of the gasket.
Now I had a decision to make. Follow the manufacturer's recommendation or the advice of two pros? I chose to use the sealant.
I placed the now tacky as heck gasket on the engine block. Then, I slowly lowered the head using my jerry-rigged block and tackle which was hanging from the garage rafter.
I didn't get the head perfectly centered on the engine block. So, I lifted the head to readjust it. The lifting of the head cause the gasket to split into two plies! That's how tacky that sealer was.
So, I learned a lesson. I am ordering another copper gasket. This time it goes on with no sealer.
In hindsight, I suppose I could have run four long wood dowels from the head holes into the block threads to act as guides as I lowered the head.
_________________
Steve Stark - 1955 M38A1 MD #85388
Member - MVPA #35153
Member - Red Bull Historic Military Vehicle Association |
|
| Back to top |
|
|
wesk
Site Administrator
Joined: Apr 04, 2005
Posts: 16256
Location: Wisconsin
|
| Posted: Sat May 06, 2017 10:13 pm Post subject: |
|
|
Hindsight is ___________________!
I prefer to follow the gasket makers instructions. They all put instructions in the box with the gasket. The many manufacturers do not always agree so try to stay with the one that made your gasket. Don't assume that if Jones gasket uses sealer then Smith's gaskets will also! And try to stay with the engine's OEM instructions except where they disagree with the new part manufacturers instructions.
When good folks offer advice that does not agree with the manufacturer's advice I corner them for the "Make/Model/Part Number" to be sure they are talking about the one I have then I make that nasty decision.
I always try to use guide studs during most engine assembly work. Especially where gasket sealers are used!
_________________
Wes K
45 MB, 51 M38, 54 M37, 66 M101A1, 60 CJ5, 76 DJ5D, 47Bantam T3-C & 5? M100
Mjeeps photo album: http://www.willysmjeeps.com/v2/modules.php?set_albumName=Wes-Knettle&op=modload&name=gallery&file=index&include=view_album.php |
|
| Back to top |
|
|
cabinfever
Member
Joined: May 14, 2013
Posts: 201
Location: Between Crosslake and Emily, Minnesota
|
| Posted: Sun May 07, 2017 8:05 am Post subject: |
|
|
Wes, what do you use for your guide studs? Did you cut off the heads of 7/16-14 bolts? Or, maybe cut lengths from a threaded rod?
Also, how many would you use? One in each corner?
FYI, the gasket I got from MM did not have any directions. It was made by Best Gasket Company.
http://www.bestgasket.com/about_our_products.asp
_________________
Steve Stark - 1955 M38A1 MD #85388
Member - MVPA #35153
Member - Red Bull Historic Military Vehicle Association |
|
| Back to top |
|
|
wesk
Site Administrator
Joined: Apr 04, 2005
Posts: 16256
Location: Wisconsin
|
| Posted: Sun May 07, 2017 9:16 am Post subject: |
|
|
| Quote: | Wes, what do you use for your guide studs? Did you cut off the heads of 7/16-14 bolts? Or, maybe cut lengths from a threaded rod?
Also, how many would you use? One in each corner? |
I use a special thought process called "KISS" "Keep It Simple Stupid"!
Why cut anything. Just use two old head studs that are long enough so you can remove them. Or go to the hardware store and buy a couple of long enough studs. You are only concerned with the threads on at least one end matching the block's 7/16x14NC threads. 5 to 6" long will do it.
I just use two and find that diagonally works just fine.
| Quote: | | FYI, the gasket I got from MM did not have any directions. It was made by Best Gasket Company. |
A "Do it yourselfer's" worst enemy is an aftermarket part without instructions! You are damned if you do and damned if you don't follow the OEM's instructions so in the interest of curiosity you research the vendor's web site and choose the vendor's destructions since they would be newer than the OEM's instructions.
On a similar note, the military technical writers always had a tendency to under write the material they had from civilian sources when writing the military versions of the manual. Therefore I always recommend you use the Willys / Kaiser civilian service manual most appropriate to your military model jeep in conjunction with your military manuals.
For the M38 use the civvvy SM-1002 and for the M38A1 use the civvy SM-1046.
_________________
Wes K
45 MB, 51 M38, 54 M37, 66 M101A1, 60 CJ5, 76 DJ5D, 47Bantam T3-C & 5? M100
Mjeeps photo album: http://www.willysmjeeps.com/v2/modules.php?set_albumName=Wes-Knettle&op=modload&name=gallery&file=index&include=view_album.php |
|
| Back to top |
|
|
cabinfever
Member
Joined: May 14, 2013
Posts: 201
Location: Between Crosslake and Emily, Minnesota
|
| Posted: Sun May 07, 2017 9:44 am Post subject: |
|
|
That's interesting.
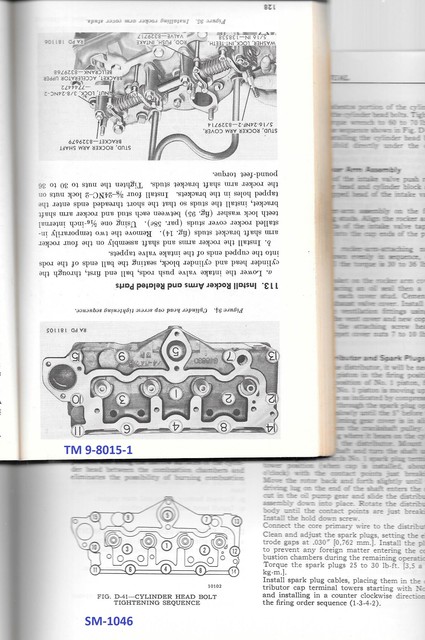
The civvy manual and the military TM have slightly different torquing sequences.
As far as gasket sealer goes, civvy says to use spray sealer on the gasket, TM does not mention a sealer.
I was told that the crimped edge of the copper gasket goes up. The civvy manual says the crimped edge goes down.
Since I don't have any extra bolts or studs around here, I will be going to the hardware store to buy some.
Thanks again, Wes.
_________________
Steve Stark - 1955 M38A1 MD #85388
Member - MVPA #35153
Member - Red Bull Historic Military Vehicle Association |
|
| Back to top |
|
|
wesk
Site Administrator
Joined: Apr 04, 2005
Posts: 16256
Location: Wisconsin
|
| Posted: Sun May 07, 2017 5:33 pm Post subject: |
|
|
Don't read anything into the manual. Just take info from the manual.
For the gasket you must decide which source to use. The civvy manual was printed in 1971. The asbestos center gasket was still in use.
The torque sequence is identical in TM 9-8015-1 and the SM-1046. The civvy manual's illustration is inverted when compared to the TM 9-8015-1. The numbers are in the same holes.
_________________
Wes K
45 MB, 51 M38, 54 M37, 66 M101A1, 60 CJ5, 76 DJ5D, 47Bantam T3-C & 5? M100
Mjeeps photo album: http://www.willysmjeeps.com/v2/modules.php?set_albumName=Wes-Knettle&op=modload&name=gallery&file=index&include=view_album.php |
|
| Back to top |
|
|
cabinfever
Member
Joined: May 14, 2013
Posts: 201
Location: Between Crosslake and Emily, Minnesota
|
| Posted: Sun May 07, 2017 8:52 pm Post subject: |
|
|
Yeah, I was comparing SM-1046 to TM9-8014 (below). I take it either sequence will have the same result.

_________________
Steve Stark - 1955 M38A1 MD #85388
Member - MVPA #35153
Member - Red Bull Historic Military Vehicle Association |
|
| Back to top |
|
|
|

