Joined: Mar 13, 2006 Posts: 1079 Location: Richburg, SC
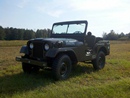
Posted: Sun Nov 13, 2011 6:38 pm Post subject: Made a little progress today on the 'A1
My plan this morning was to install the hard line from the m/c to the front axle, bleed the brakes and get back on getting her running again - more on that tomorrow. I installed the line, went to the rear and put her up on jack stands - removed the back tires. Went to loosen the bleeder screw and it snaps off - even after careful turns! That's OK, as I thought ahead 10 years ago and bought new wheel cylinders for all 4 corners, so I'll just replace it and carry on. No dice - the screws holding the drum on were holding fast! Tried PB Blaster, tapping on the screws, heat, and one of those drivers you hit on the handle with a hammer to loosen screws - broke the only flat bit I had! Ended up having to drill them out. The drum came off fairly easy after that. Replaced the w/c and moved on to the other side - bleeder broke off. Those screws came out fairly easily along with the drum. Moved on to the front - went ahead and decided to replace the wheel cylinders. These were a bi*ch! Screws came out on the driver's side, but had to drill the pass. side. Drums didn't want to come off at all either. Finally got them off and changed the wheel cylinders. Started bleeding them(by myself and a piece of board to hold the pedal) - finally got a good pedal after tightening a few hard line nuts here and there (I put all new brake lines on last year, but winter caught me and I never finished). It took me 6 hours to install that 1 hard line and bleed the brakes! She's fighting me all the way to get her back on the road, but I'll get her before it's over!
Now that I have a way to stop her, I guess I'll get back on getting her running tomorrow and Tuesday - we're supposed to have great weather. I'm pretty sure my pump is pumping and nothing is going to the crankcase, but I don't think gas is getting through the carb. I can spray ether and it will start and quickly die. I can spary gas in the carb and get the same results. I am pulling from a gas can that is almost level with the pump. I have almost a full (glass bowl type pump) bowl of gas - with about a 1/4" bubble on top. I will try a gravity feed setup tomorrow before I take the carb off and check it.
Joined: Mar 13, 2006 Posts: 1079 Location: Richburg, SC
Posted: Sun Nov 13, 2011 6:48 pm Post subject:
Oh, I forgot to mention, the driver's side lower kingpin bearings must be completely gone because I have about an inch of up/down movement at the hub (probably 1/8" at the kingpin). Oh well, something else I get to learn how to do - the seals/scrapers needed replacing anyway. Fortunately, I thought ahead 10 years ago when I was buying parts and bought those too.
Joined: Apr 14, 2005 Posts: 153 Location: N. Wisconsin
Posted: Sun Nov 13, 2011 8:41 pm Post subject:
Ouch! Your frustrating day sounds all too familiar to me (and probably many of the others who are reading it). I can really relate to your problems with those screws holding on the brake drums. If I recall right, when I went to "just" change my wheel cylinders, I had to drill out 8 of 12! Ah well... that's one hurdle you won't have to deal with again. It's a step in the right direction. _________________ Support our troops, past and present.
Dave
M38A1 2/55, MD81433, U.S. ARMY 2A3514
M100 Dunbar Kapple, ?/51, #15122
Joined: Nov 01, 2011 Posts: 199 Location: Escondido, CA
Posted: Sun Nov 13, 2011 8:42 pm Post subject:
Hang in there and keep at it. I love your "I thought ahead 10 years ago" comments! _________________ Jim McKim
1952 M38 son-father project
Slowly turning rusty parts into OD parts
That's why I usually pull the rear hub and drum as an assembly if I know those screws haven't been off in a long time. Give the drum screws one shot each with the hand impact tool and flat bit. If they don't pop then straight away to the big bertha striker type hub puller. _________________ Wes K
45 MB, 51 M38, 54 M37, 66 M101A1, 60 CJ5, 76 DJ5D, 47Bantam T3-C & 5? M100
Joined: Mar 13, 2006 Posts: 1079 Location: Richburg, SC
Posted: Mon Nov 14, 2011 4:50 am Post subject:
Yeah, for some reason every job I go into on this thing I think it will only take an hour our so. I keep forgetting this thing is 57 years old, hasn't been maintained in probably 35 - 40, and has been sitting (off and on) for the last 12 - I should remember to expect it! Oh yeah, about the rear hub. Do you just take the cap and nut off, then have to use a puller to get the hub off? I have to change some studs. I am planning on replacing the brakes with later model, larger, self adjusting brakes at some time in the future if I drive it enough. Yes, I was all gung ho about 10-12 years ago (before I got married and started a family) and bought up about 80% of the parts I needed then, which is a good thing because parts prices have gotten rediculous! I am losing some steam again this year -the plan was to get it (at least) moving on it's own before winter shuts me down again. I hope I can get that accomplished in the next 2 days because thanksgiving and christmas are once again upon us!
Joined: May 14, 2009 Posts: 972 Location: South Dakota
Posted: Mon Nov 14, 2011 6:23 am Post subject:
Buy a large can with brush of anti seize compound. I put it on all threads, spark plugs etc. so the next time you want to go back, you know you are going to get it apart. Heck, maybe even brush your teeth with it! John
Joined: Nov 13, 2007 Posts: 289 Location: Fort Smith Arkansas
Posted: Mon Nov 14, 2011 2:19 pm Post subject: Torque setting
I was raised that you take a "rolling torque" and add it to the torque spec. when tightening a bolt. Rolling torque being the force needed to make the bolt turn prior to the head of the bolt making contact with the surface. Not much force to compensate for on common bolts but it can be notable on inch pound stuff and (where I really needed it) large bolt diameters above 1". Ex Navy steam plant mechanic here. _________________ 1955 M170
1980 JD 450C
1948 Ford 8N
2008 Rubicon Unlimited MyGig
Joined: Nov 01, 2011 Posts: 199 Location: Escondido, CA
Posted: Mon Nov 14, 2011 5:14 pm Post subject:
Bretto wrote:
Does anyonw have issues with the anti-seize affecting your torque readings?
See page 1 of "Fastener Tightening Can Be Determined By Several Methods" and both pages of "What is the Proper Torque to use on a Given Bolt" by the Industrial Fasteners Institute, which can be found on page 17 of Wes's photo album. The "K factor" is the relevant part. The effect of anti-seize depends on what you are comparing it with.
rdsar2k: I haven't ever heard of adding the "rolling torque" to the torque spec. The torque spec should already have that accounted for. If you read the IFI documents in Wes's album, which agree with my mechanical engineering textbook, you'll see why that is the case.
- Ex Navy steam plant machinist mate, but I can't even remember seeing a torque wrench in our tool crib _________________ Jim McKim
1952 M38 son-father project
Slowly turning rusty parts into OD parts
Joined: Mar 13, 2006 Posts: 1079 Location: Richburg, SC
Posted: Mon Nov 14, 2011 6:12 pm Post subject:
Making little strides, but she's still fighting me. I took the drums back off today, cleaned them up and painted them with caliper paint - also cleaned and painted the hubs and Superwinch lockout hubs and cleaned the backing plates and all brake parts.
I sat a gas can in front of the window going to the carb, pulled the choke, and she fired right up! So I guess that means I need a new fuel pump. She didn't idle great and was running real rich. I was showing about 40psi oil pressure at fast idle, and charging on the ammeter. I didn't have the radiator filled so I couldn't run her long or get a temp reading. Every time I ran her for a minute or two she ran a little better and smoked a little less - I may have seen a little white or blue smoke though.
I stopped her off and started filling the radiator. After realizing the petcock was open, I closed it and started filling again - still had some dripping going on, so I looked again - the WATER PUMP was draining out the water as fast as I was putting it in! So now I have to order a fuel pump, water pump, kingpin bearings (maybe cups too) and an axle nut socket. I threw the tires back on and aired them back up. Then she took her first trip in 12 years out of the shop under her own power! It was a short trip, but she did it! And the brakes worked too!
I just wish my daughter could work my phone's video camera to record that first trip because my wife wasn't there to do it. I think she was as excited as I was. I guess it is worth it now! I think I got a little bit of my steam back today - maybe I can push and get it done before it gets too cold.
Joined: Nov 13, 2007 Posts: 289 Location: Fort Smith Arkansas
Posted: Mon Nov 14, 2011 6:41 pm Post subject:
[quote="jimm"]
Bretto wrote:
- Ex Navy steam plant machinist mate, but I can't even remember seeing a torque wrench in our tool crib
Sorry. I don't want to be one of "those guys". Things rattle around in my head and sometimes I should just keep my mouth shut. I was a tin can sailor machinist mate also. After a gig on an Adams class destroyer I went into the repair side working at the land based then sea based repair ships. I used to overhaul and align the centrifical air conditioners and later repair and overhaul the main feed pumps on the 1200 psi steam plants. The SOP in that arena was to account for running or rolling torque as the multistage pumps had labyrinth seals with 12000 rpm 900 degree 1500 psi pumps that had metal shim type couplings that bolted to the steam turbine. The alignment tolerance pumps ( you may remember they are big pumps) was 3 dimentional with a toerance of 5 ten thousanths of an inch with the turbine required to be .002 lower than the pump so it would grow in as it heated up. The procedure was always to compensate for the bolt turning resistance and add it to the torque as each mounting bolt would be different and it would change as you wouldn't get these aligned in the first effort. You had to torque to the same every time as any differing torque on any mounts would change the alignment. It was part of the QA procedures to do this and I did it so long it was second nature. I should have kept my blather to myself. Same thing applied to the Centrificals but these were not normal day to day type torque things; specialized applications. I'll crawl back under my rock now.. _________________ 1955 M170
1980 JD 450C
1948 Ford 8N
2008 Rubicon Unlimited MyGig
Joined: Nov 24, 2010 Posts: 1390 Location: Orem, UT
Posted: Mon Nov 14, 2011 7:26 pm Post subject:
wilfreeman wrote:
kingpin bearings (maybe cups too)
You have to replace as a set. If the bearings are bad, the cups are bad Those little bugger are expensive to for some reason sorry to say. You can get them for cheap at Summit but you get what you pay for. _________________ Brett
'51 M38
PHOTO DIARY OF MY BUILD
Joined: Mar 13, 2006 Posts: 1079 Location: Richburg, SC
Posted: Mon Nov 14, 2011 8:35 pm Post subject:
I've seen $50 for bearing and cup - do you have to replace upper and lower, or just if the upper is bad also? I'll have to wait 'til I get my socket to check them out - nobody in town has the socket. Also, I've been doing a little research on fuel pumps and found an Airtex 9562 at Autozone for $60 that supposedly fits a 1955 CJ5, but I saw a post where Wes said the 9562 is for an L head - is this correct? It has the threaded fittings for fuel and vacuum. The other (Airtex 4032) pump is $78 and has slip on fittings for the fuel side, which is no problem if I have to buy this more expensive one. Also, I found a dual groove Cardone pulley water pump (remanufactured, lifetime warranty) for $33 at Oreilly - looks the same, but will it work?
http://www.oreillyauto.com/site/c/detail/A1C0/58409.oap?year=1955&make=Jeep&model=Willys&vi=1421143&ck=Search_water+pump_01398_1421143_1742&keyword=water+pump&pt=01398&ppt=C0331
All times are GMT - 6 Hours Goto page 1, 2, 3, 4Next
Page 1 of 4
You cannot post new topics in this forum You cannot reply to topics in this forum You cannot edit your posts in this forum You cannot delete your posts in this forum You cannot vote in polls in this forum