| View previous topic :: View next topic |
| Author |
Message |
wesk
Site Administrator


Joined: Apr 04, 2005
Posts: 16262
Location: Wisconsin
|
 Posted: Thu Aug 02, 2012 3:11 pm Post subject: Posted: Thu Aug 02, 2012 3:11 pm Post subject: |
 |
|
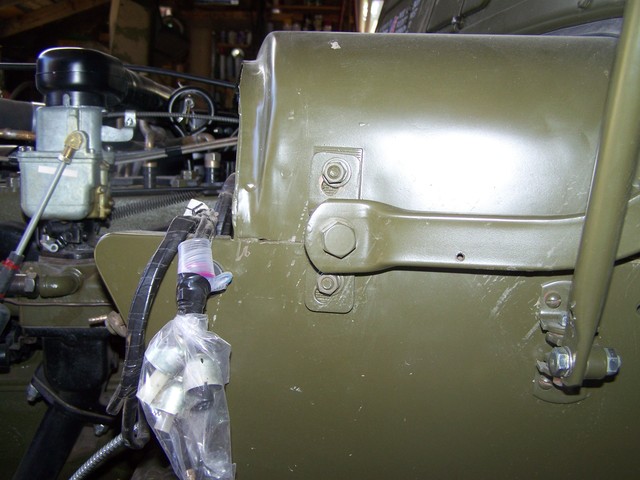
I don't see a cut and dry 50/50 photo selection. The manual photo carries the greatest weight. The rest of the "After they left the factory" photos could easily have been reversed in the field. Also keep in mind that illustrations in TM 9-804 and TM 9-8012 are for the most part based on a new un-repaired jeep and those in TM 9-1804B show one being repaired. The three figures in TM 9-8012, 126, 127 & 128 all seem to show the bottom of the slot forward while the illustrations in TM 9-1804B 10 & 11 seem to show the bottom of the slot aft.
Let's examine what happens when they are installed:
Installation one:
I believe this to be correct for a factory new installation which has an untwisted cowl or windshield.. It matches the TM 9-8012 and make sense.
When you adjust the window upwards it also moves rearward. This makes sense because the purpose of adjusting upwards is to increase the angle to the rear at the top and have the windshield sit further aft on the cowl.
When you adjust the windshield downward it also moves forward. This is correct since we want the top angle more vertical and the windshield to sit further foward on the cowl.
Installation two:

I believe this to be incorrect for a factory installation because it causes the windshield movement to contradict itself when adjusting but in so doing this can often help when the windshield or cowl is twisted. It works well when there is a conflict between the distance from the top of the windshield to the rear tailgate top which effects the fit of the top and when there are conflicts with the windshield to door angle.
_________________
Wes K
45 MB, 51 M38, 54 M37, 66 M101A1, 60 CJ5, 76 DJ5D, 47Bantam T3-C & 5? M100
Mjeeps photo album: http://www.willysmjeeps.com/v2/modules.php?set_albumName=Wes-Knettle&op=modload&name=gallery&file=index&include=view_album.php |
|
| Back to top |
|
 |
Bretto
Member
Joined: Nov 24, 2010
Posts: 1390
Location: Orem, UT
|
| Posted: Thu Aug 02, 2012 5:02 pm Post subject: |
|
|
OK I tried last night and had many issues trying to get it right with the slope down toward aft direction. Gave up for the evening to sleep on it. Today when I got home, I flopped them so now the slope goes up toward the aft direction and got it dialed in within 30 min.
So, I have to agree with Wes and my vote is this way:
_________________
Brett
'51 M38
PHOTO DIARY OF MY BUILD |
|
| Back to top |
|
|
evanso1975
Member

Joined: May 10, 2010
Posts: 615
Location: North Yorkshire, UK
|
| Posted: Fri Aug 03, 2012 12:21 am Post subject: |
|
|
Useful tip from the home of daft ideas:
Once you've found which orientation works best on your jeep, get a small letter punch kit and stamp "L" or "R" on the inside face of the respective pivot bracket. 
Owen.
_________________
Owen
1951 US Air Force M38
1944 F-1 1/2-ton Airdrome Trailer
1940 C15 Chevrolet CMP 11-cab
1939 DKW KS200 Motorcycle
MVT # 19406 |
|
| Back to top |
|
|
skyjeep50
Member
Joined: Feb 20, 2007
Posts: 606
Location: Illinois
|
| Posted: Fri Aug 03, 2012 7:47 am Post subject: |
|
|
On my M38 the windshield bracket slots are high-front, low-back.
_________________
1951 M38 |
|
| Back to top |
|
|
jimm
Member

Joined: Nov 01, 2011
Posts: 199
Location: Escondido, CA
|
| Posted: Fri Aug 03, 2012 6:20 pm Post subject: |
|
|
And on mine, which has an Arctic Top with OD paint & hood numbers but still has the pivoting windshield brackets, they are low-front, high-back. That said, I don't count on anything on mine being correct, given the amount of "civilizing" it went through by POs.
_________________
Jim McKim
1952 M38 son-father project
Slowly turning rusty parts into OD parts |
|
| Back to top |
|
|
evanso1975
Member
Joined: May 10, 2010
Posts: 615
Location: North Yorkshire, UK
|
|
| Back to top |
|
|
jimm
Member
Joined: Nov 01, 2011
Posts: 199
Location: Escondido, CA
|
| Posted: Mon Aug 06, 2012 7:48 pm Post subject: |
|
|
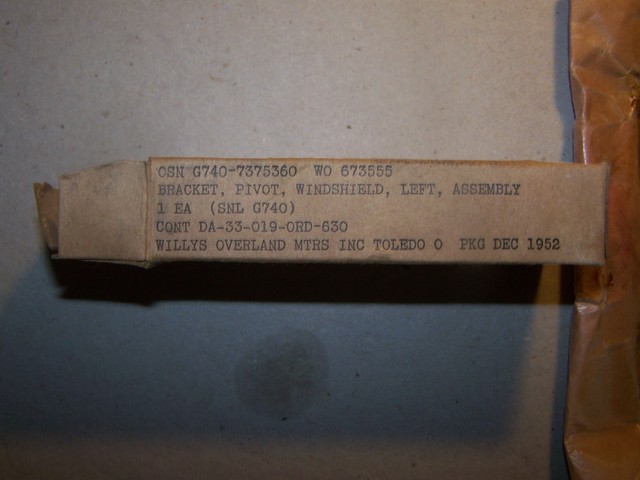
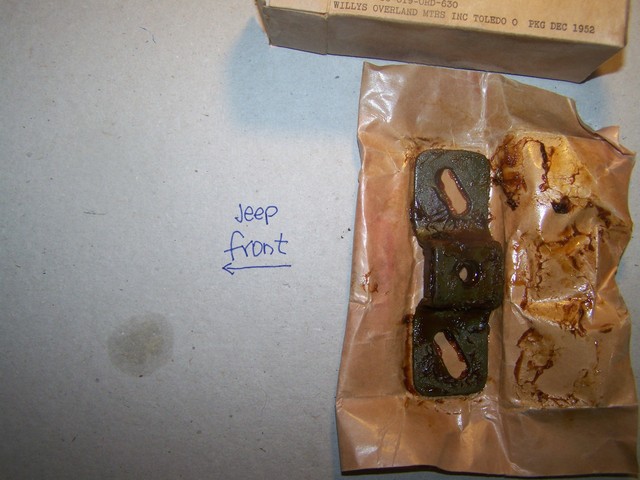
Which is shown with the same packaging as your photo earlier in this thread (LEFT), and it is high-front/low-rear! Interesting.
_________________
Jim McKim
1952 M38 son-father project
Slowly turning rusty parts into OD parts |
|
| Back to top |
|
|
RICKG
Member
Joined: Aug 31, 2010
Posts: 1741
Location: SO IDAHO
|
| Posted: Tue Aug 28, 2012 11:33 am Post subject: GOT A NOS LEFT SIDE BRACKET |
|
|
Got it for 7bucks shipped on flea-bay, i think i got out ok.
Nos left side, runs hi to low, front to rear. Now maybe i can
get my windshield properly adjusted now that i have a left and rt
bracket. Just wanted to follow up on the post..
_________________
keep 'em rollin'
RICKG MC 51986 DOD 01-52, '50 CJ3a |
|
| Back to top |
|
|
Bretto
Member
Joined: Nov 24, 2010
Posts: 1390
Location: Orem, UT
|
| Posted: Tue Aug 28, 2012 12:45 pm Post subject: |
|
|
Let us know how it goes Rick. I had no luck getting it in that way. I put mine with slots low to high fore to aft direction. The other way put the frame too far forward on the cowl. See mine and Wes's post above. I know what the box says but nothing is 100%. Other vendors list them the other direction as I put them in. Seems they are installed either way when you study various pics so I suppose what ever works, roll with it.
_________________
Brett
'51 M38
PHOTO DIARY OF MY BUILD |
|
| Back to top |
|
|
RICKG
Member
Joined: Aug 31, 2010
Posts: 1741
Location: SO IDAHO
|
| Posted: Wed Sep 12, 2012 7:21 pm Post subject: To follow up on this thread.. |
|
|
My adjustment complaint was 2 fold.
1.The drivers side latch was binding in the windshield mt rifle rack.
2. I built my rods for the top bows per the swell info found on this site
for (future) canvas top but the drivers side was binding.
Installed the left side bracket newly purchased and 15 mins everything
lines up 
I am high side front, low side aft..
Right or wrong this is whats working on my truck.
_________________
keep 'em rollin'
RICKG MC 51986 DOD 01-52, '50 CJ3a |
|
| Back to top |
|
|
|

