
In the near future, going to replace tub rear panel (spare tire mounts to), rear floor pan and both front floor pans/gas tank pan.
Any suggestions for the order of removal and replacement? I can't afford all the sheet metal replacement panels at the same time and figured those that have done tub work might offer some suggestions on replacement- order.
My first thought was cutting out the rear panel with tub on frame, welding new panel in place(except rear floor), then weld metal bars in various positions to stiffen tub assy before removing tub off frame for all the floor panel replacements.
Any suggestion on welding/replacement order would be very helpful.
Also, what size spot weld cutter bit is recommended?
Smokey1
Austin,TX
M38a1 tub replacement panels-order of operation?
-
smokey1

- Member
- Posts: 31
- Joined: Wed Mar 04, 2009 6:00 pm
- Location: Austin, TX
-
OKCM38CDN
I did my M-38 CDN back in 2004-2005. I replaced both front quarter panels and the passenger rear quater panel, both tail light panels and the floors in the front. Also replaced the Cowl and dash from a doner vehicle. I did this all in a welding class over the period of a year.
The thing I did was to only do one panel at a time... Cut the old panel out; only after you get the new panel. Then line everything up then tack weld the new panel in and then when satisfied it is correct then finish welding the panels in...
The secret is PATIENCE !!!! Take your time and all should go well... Take plenty of measurements and make some reference lines on panels you are not removing, I recommend using sharpies as they do not wipe away and can be painted over later...
I did my restoral with the body sitting on metal saw horses not on the frame... I got very lucky and only had two mounting holes that needed to be reamed out (I was half a hole off in those positions).
I used a 4 1/2" grinder to cut my panels out, looking back that does the job using cut off wheels, but a plasma cutter probably would have been better...
Hope this helps...
Good Luck and have fun...
I am getting reay to replace both rear quarter panels in a "51 Willys Wagon this fall. I have the panels and will start marking and measuring soon...
The thing I did was to only do one panel at a time... Cut the old panel out; only after you get the new panel. Then line everything up then tack weld the new panel in and then when satisfied it is correct then finish welding the panels in...
The secret is PATIENCE !!!! Take your time and all should go well... Take plenty of measurements and make some reference lines on panels you are not removing, I recommend using sharpies as they do not wipe away and can be painted over later...
I did my restoral with the body sitting on metal saw horses not on the frame... I got very lucky and only had two mounting holes that needed to be reamed out (I was half a hole off in those positions).
I used a 4 1/2" grinder to cut my panels out, looking back that does the job using cut off wheels, but a plasma cutter probably would have been better...
Hope this helps...
Good Luck and have fun...
I am getting reay to replace both rear quarter panels in a "51 Willys Wagon this fall. I have the panels and will start marking and measuring soon...
-
Bretto
- Jeep Legend

- Posts: 1390
- Joined: Tue Nov 23, 2010 6:00 pm
- Location: Orem, UT
Agreed, one panel out then replace asap with new. Make sure you brace everything up b4 cutting and don't move the tub around when panels are out.
I finally just got done with redoing my floors and hat channels just the other day. I recommend getting materials from a local sheet company. I bought enough material to do both floors and have them also bend lengths of hat channel. I got 16G sheet material for the floors and hat and a few reminents of 18G for misc tub repairs all for $60 and that included the hat bends. I then just cut the hats to length and cut out my own floors using the old as patterns.
I started by using a 3" cut off air tool till my compressor croaked. While I was waiting for the parts for my compressor, I discoverd they have these ultra thin 3/64", for a small kerf, cut off wheels for the 4.5 angle grinder. Much fast than the air cutter.
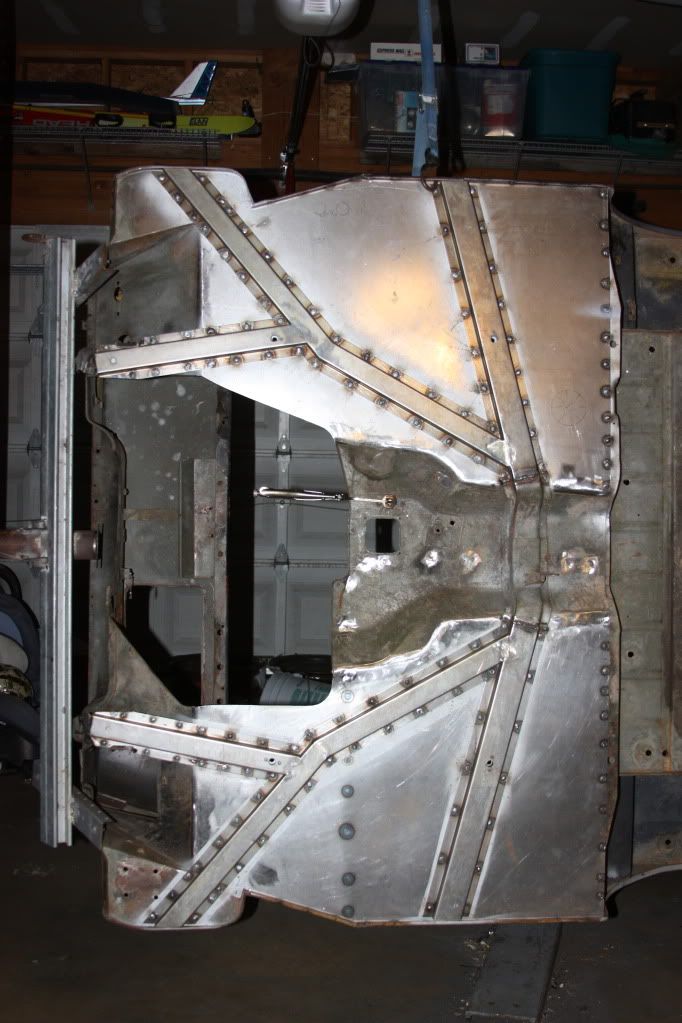
I finally just got done with redoing my floors and hat channels just the other day. I recommend getting materials from a local sheet company. I bought enough material to do both floors and have them also bend lengths of hat channel. I got 16G sheet material for the floors and hat and a few reminents of 18G for misc tub repairs all for $60 and that included the hat bends. I then just cut the hats to length and cut out my own floors using the old as patterns.
I started by using a 3" cut off air tool till my compressor croaked. While I was waiting for the parts for my compressor, I discoverd they have these ultra thin 3/64", for a small kerf, cut off wheels for the 4.5 angle grinder. Much fast than the air cutter.
-
53a1

- Jeep Enthusiast

- Posts: 586
- Joined: Tue Jun 24, 2008 6:00 pm
- Location: Kern Co.
-
wesk

- Site Administrator

- Posts: 16469
- Joined: Sun Apr 03, 2005 6:00 pm
- Location: Wisconsin
- Contact:
Bretto,
Nice job. Just goes to show what can be done with raw stock, the right tools, a lot of patience and some skill.
I have seen several folks get the hat channel bent at the tin fabricator's shop. The toughest thing seems to be matching the bend radius. Most current breaks seem to have sharper fingers or bars compared to the more gentle curved break used by Willys.
Nice job. Just goes to show what can be done with raw stock, the right tools, a lot of patience and some skill.
I have seen several folks get the hat channel bent at the tin fabricator's shop. The toughest thing seems to be matching the bend radius. Most current breaks seem to have sharper fingers or bars compared to the more gentle curved break used by Willys.
Wes K
45 MB, 51 M38, 54 M37, 66 M101A1, 60 CJ5, 76 DJ5D, 47Bantam T3-C & 5? M100
Mjeeps photo album: http://www.willysmjeeps.com/v2/modules. ... _album.php
45 MB, 51 M38, 54 M37, 66 M101A1, 60 CJ5, 76 DJ5D, 47Bantam T3-C & 5? M100
Mjeeps photo album: http://www.willysmjeeps.com/v2/modules. ... _album.php
-
idiocrates

- Jeep Enthusiast
- Posts: 437
- Joined: Thu Nov 01, 2007 6:00 pm
- Location: Seguin, Texas
My situation was a little different. My tub (in retrospect) should have been trashed. The only retainable panels or parts were the cowling and side panels.....and even the side panels got new lower rocker panels. And since my tub was grossly twisted and warped from all the wrong mounting and collapsed hat channels and removed rear cross member I figured what the heck....I don't think I can screwed it up too much worse so I totally removed it from the frame.....set it level on blocks off the floor. I started by using a 5/16" spot weld cutter to remove the channel across the exterior of the end panel. Just fyi....that bit is now laying in the weeds somewhere across the road from my shop....I am definitely not pro spot weld cutter. Anyway...next I cut away ALL the guts of tub as close to the sides as I culd get with an angle grinder and cut-off disk. The front floor pans I cut at the transition from horizontal to vertical. I also cut the end panel just inside the seam with the side panels. Next I used the angle grinder with a Norton flap disk to grind down all the spot welds along all the seams.....wheelhouses to sides.....floor riser to sides.....front floor pans to sides.....and end panel to sides.
We started rebuilding by welding the floor riser to the sides.....then the new end panel to the sides.....then the new rear floor to the riser and end panel....then wheel houses to sides, new rear floor and riser.....then we placed the passenger floor pan......then the drivers side floor pan and fuel sump....then fitted the old tranny hump to the new floor pans....and then I decided to move and everything came to a screeching halt. Next we'll do a test alignment and try to make locations for hat channels. At this point....no one has lost an eye yet....so I'd call it at least partially successful.
We started rebuilding by welding the floor riser to the sides.....then the new end panel to the sides.....then the new rear floor to the riser and end panel....then wheel houses to sides, new rear floor and riser.....then we placed the passenger floor pan......then the drivers side floor pan and fuel sump....then fitted the old tranny hump to the new floor pans....and then I decided to move and everything came to a screeching halt. Next we'll do a test alignment and try to make locations for hat channels. At this point....no one has lost an eye yet....so I'd call it at least partially successful.
Jim
***********************
'?? - M38A-1
***********************
'?? - M38A-1
-
smokey1
- Member
- Posts: 31
- Joined: Wed Mar 04, 2009 6:00 pm
- Location: Austin, TX
Great info and tips. Say, how did you guys remove each pannel. By drilling out each spot weld wth a drill bit or use a purpose spot welder cutter bit? If the spot weld cutter bit, what size? I've got layers of paint and have not ground down the paint around each weld yet to see the orginal size of spot welds on these jeeps.
3/8 and 1/2 seem to be two common spot weld cutter bit sizes.
Hoping to round up/order the right supplies so I can get started this fall.
3/8 and 1/2 seem to be two common spot weld cutter bit sizes.
Hoping to round up/order the right supplies so I can get started this fall.
-
Bretto
- Jeep Legend
- Posts: 1390
- Joined: Tue Nov 23, 2010 6:00 pm
- Location: Orem, UT
Thanks Wes, a its means a lot. In regards to the hat bends, yes mine are more squared off so they dont blend to well with the center hat. Oh well, its still sound.
Smokey1,
Yes you have to cut all the spot welds. I just used the cheap 3/8" $5 one from Harbor Frieght. It has 2 sides and I just bearly rotated the bit. That was after cutting out the toolbox, hat, and floor panels spot welds. It did really well. Most spot welds are easily visible but if you can't find them and you know they are there, just hit it with a little sandpaper action. They show up clearly. No need to grind paint off.
Smokey1,
Yes you have to cut all the spot welds. I just used the cheap 3/8" $5 one from Harbor Frieght. It has 2 sides and I just bearly rotated the bit. That was after cutting out the toolbox, hat, and floor panels spot welds. It did really well. Most spot welds are easily visible but if you can't find them and you know they are there, just hit it with a little sandpaper action. They show up clearly. No need to grind paint off.
-
smokey1
- Member
- Posts: 31
- Joined: Wed Mar 04, 2009 6:00 pm
- Location: Austin, TX
