
I found this on the CJ2A site about electronic ignition
1. turn the crank so the 5º flywheel timing mark is lined up in window
2. connect voltmeter pos. lead to coil neg. terminal (wire from coil to dist)
3. connect voltmeter neg. lead to engine ground
4. rotate distributor body CCW as far as it will go
5. turn ignition on - voltage should be zero (or nearly 0 w/electronic dist.)
6. slowly rotate distributor body CW until voltage jumps to max (6 or 12v)
7. lock the distributor down
8. turn ignition off
Timing is now right-on.
If you can't find the zero-to-max voltage trigger point, then you'll need to re-orient the oil pump.
If you DO find the zero-to-max voltage trigger point, get the dist. locked down, go back and find #1 compression, and run the #1 plug wire to wherever the rotor is pointing, and the remainder in 1-3-4-2 CCW order.
Ok - I tried that procedure - I get voltage right away and no matter which way I turn the distributor the voltage reading doesn't break. See if I am right - Ignition feed goes to the + on the coil as well as the black wire from the Omix-Ada distributor (in my case since the dash wiring isn't in I jumped + battery to the + coil). The blue wire from the Omix-Ada distributor goes to the – (neg) on the coil. My voltmeter– (neg) goes to frame ground (as does the battery -) and the + probe goes to the – (neg) side of the coil, where the Omix-Ada distributor blue wire is. The rotor is pointed to a valley - the procedure says I should read 0 volts at this point, then turn CCW until I get a voltage reading. As said I got a voltage reading right away. I tried CCW, which points a high point (lobe), connected battery voltage - got voltage right away. I even lifted the distributor free of the oil pump and spun the rotor - at no place does the meter drop. It says if I can’t find the trigger point re-orienting the pump – I would think my lifting the distributor and slowly rotating the rotor should have found the trigger point.
Timing a new 12V Omix-Ada distubutor
-
Texbillhs

- Contributor

- Posts: 134
- Joined: Tue Apr 24, 2012 6:00 pm
- Location: Pennsylvania -Avondale/Kennett Sq
Timing a new 12V Omix-Ada distubutor
1952 M38
-
Texbillhs
- Contributor
- Posts: 134
- Joined: Tue Apr 24, 2012 6:00 pm
- Location: Pennsylvania -Avondale/Kennett Sq
I wonder - does the cap need to be on?
I am going to go try it putting the cap on - I can't see it should make a difference
1952 M38
-
wesk

- Site Administrator

- Posts: 16468
- Joined: Sun Apr 03, 2005 6:00 pm
- Location: Wisconsin
- Contact:
You don't need a volt meter, timing light or any other tester to accomplish what you just described.
Bring #1 TDC on compression. Now back the crank up unitl the 5 deg BTDC mark is aligned correctly. Insert the distributor and confirm the rotor points to the #1 spark plug wire. (If it doesn't then the wires are in the wrong locations on the cap or the oil pump is not installed and indexed correctly. To correct this problem requires either correctly installing the oil pump or re-arranging the wires in the cap.)
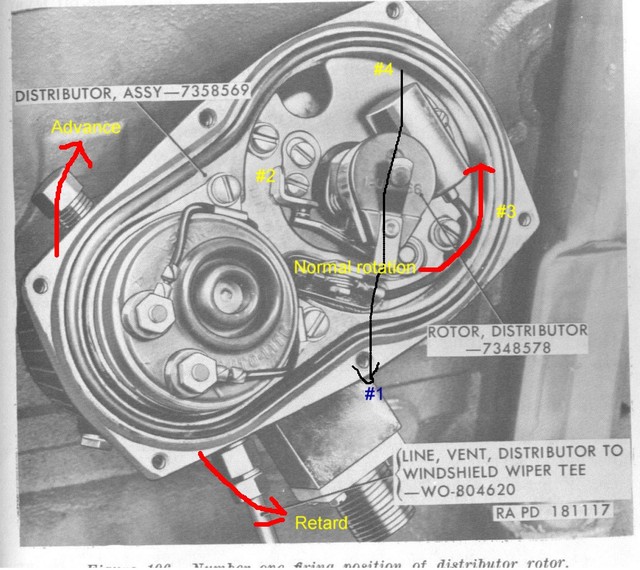
Once the distributor is installed and pointing to #1 wire then slowly move the distributor housing back or forth until you can see the points open on the high point of the point cam. With the points open and the rotor pointing close to #1 plug wire position slowly rotate the distributor housing CCW (retard) until the points are closed. Now place a clean strip of plain paper between the point contacts. Now maintain a slight pulling pressure on the paper and slowly rotate the distributor housing CW (Advance) until the instance the paper slips free of the points and lock the housing right there.
Bring #1 TDC on compression. Now back the crank up unitl the 5 deg BTDC mark is aligned correctly. Insert the distributor and confirm the rotor points to the #1 spark plug wire. (If it doesn't then the wires are in the wrong locations on the cap or the oil pump is not installed and indexed correctly. To correct this problem requires either correctly installing the oil pump or re-arranging the wires in the cap.)
Once the distributor is installed and pointing to #1 wire then slowly move the distributor housing back or forth until you can see the points open on the high point of the point cam. With the points open and the rotor pointing close to #1 plug wire position slowly rotate the distributor housing CCW (retard) until the points are closed. Now place a clean strip of plain paper between the point contacts. Now maintain a slight pulling pressure on the paper and slowly rotate the distributor housing CW (Advance) until the instance the paper slips free of the points and lock the housing right there.
Wes K
45 MB, 51 M38, 54 M37, 66 M101A1, 60 CJ5, 76 DJ5D, 47Bantam T3-C & 5? M100
Mjeeps photo album: http://www.willysmjeeps.com/v2/modules. ... _album.php
45 MB, 51 M38, 54 M37, 66 M101A1, 60 CJ5, 76 DJ5D, 47Bantam T3-C & 5? M100
Mjeeps photo album: http://www.willysmjeeps.com/v2/modules. ... _album.php
-
Texbillhs
- Contributor
- Posts: 134
- Joined: Tue Apr 24, 2012 6:00 pm
- Location: Pennsylvania -Avondale/Kennett Sq
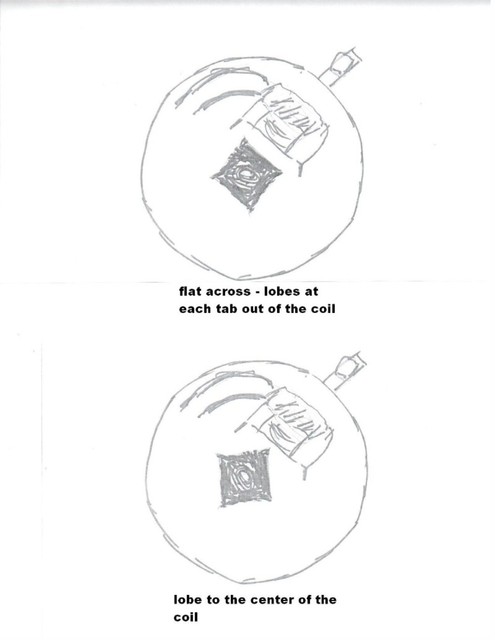
I did that - it barked once before the battery got so low that I have it on a charger - It might start. This isn't a M38 24v as pictured, it is a new Omix-Ada electronic distributor and 12v. Once I did the thumb over the hole compression on #1, set the 5deg the distributor was 180 off. I placed #1 wire where the rotor pointed and CCW the over wires in the firing order. Electronic pointless is greek to me - under the rotor is a square block with 4 little tits at the corners (lobes) and there is what looks like a coil with 2 tabs - one almost straight out and one at an angle. Is the firing position a flat facing the coil or is it a corner (tit, lobe or whatever) facing the center of the coil? Wish I could put in a drawing, but I haven't figured that out - I think it is something to do with the Img* button above
[img]http://willysmjeeps.com/v2/modules/gall ... .sized.jpg[/img]
[img]http://willysmjeeps.com/v2/modules/gall ... .sized.jpg[/img]
1952 M38
-
wesk
- Site Administrator
- Posts: 16468
- Joined: Sun Apr 03, 2005 6:00 pm
- Location: Wisconsin
- Contact:
That makes a big difference. I was thinking you had a replacement 24 volt distributor from Omix. I edited your post title to show what distributor you are seeking info on.
That 2A writeup is for all distributors used in the 2A both conventional and electronic. Read it carefully on items 5 & 6:
With point type ignitions that write-up is not the best way. If you leave the switch on too long on those the points will burn up.
Did you connect wires per the Omix instruction sheet?
http://www.omix-ada.com/instructions/923068.pdf
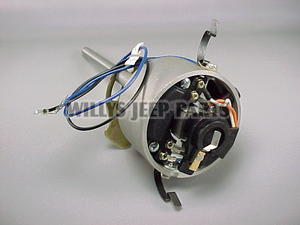
This is the illustration from the Willys Jeeps Parts page.
That 2A writeup is for all distributors used in the 2A both conventional and electronic. Read it carefully on items 5 & 6:
Nearly Zero w/electronic5. turn ignition on - voltage should be zero (or nearly 0 w/electronic dist.)
6. slowly rotate distributor body CW until voltage jumps to max (6 or 12v)
With point type ignitions that write-up is not the best way. If you leave the switch on too long on those the points will burn up.
Did you connect wires per the Omix instruction sheet?
http://www.omix-ada.com/instructions/923068.pdf
This is the illustration from the Willys Jeeps Parts page.
Last edited by wesk on Sun Jul 15, 2012 8:59 am, edited 2 times in total.
Wes K
45 MB, 51 M38, 54 M37, 66 M101A1, 60 CJ5, 76 DJ5D, 47Bantam T3-C & 5? M100
Mjeeps photo album: http://www.willysmjeeps.com/v2/modules. ... _album.php
45 MB, 51 M38, 54 M37, 66 M101A1, 60 CJ5, 76 DJ5D, 47Bantam T3-C & 5? M100
Mjeeps photo album: http://www.willysmjeeps.com/v2/modules. ... _album.php
-
Texbillhs
- Contributor
- Posts: 134
- Joined: Tue Apr 24, 2012 6:00 pm
- Location: Pennsylvania -Avondale/Kennett Sq
I email the drawing
I did get it to run a little yesterday but not right. I am going to go back and check the carb next as it sounds like fuel starvation. In the drawing you see 2 positions across the flats and pointed to the center. I thought the rotor block might be a ceramic magnet but iron isn't attracted. In the drawing - the (one positioned across) mine won't quite position like that as the oilier hits the block before it can get to that position. If my oil pump is one tooth off I have read that is 30deg. If that is the case and if I see room in the adjustment plate, I may remove that oilier - it is fake, only there for looks anyway. I emailed the drawing
[img]http://willysmjeeps.com/v2/modules/gall ... 1F_028.jpg[/img]
[img]http://willysmjeeps.com/v2/modules/gall ... 1F_028.jpg[/img]
1952 M38
-
wesk
- Site Administrator
- Posts: 16468
- Joined: Sun Apr 03, 2005 6:00 pm
- Location: Wisconsin
- Contact:
Bill's drawing:
Wes K
45 MB, 51 M38, 54 M37, 66 M101A1, 60 CJ5, 76 DJ5D, 47Bantam T3-C & 5? M100
Mjeeps photo album: http://www.willysmjeeps.com/v2/modules. ... _album.php
45 MB, 51 M38, 54 M37, 66 M101A1, 60 CJ5, 76 DJ5D, 47Bantam T3-C & 5? M100
Mjeeps photo album: http://www.willysmjeeps.com/v2/modules. ... _album.php
-
Texbillhs
- Contributor
- Posts: 134
- Joined: Tue Apr 24, 2012 6:00 pm
- Location: Pennsylvania -Avondale/Kennett Sq
Got it running
I got it running - FYI it was the second drawing - the rotor block corner toward the center of that coil
I will continue with a new post about the Solex carburetor
I will continue with a new post about the Solex carburetor
1952 M38