Hello the fine people of this forum. I am here for your knowledge and expertise. I had purchased a 52 M38 last summer, at least that is what the title says, no telling how many other year vehicles it might be made out of..lol. I have a couple of issues that I have come across that I need advice and verification on. For the first one lets tackle timing.
I know this issue has been covered in length and various types of threads, but just looking for some verification that I am going in the right direction. The Jeep was having a bit of a hard starting so I had nothing better to do with my life so I thought I would dive into looking at the timing. While looking into it I notice that my M38 has 3 different timing markers on it. It has the bump on the timing cover, a V notch on the pully, a timing bracket along with marks on the flywheel. None of these actually correspond to cylinder 1 at TDC. Out all these markings I had to choose one to work with and the best on that I could actually see the markings on was the flywheel. While trying to get the timing marks on the flywheel lined up I noticed that it was on the compression stroke of cylinder 2, so it looks like someone mounted it 180 degrees out. According to what I have read, I can just set the timing with cylinder 2 instead of cylinder 1. Am I correct with that assumption?
On to the second issue, which might align with the first issue. I put a fresh set of spark plugs in Jeep and they only ran for maybe 20 minutes total and they are already full of carbon buildup. I had just put a brand new Solex carb on it so that I could rebuild the Carter that was on it. Either this Jeep likes to run really rich or not getting enough juice to the plugs. With that being said I am running only 12v through the 24v coil, but have read in the forums that it should be an issue to do that. Any thoughts? I would post pictures of everything, but not sure how to do it on this site.
Thank you for your time
Fun times with timing.
-
Mudviper

- Member
- Posts: 6
- Joined: Sat May 20, 2023 6:00 pm
- Location: Flint, Mi
-
wesk

- Site Administrator

- Posts: 16461
- Joined: Sun Apr 03, 2005 6:00 pm
- Location: Wisconsin
- Contact:
I see you wasted no time joining the site. Welcome aboard.
On the timing it is my preference to simply use the easiest most accessible timing marks which I feel are on the front cam cover and the bottom pulley.
You never said in your facebook post which distributor you are using. If using the military then correct indexing of the oil pump gear is very important.
Another timing area of interest is cam timing. Folks overlook both it and the oil pump gears way to often and one depends on the other! Unfortunately the only way to confirm cam timing is absolutely correct is to remove the cam cover and check the gear index marks.
If you feed 50 % of the required voltage it is safe to say the coil output would be 50% low.
As for posting photos just look at the lower part of the board lists on the Board Index. There is a photo board with how to's posted and where you can request your own photo album.
Wes K
45 MB, 51 M38, 54 M37, 66 M101A1, 60 CJ5, 76 DJ5D, 47Bantam T3-C & 5? M100
Mjeeps photo album: http://www.willysmjeeps.com/v2/modules. ... _album.php
45 MB, 51 M38, 54 M37, 66 M101A1, 60 CJ5, 76 DJ5D, 47Bantam T3-C & 5? M100
Mjeeps photo album: http://www.willysmjeeps.com/v2/modules. ... _album.php
-
Mudviper
- Member
- Posts: 6
- Joined: Sat May 20, 2023 6:00 pm
- Location: Flint, Mi
I figured out this whole picture thing so lets trying this again..lol
I don't trust the timing marks on the front of the engine due to the fact there are 3 different types. It has the bump on the timing cover, a V notch on the pulley and looks like a self made bracket (see picture below)
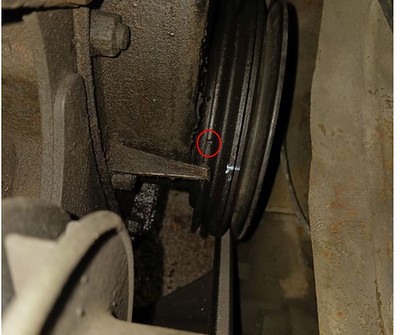
I first set up the timing using the V notch and the bump on the pulley, which did bring the oil pump notch where it should be according to what I have seen on Wes's pictures on other threads.

When I dropped the distributor into the hole and got it lined up with the slot, it put the rotor between 3 and 4 o'clock, not the 7 o'clock position I have read it is supposed to be. Other sites I have read that the rotor should be pointed at the 5 o'clock position.
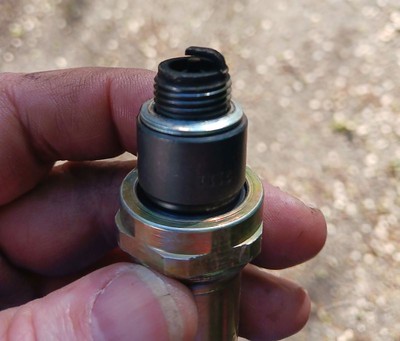
Now there are also timing marks on the flywheel, although they don't have the same text on them that I have seen in pictures. There is a line that says 5 degrees. When using the timing marks on the flywheel, it appears that it lines up with the compression stroke of #2 cylinder, which tells me that the flywheel was installed 180 degrees out of position. When I line up the 5 degree timing mark on the flywheel, it brings the rotor very close to where the #2 spark plug wire should be.
Here is a picture of a brand new spark plug with it only being run for around 20 minutes.
I don't trust the timing marks on the front of the engine due to the fact there are 3 different types. It has the bump on the timing cover, a V notch on the pulley and looks like a self made bracket (see picture below)
I first set up the timing using the V notch and the bump on the pulley, which did bring the oil pump notch where it should be according to what I have seen on Wes's pictures on other threads.
When I dropped the distributor into the hole and got it lined up with the slot, it put the rotor between 3 and 4 o'clock, not the 7 o'clock position I have read it is supposed to be. Other sites I have read that the rotor should be pointed at the 5 o'clock position.
Now there are also timing marks on the flywheel, although they don't have the same text on them that I have seen in pictures. There is a line that says 5 degrees. When using the timing marks on the flywheel, it appears that it lines up with the compression stroke of #2 cylinder, which tells me that the flywheel was installed 180 degrees out of position. When I line up the 5 degree timing mark on the flywheel, it brings the rotor very close to where the #2 spark plug wire should be.
Here is a picture of a brand new spark plug with it only being run for around 20 minutes.
-
wesk
- Site Administrator
- Posts: 16461
- Joined: Sun Apr 03, 2005 6:00 pm
- Location: Wisconsin
- Contact:
All the above is best described as: Trying to work around an incorrect setup. My advice is to move out of the "Can we make this work?" idea and go back to square one and guarantee yourself that the setup is absolutely correct.I don't trust the timing marks on the front of the engine due to the fact there are 3 different types. It has the bump on the timing cover, a V notch on the pulley and looks like a self made bracket (see picture below)
I first set up the timing using the V notch and the bump on the pulley, which did bring the oil pump notch where it should be according to what I have seen on Wes's pictures on other threads.
When I dropped the distributor into the hole and got it lined up with the slot, it put the rotor between 3 and 4 o'clock, not the 7 o'clock position I have read it is supposed to be. Other sites I have read that the rotor should be pointed at the 5 o'clock position.
Now there are also timing marks on the flywheel, although they don't have the same text on them that I have seen in pictures. There is a line that says 5 degrees. When using the timing marks on the flywheel, it appears that it lines up with the compression stroke of #2 cylinder, which tells me that the flywheel was installed 180 degrees out of position. When I line up the 5 degree timing mark on the flywheel, it brings the rotor very close to where the #2 spark plug wire should be.
1 - Remove timing gear cover and confirm cam gear is correctly aligned with the crank gear. If not correct it.
2 - With #1 TDC compression: confirm oil pump driven shaft aligns correctly IAW photo or diagram. If not remove and reinstall oil pump correctly.
3 - Re-install timing gear cover. Before re-installing crank pully, weld the notch and file it smooth. Fabricate or purchase from autoparts house a Degree Wheel that can be attached temporarily to the pulley.
4 - Obtain or fabricate a wiggler TDC finder unless you are willing to remove the cylinder head. It is very difficult on the L134's to measure accurately piston travel with the head installed since the spark plug hole in the head is not directly over the top of the piston. With the head removed a simple dial indicator with magnetic base is placed on the block and rides the top of the piston. If this topic is currently greek to you, visit a local engine building shop and ask them to show you how it is done.
5 - Now it is time to bring # 1 to TDC compression, then back off about 45 degrees of crank rotation. with the wiggler or dial indicator ready to record start rotating the crank forward again, carefully monitor the piston's up travel and stop the instant the indicator ceases to show upward movement. You are now exactly at TDC on compression.
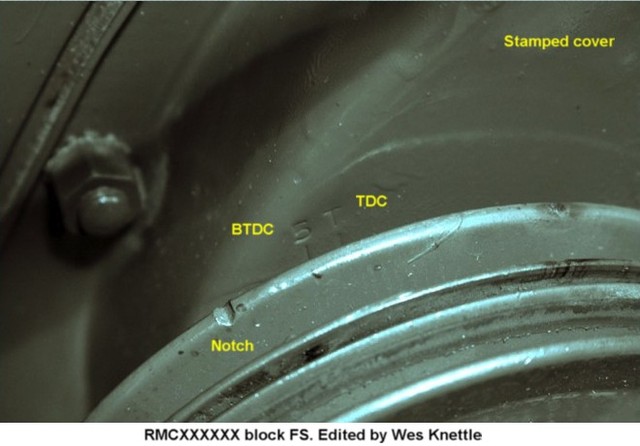
6 - Now you must decide which of the 3 types of marking systems you wish to use from now on. Flywheel, raised marks on gear cover or a bolt on tab. The simplist and easiest to use and access is the bolt on tab. The M38A1's timing tab is the perfect choice. Or if you already have the late M38 stamped timing maarks gear cover you can use it.
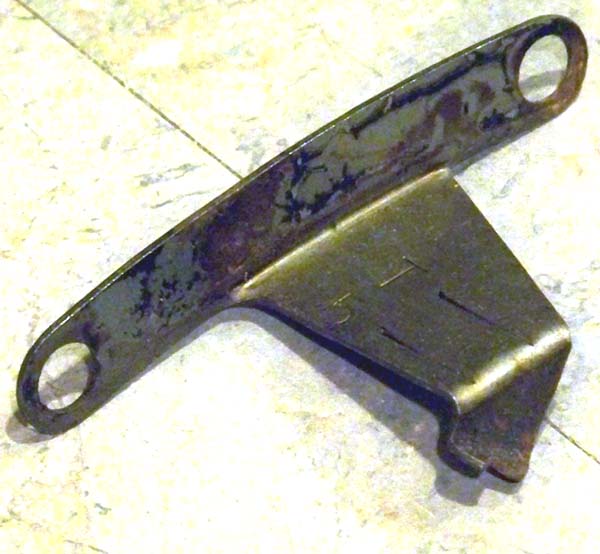
With the #1 piston setting at TDC on compression file a new notch in the crank pulley to align with the "T" pointer on the tab or the "T" stamp on the late M38 front gear cover, shown below.
That is it. From this point on you have an accurate TDC measuring system.
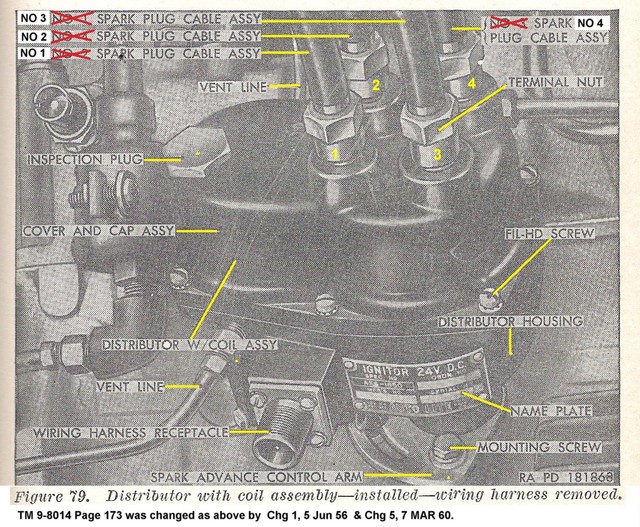
For those of you listening in that own M38A1's and M170's a friendly reminder to be sure you are looking at the correction page illustration of the correct rotor index position when setting up your distributor. The TM 9-8014 original issue has it wrong and a later correction was published.
This is the illustration I am referring to:
You also mention carbon on your plugs with 20 minutes of running in the garage. It is best to drive the care steadily between 40 and 45 MPH for at least 30 minutes if you wish to gage carbon buildup accurately.
Wes K
45 MB, 51 M38, 54 M37, 66 M101A1, 60 CJ5, 76 DJ5D, 47Bantam T3-C & 5? M100
Mjeeps photo album: http://www.willysmjeeps.com/v2/modules. ... _album.php
45 MB, 51 M38, 54 M37, 66 M101A1, 60 CJ5, 76 DJ5D, 47Bantam T3-C & 5? M100
Mjeeps photo album: http://www.willysmjeeps.com/v2/modules. ... _album.php
-
Mudviper
- Member
- Posts: 6
- Joined: Sat May 20, 2023 6:00 pm
- Location: Flint, Mi
There has to be an easier way to figure out this timing without having to tear the engine apart. Until taking the Jeep out of storage this spring, it would start on the first turn of the key.
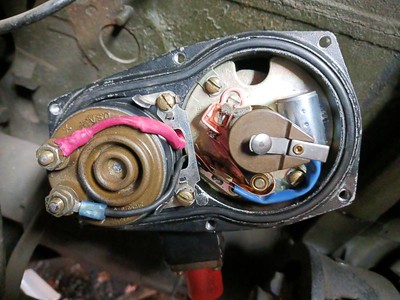
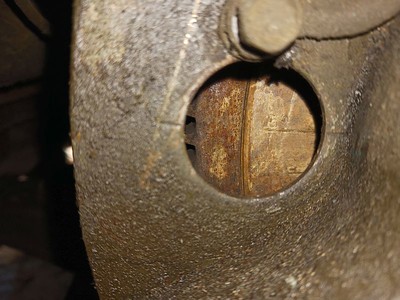
So lets take out all the timing marks and timing altogether and look at the relationship of the oil pump to the distributor. From the photo below that you have posted in previous timing issue threads, from my understanding if the groove on the oil pump is positioned like the image on the right then when I drop the distributor in the rotor should be at 7 o'clock position. If that is the case, then I already have a problem since my rotor is close to the 4 o'clock position. The would mean that I have something not right with the distributor or I have a rotor that is not keyed correctly. I am safe to assume that is correct?

So lets take out all the timing marks and timing altogether and look at the relationship of the oil pump to the distributor. From the photo below that you have posted in previous timing issue threads, from my understanding if the groove on the oil pump is positioned like the image on the right then when I drop the distributor in the rotor should be at 7 o'clock position. If that is the case, then I already have a problem since my rotor is close to the 4 o'clock position. The would mean that I have something not right with the distributor or I have a rotor that is not keyed correctly. I am safe to assume that is correct?
-
Xamon

- Jeep Enthusiast

- Posts: 593
- Joined: Mon Sep 17, 2012 6:00 pm
- Location: South East Saskatchewan
I am gonna butt in with a probably useless question but do you have an engine serial number? There is little difference between m38 engines and mb or equivalent civi except timing gear vs timing chain making the cam spin the opposite way. not sure this would make any real difference just something I am curious about.
Honestly though the easiest and generally fastest fix for any issue is to follow Wes's advice, as painful as it may seem at times.
Honestly though the easiest and generally fastest fix for any issue is to follow Wes's advice, as painful as it may seem at times.
Carievale Saskatchewan Canada
http://www.willysmjeeps.com/v2/modules. ... _album.php
http://www.willysmjeeps.com/v2/modules. ... _album.php
-
Mudviper
- Member
- Posts: 6
- Joined: Sat May 20, 2023 6:00 pm
- Location: Flint, Mi

-
wesk
- Site Administrator
- Posts: 16461
- Joined: Sun Apr 03, 2005 6:00 pm
- Location: Wisconsin
- Contact:
You are to intent on going from here and not going back to start position. Yes , with a ton of experimentation one can work around any prior errors by prior engine fixers except the worst kind. The distributor rotor only goes on one way. The only way to end up in your predictament is to have the distributor not agreeing with the oil pump shaft, and/or the oil pump driven gear not agreeing with the cam gear and/or the cam drive gear not indexed properly to the crank drive gear. For it to come out well in the end you must mimic all your predecessor's steps exactly the way he did them.
Wes K
45 MB, 51 M38, 54 M37, 66 M101A1, 60 CJ5, 76 DJ5D, 47Bantam T3-C & 5? M100
Mjeeps photo album: http://www.willysmjeeps.com/v2/modules. ... _album.php
45 MB, 51 M38, 54 M37, 66 M101A1, 60 CJ5, 76 DJ5D, 47Bantam T3-C & 5? M100
Mjeeps photo album: http://www.willysmjeeps.com/v2/modules. ... _album.php
-
Mudviper
- Member
- Posts: 6
- Joined: Sat May 20, 2023 6:00 pm
- Location: Flint, Mi
Thank you Wes
Right now I am not concerned with the timing issue, just trying to eliminate possibilities.
Right now I am trying to figure out why my rotor would be pointing to the 4 o'clock position instead of the 7 o'clock position if I have the slot on the oil pump in the right position and the shaft of the distributor keys into the oil pump. I regards to this, at the moment if I am correct, it shouldn't matter if the oil pump drive gear agrees with the cam gear or the cam drive gear not indexed properly. I can address that later. If can't get the rotor in the correct position in relation to the oil pump, then getting everything else lined up would be somewhat irrelevant
I will need to take a look at some rotors and see how they are keyed, I might have the wrong rotor.
-
Mudviper
- Member
- Posts: 6
- Joined: Sat May 20, 2023 6:00 pm
- Location: Flint, Mi
I guess at this moment this is all a moot point, I managed to get the old girl to fire up and purr like an old cat.
I set the timing based of the flywheel markings and #2 cylinder. I set the spark plugs with #1 cylinder around the 5 position along with 2, 4 and 3 to follow. Engine fired right up. Lets see after the next couple days if it stays true.
I set the timing based of the flywheel markings and #2 cylinder. I set the spark plugs with #1 cylinder around the 5 position along with 2, 4 and 3 to follow. Engine fired right up. Lets see after the next couple days if it stays true.