
Couple questions. I have my engine, bell housing and transmission on the floor.
What is the best way to assemble?
Can the throw out fork be installed through the inspection port if i put the bell housing on first?
or should the bell housing be installed to transmission first then onto engine?
1955 M170
bell housing / transmission/ engine
-
bl5211a

- Jeep Enthusiast

- Posts: 344
- Joined: Wed Dec 27, 2006 6:00 pm
- Location: NC
bell housing / transmission/ engine
Brian
1955 M170
1940 BSA M20
1955 M170
1940 BSA M20
-
wesk

- Site Administrator

- Posts: 16467
- Joined: Sun Apr 03, 2005 6:00 pm
- Location: Wisconsin
- Contact:
Depends on your method of installing the engine. I often find it easier to assemble the bell, tranny & transfer and mount it to the rear crossmember first. Then install the engine into the chassis last. This is an easy way to do it and the huge floor opening in the M38/M38A1/M170 make it quite simple. You Do Not want to try to install the clutch fork and spring through the small bell inspection plate. The fork, ball and spring should be installed on the front of the tranny before the engine is bolted to the bell.
Wes K
45 MB, 51 M38, 54 M37, 66 M101A1, 60 CJ5, 76 DJ5D, 47Bantam T3-C & 5? M100
Mjeeps photo album: http://www.willysmjeeps.com/v2/modules. ... _album.php
45 MB, 51 M38, 54 M37, 66 M101A1, 60 CJ5, 76 DJ5D, 47Bantam T3-C & 5? M100
Mjeeps photo album: http://www.willysmjeeps.com/v2/modules. ... _album.php
-
bl5211a
- Jeep Enthusiast
- Posts: 344
- Joined: Wed Dec 27, 2006 6:00 pm
- Location: NC
thanks..
just curious - My transfer case is not completed yet. Have you ever tried this method..
1) Install transmission to bell housing.
2) Bell housing & transmission to engine
3) sit engine and transmission into chassis
4) then install transfer case
Guessing it may be difficult to instal transfer case last?
Brian
just curious - My transfer case is not completed yet. Have you ever tried this method..
1) Install transmission to bell housing.
2) Bell housing & transmission to engine
3) sit engine and transmission into chassis
4) then install transfer case
Guessing it may be difficult to instal transfer case last?
Brian
Brian
1955 M170
1940 BSA M20
1955 M170
1940 BSA M20
-
wesk
- Site Administrator
- Posts: 16467
- Joined: Sun Apr 03, 2005 6:00 pm
- Location: Wisconsin
- Contact:
If you have a lift and tall transmission jack that's fine. If you don't have a garage type lift then lay on the floor and have someone lay the transfer case on your chest and then practice holding the transfer case level about 6" off your chest for 3 to 5 minutes at a time.
In my method above you slide the assembled tranny/transfer/bell/cross member under the jeep then roll the cherry picker so the hook goes thru that huge opening in the floor and strap it to the assembly and lift the assembly into place and install the four cross member bolts.
Now when you are ready for the engine you simply place a small bottle jack under the bell and raise it to the correct angle to match the rear of the approaching engine.
In my method above you slide the assembled tranny/transfer/bell/cross member under the jeep then roll the cherry picker so the hook goes thru that huge opening in the floor and strap it to the assembly and lift the assembly into place and install the four cross member bolts.
Now when you are ready for the engine you simply place a small bottle jack under the bell and raise it to the correct angle to match the rear of the approaching engine.
Wes K
45 MB, 51 M38, 54 M37, 66 M101A1, 60 CJ5, 76 DJ5D, 47Bantam T3-C & 5? M100
Mjeeps photo album: http://www.willysmjeeps.com/v2/modules. ... _album.php
45 MB, 51 M38, 54 M37, 66 M101A1, 60 CJ5, 76 DJ5D, 47Bantam T3-C & 5? M100
Mjeeps photo album: http://www.willysmjeeps.com/v2/modules. ... _album.php
-
bl5211a
- Jeep Enthusiast
- Posts: 344
- Joined: Wed Dec 27, 2006 6:00 pm
- Location: NC
-
skyjeep50
- Jeep Enthusiast
- Posts: 606
- Joined: Mon Feb 19, 2007 6:00 pm
- Location: Illinois
I've used an even easier method. On the top of a workbench assemble transmission, transfer, bell housing, clutch fork w/ throw out bearing as a unit. Assemble engine and clutch. Then mate the two subunits on the bench using an engine hoist to support the trans/transfer. Then you can lift the entire power plant including all accessories (starter, generator, carb, distributor, radiator, hoses, fuel pump, parking brake, etc.) into the jeep. When the engine is "in" and sitting on the front engine mounts and supported by the hoist, you can lift the transmission cross support into place by hand from the side and bolt to the frame and transmission. This is detailed in the TM's. There are two rings in the engine lifting hook, the front one lifts the engine level, the rear one is for lifting the entire power plant level - they worked that one out beautifully! The great thing about doing all the detail work on a bench top is that everything is at hand level and easy to work on, no crawling under the jeep at all. If you need to you can rough set the timing, adjust the valves and attach vent lines, spark plug wires, carb crossover tube, paint - do all the little stuff that can be hard to reach once the engine is in the vehicle. Below is my M38 engine ready to install, stand up installation and my M38A1 engine. Good luck with your project!


1951 M38
-
elias929
- Contributor

- Posts: 56
- Joined: Wed Jul 17, 2013 6:00 pm
- Location: terrebonne,Canada
I am work now on my clutch and i remove the transmission/transfer case below the jeep and is very well. Remove the plates on the floor and you have more place for work. I put the jeep on the jack stand. Here the picture for give you an idea...
https://lh4.googleusercontent.com/-Bor0 ... 223511.jpg
https://lh4.googleusercontent.com/-g_eF ... 223545.jpg
https://lh5.googleusercontent.com/-seud ... 234641.jpg
https://lh4.googleusercontent.com/-Bor0 ... 223511.jpg

https://lh4.googleusercontent.com/-g_eF ... 223545.jpg

https://lh5.googleusercontent.com/-seud ... 234641.jpg

-
bl5211a
- Jeep Enthusiast
- Posts: 344
- Joined: Wed Dec 27, 2006 6:00 pm
- Location: NC
-
skyjeep50
- Jeep Enthusiast
- Posts: 606
- Joined: Mon Feb 19, 2007 6:00 pm
- Location: Illinois
-
wesk
- Site Administrator
- Posts: 16467
- Joined: Sun Apr 03, 2005 6:00 pm
- Location: Wisconsin
- Contact:
Elias,
I thought you had a M38CDN but that looks like a US M38 serial plate in your dash set.
I thought you had a M38CDN but that looks like a US M38 serial plate in your dash set.
Wes K
45 MB, 51 M38, 54 M37, 66 M101A1, 60 CJ5, 76 DJ5D, 47Bantam T3-C & 5? M100
Mjeeps photo album: http://www.willysmjeeps.com/v2/modules. ... _album.php
45 MB, 51 M38, 54 M37, 66 M101A1, 60 CJ5, 76 DJ5D, 47Bantam T3-C & 5? M100
Mjeeps photo album: http://www.willysmjeeps.com/v2/modules. ... _album.php
-
elias929
- Contributor
- Posts: 56
- Joined: Wed Jul 17, 2013 6:00 pm
- Location: terrebonne,Canada
-
wesk
- Site Administrator
- Posts: 16467
- Joined: Sun Apr 03, 2005 6:00 pm
- Location: Wisconsin
- Contact:
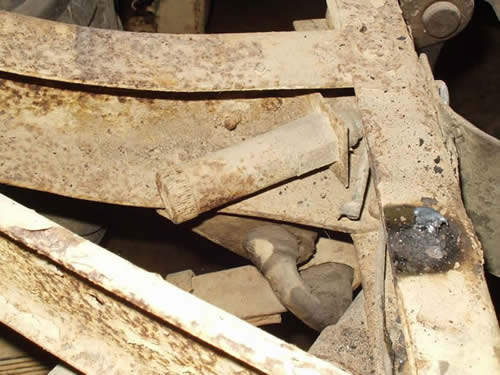
CDN was built by Ford of Canada. Had a different serial plate. Only a very few early units that used Willys supplied parts for the assembly line setup had the "Jeep" script on the front of the tool box. Rest were blank. Engines were painted gray. The CDN's had a convoy lamp under the rear of the bed that illuminated the rear axle pumpkin and had a switch on the left side of the dash. There were a few subtle differences in frame tie downs and trailer chain eyebolts at the pintle.
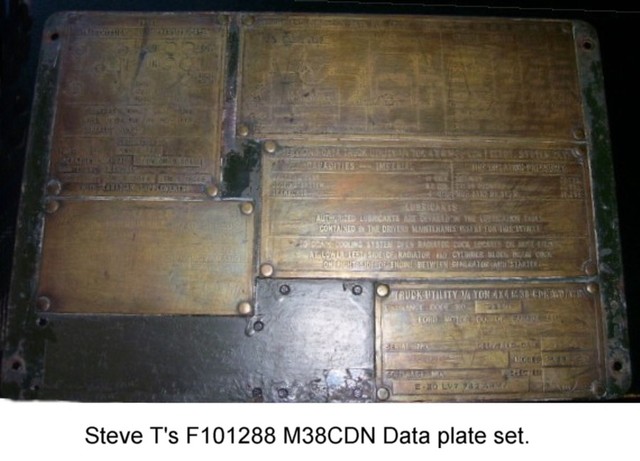
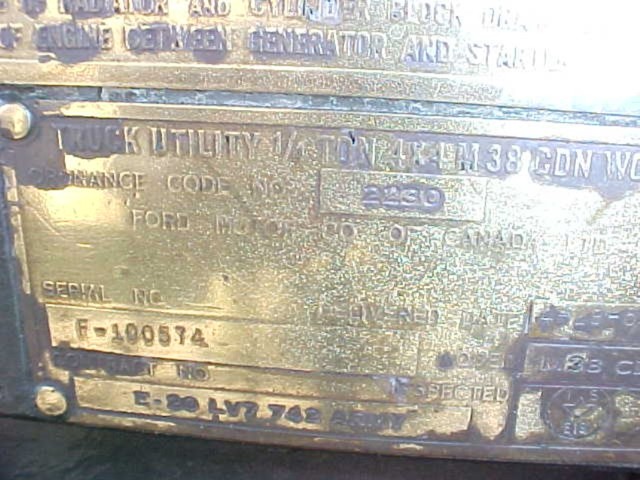
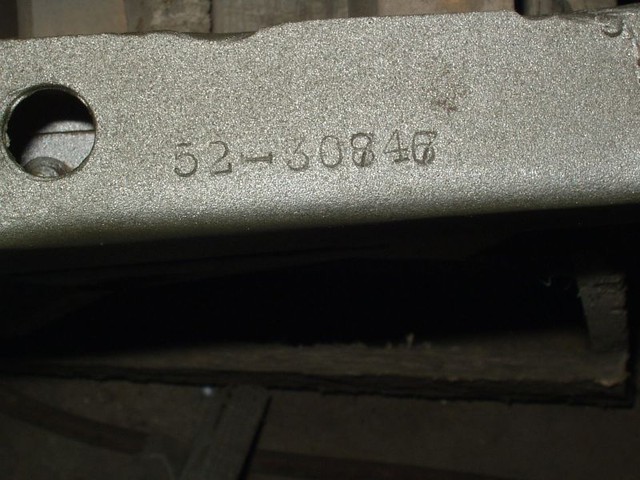
CAR # stamped on top of left front frame rail.
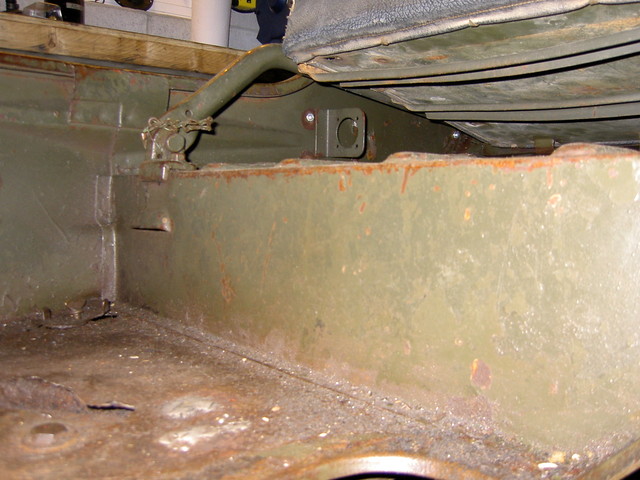
CDN tool box front.
Convoy lamp
CAR # stamped on top of left front frame rail.
CDN tool box front.
Convoy lamp
Wes K
45 MB, 51 M38, 54 M37, 66 M101A1, 60 CJ5, 76 DJ5D, 47Bantam T3-C & 5? M100
Mjeeps photo album: http://www.willysmjeeps.com/v2/modules. ... _album.php
45 MB, 51 M38, 54 M37, 66 M101A1, 60 CJ5, 76 DJ5D, 47Bantam T3-C & 5? M100
Mjeeps photo album: http://www.willysmjeeps.com/v2/modules. ... _album.php
-
elias929
- Contributor
- Posts: 56
- Joined: Wed Jul 17, 2013 6:00 pm
- Location: terrebonne,Canada
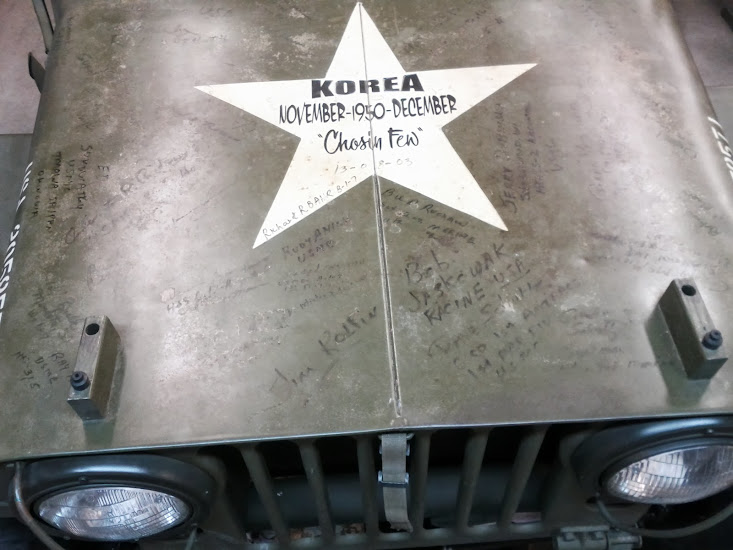
Thanks Wesk! I did buy in Florida last month. On the first title the jeep came of Wisconsin. Is that it tells you something. The hood is signing by the war veterans. Here a picture:
https://lh6.googleusercontent.com/-QKgR ... 223558.jpg
https://lh6.googleusercontent.com/-QKgR ... 223558.jpg
-
wesk
- Site Administrator
- Posts: 16467
- Joined: Sun Apr 03, 2005 6:00 pm
- Location: Wisconsin
- Contact:
I'd say you have a Willys built M38 not a CDN.
Wes K
45 MB, 51 M38, 54 M37, 66 M101A1, 60 CJ5, 76 DJ5D, 47Bantam T3-C & 5? M100
Mjeeps photo album: http://www.willysmjeeps.com/v2/modules. ... _album.php
45 MB, 51 M38, 54 M37, 66 M101A1, 60 CJ5, 76 DJ5D, 47Bantam T3-C & 5? M100
Mjeeps photo album: http://www.willysmjeeps.com/v2/modules. ... _album.php