So, on my speedometer problem

Discussion topics on Willys Overland M series vehicles
User avatar
wesk
Site Administrator
Site Administrator
Posts: 16467
Joined: Sun Apr 03, 2005 6:00 pm
Location: Wisconsin
Contact:

Post by wesk »

Terminology war is not necessary. The best way to deal with confusing terms is to use the terms the manufacturer of the product you are working on used. In this case Spicer called both items gears. No speedo worms in spicer boxes!!!

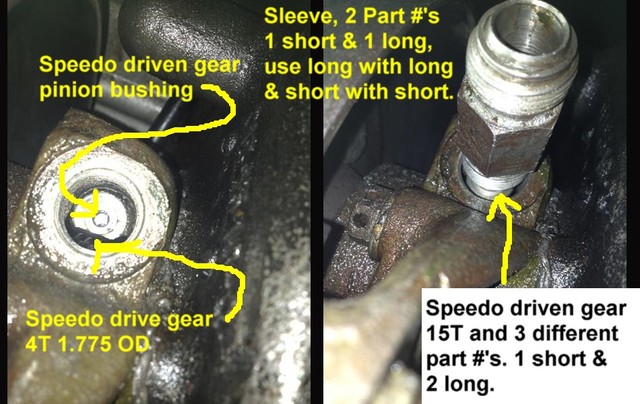
The drive gear which you can just barely see the four teeth of peering out from the lower side of the hole in the left photo is Ord. part number 7373157, Spicer # 18452-2, Warner Gear # J2-169, WO# A1511; gear, drive, speedometer (4T, 1.775 OD). This has been the same drive gear used on Willys D18's from 1941 through 1972 M38A1 production.
Image

It looks to me like Dan has a long speedo driven gear and a short sleeve.

The short sleeve can opnly be used with the short speedo driven gear.

Sleeve, short, Spicer # 55-454-2, Ord # 7697552, WO# 801092
Driven gear, short 15T, Spicer# 18-453-9, Ord# 7697553, WO# 801696
These were used on 41 thru 51 MB, CJ2A, CJ3A and early M38.

The long sleeves can only be used with the two long gears.

Sleeve, long, Spicer# 55-454-3, SW# 418991, Ord# 8328481,
-------------- WO# 806719
Driven gear, long 15T, Spicer# 18-453-10, SW# 448361, Ord# 8328480,
--------------------WO# 806718
These were used on Late CJ3A's and M38's onward.
Wes K
45 MB, 51 M38, 54 M37, 66 M101A1, 60 CJ5, 76 DJ5D, 47Bantam T3-C & 5? M100

Mjeeps photo album: http://www.willysmjeeps.com/v2/modules. ... _album.php
User avatar
Deadguy
Jeep Enthusiast
Jeep Enthusiast
Posts: 776
Joined: Wed Jun 08, 2011 6:00 pm
Location: Bellmore, NY
Contact:

Post by Deadguy »

Well, that sleeve already has the driven gear in it in the picture. When I put the sleeve over the driven gear , the end of the speedo driven gear that attaches to the speedometer cable doesn't even come out of the sleeve. Once the driven gear is in the speedometer pinion bushing, it is at such an angle that the sleeve won't match up to the threaded hole, and can't go in.
1952 M38A1
Marine core reinforced rear bumper, military transistorized turn signal upgrade, arctic heater, 11" drum brakes, 200L PTO winch, Huffy overdrive, deep water fording kit, RT 68 vehicle mounted radio, Trac Locs front and rear.
www.danhenk.com
User avatar
wesk
Site Administrator
Site Administrator
Posts: 16467
Joined: Sun Apr 03, 2005 6:00 pm
Location: Wisconsin
Contact:

Post by wesk »

Once the driven gear is in the speedometer pinion bushing, it is at such an angle that the sleeve won't match up to the threaded hole, and can't go in.
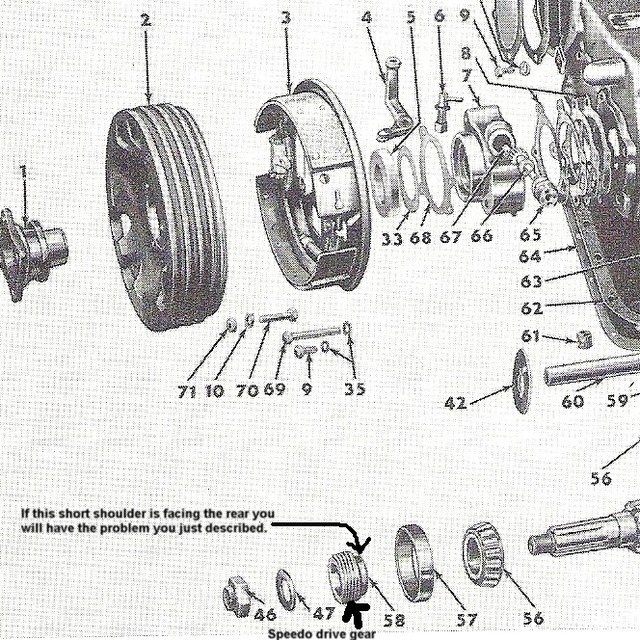
Now see Dan, the way you slowly give us one small piece of your problem in each post makes it very difficult to help you sort it out. Had you said the sentence above in the first post I would have quickly told you to remove the rear yoke and brake and check the positioning of the drive gear which is probably to far forward and may be on the shaft backwards.

Image
Wes K
45 MB, 51 M38, 54 M37, 66 M101A1, 60 CJ5, 76 DJ5D, 47Bantam T3-C & 5? M100

Mjeeps photo album: http://www.willysmjeeps.com/v2/modules. ... _album.php
User avatar
Deadguy
Jeep Enthusiast
Jeep Enthusiast
Posts: 776
Joined: Wed Jun 08, 2011 6:00 pm
Location: Bellmore, NY
Contact:

Post by Deadguy »

I didn't know I was giving you only a small part of the problem, I posted a picture and didn't know the hole was called a "pinion bushing". I've never worked on a military jeep before, so I have a huge learning curve!
So, basically at this point, I need to pull the transfer case?
1952 M38A1
Marine core reinforced rear bumper, military transistorized turn signal upgrade, arctic heater, 11" drum brakes, 200L PTO winch, Huffy overdrive, deep water fording kit, RT 68 vehicle mounted radio, Trac Locs front and rear.
www.danhenk.com
User avatar
wesk
Site Administrator
Site Administrator
Posts: 16467
Joined: Sun Apr 03, 2005 6:00 pm
Location: Wisconsin
Contact:

Post by wesk »

Actually you will do a lot less work if you carefully read what I write in my posts. Go back and re-read my post where I explain how to get to the little drive gear without removing the transfer case. Also, do it before you fix your parking brake!
Wes K
45 MB, 51 M38, 54 M37, 66 M101A1, 60 CJ5, 76 DJ5D, 47Bantam T3-C & 5? M100

Mjeeps photo album: http://www.willysmjeeps.com/v2/modules. ... _album.php
User avatar
Deadguy
Jeep Enthusiast
Jeep Enthusiast
Posts: 776
Joined: Wed Jun 08, 2011 6:00 pm
Location: Bellmore, NY
Contact:

Post by Deadguy »

If I can access all that without pulling the transfer case, great. I've never pulled apart a transfer case before. One question though. If the pinion bushing is rotated too far towards the top of the transfer case, doesn't the drive shaft need to be repositioned?
1952 M38A1
Marine core reinforced rear bumper, military transistorized turn signal upgrade, arctic heater, 11" drum brakes, 200L PTO winch, Huffy overdrive, deep water fording kit, RT 68 vehicle mounted radio, Trac Locs front and rear.
www.danhenk.com
User avatar
wesk
Site Administrator
Site Administrator
Posts: 16467
Joined: Sun Apr 03, 2005 6:00 pm
Location: Wisconsin
Contact:

Post by wesk »

Read my post again. Look at my illustration again. The object I suggested may be in backwards is the drive gear!
Wes K
45 MB, 51 M38, 54 M37, 66 M101A1, 60 CJ5, 76 DJ5D, 47Bantam T3-C & 5? M100

Mjeeps photo album: http://www.willysmjeeps.com/v2/modules. ... _album.php
User avatar
Deadguy
Jeep Enthusiast
Jeep Enthusiast
Posts: 776
Joined: Wed Jun 08, 2011 6:00 pm
Location: Bellmore, NY
Contact:

Post by Deadguy »

Ok, if I pull the whole thing though, the pinion busing is on the drive shaft, right? Even if I turn around the speedometer drive, the pinion bushing will still hold the driven gear at too harsh of an angle to screw on the sleeve, right? Like I said, I haven't pulled apart a transfer case before, I just don't want to pull a bunch of stuff, and then have questions while it's all apart on my garage floor.
1952 M38A1
Marine core reinforced rear bumper, military transistorized turn signal upgrade, arctic heater, 11" drum brakes, 200L PTO winch, Huffy overdrive, deep water fording kit, RT 68 vehicle mounted radio, Trac Locs front and rear.
www.danhenk.com
User avatar
wesk
Site Administrator
Site Administrator
Posts: 16467
Joined: Sun Apr 03, 2005 6:00 pm
Location: Wisconsin
Contact:

Post by wesk »

You are not grasping the drawing. The pinion bushing (item 67) is fixed in housing (Item 7). There's no way it can be relocated forward or aft. You only need to deal with what I wrote above. Pull the brake, remove housing 7 with the bearing and reverse the drive gear on the shaft.
Wes K
45 MB, 51 M38, 54 M37, 66 M101A1, 60 CJ5, 76 DJ5D, 47Bantam T3-C & 5? M100

Mjeeps photo album: http://www.willysmjeeps.com/v2/modules. ... _album.php
User avatar
Deadguy
Jeep Enthusiast
Jeep Enthusiast
Posts: 776
Joined: Wed Jun 08, 2011 6:00 pm
Location: Bellmore, NY
Contact:

Post by Deadguy »

You know, I just made sense of what you are saying. I'll do it on my day off tomorrow. What is the socket size for that nut on the back of the parking brake? It's too big for anything I have, so I want to make sure I get the correct one tomorrow from the local auto store.
1952 M38A1
Marine core reinforced rear bumper, military transistorized turn signal upgrade, arctic heater, 11" drum brakes, 200L PTO winch, Huffy overdrive, deep water fording kit, RT 68 vehicle mounted radio, Trac Locs front and rear.
www.danhenk.com
User avatar
Xamon
Jeep Enthusiast
Jeep Enthusiast
Posts: 593
Joined: Mon Sep 17, 2012 6:00 pm
Location: South East Saskatchewan

Post by Xamon »

had to get socket for that, $13 and I can't remember the size I think 1&1/4". You can measure it with a tape though. Also if you have it use an impact to take it off. When putting it back use a torque wrench of course. Learned long ago, impacts are for taking things off not putting them on.
User avatar
wesk
Site Administrator
Site Administrator
Posts: 16467
Joined: Sun Apr 03, 2005 6:00 pm
Location: Wisconsin
Contact:

Post by wesk »

1 1/8 th "
Wes K
45 MB, 51 M38, 54 M37, 66 M101A1, 60 CJ5, 76 DJ5D, 47Bantam T3-C & 5? M100

Mjeeps photo album: http://www.willysmjeeps.com/v2/modules. ... _album.php
User avatar
Deadguy
Jeep Enthusiast
Jeep Enthusiast
Posts: 776
Joined: Wed Jun 08, 2011 6:00 pm
Location: Bellmore, NY
Contact:

Post by Deadguy »

Mine was 1 1/4". Fortunately, the sockets were cheap, and I bought both sizes just in case. Unfortunately, I cannot get that nut to move. I like to think of myself as a decently strong guy. I work out, I do Muy Thai Kickboxing. But even with the tires up against a wall so they couldn't move forward, Kroil oil poured over the nut first, a breaker bar and a rubber mallet, I could not get that thing to move. I guess I'll have to take it to my buddies shop where he has air tools.
1952 M38A1
Marine core reinforced rear bumper, military transistorized turn signal upgrade, arctic heater, 11" drum brakes, 200L PTO winch, Huffy overdrive, deep water fording kit, RT 68 vehicle mounted radio, Trac Locs front and rear.
www.danhenk.com
User avatar
Xamon
Jeep Enthusiast
Jeep Enthusiast
Posts: 593
Joined: Mon Sep 17, 2012 6:00 pm
Location: South East Saskatchewan

Post by Xamon »

Don't feel bad, I had the right sized wrench and could not move it, that's why I bought the socket, 2 seconds with the impact and off it came.
User avatar
jimm
Active Member
Active Member
Posts: 202
Joined: Mon Oct 31, 2011 6:00 pm
Location: Escondido, CA

Post by jimm »

The nut for the companion flange (item 1 in above figure) is torqued to 100-120 ft-lbs when installed, so it can be tough to remove. This T18 rebuild guide http://www.cj3apage.com/Model%2018%20Rebuild.htm has some suggestions for getting it loose (section D1) as well as instructions on reassembly (section A36). A rubber mallet usually has too much bounce to it to pop something like this loose. Kroil is good for rusty or seized fasteners but doesn't help where the nut is just socked down tight. A cheater extension on your breaker bar, or a steel hammer, might bust it loose. Or, if you can put your weight on the end of the breaker bar and bounce on it, it might save you a trip to the shop (think "tight wheel lug nut").
Jim McKim
1952 M38 son-father project
Slowly turning rusty parts into OD parts
Post Reply