
I am restoring some black out grille and tail lights.
On two the light sockets are corroded to where they are unusable.
The rest of the light parts appear okay.
Is there a supplier that will sell replacement twist lock light bulb fixtures?
All of the sockets for all of the lights appear to be identical including the dash lights.
Also, the grille lights were pretty tight when I took them apart. Now after several days and after cleanup and repainting I can't get the doors to fit back onto the buckets as tight as before.
I seem to remember somewhere in the dim, foggy that old rubber gaskets can expand once decompressed. Might this be what happened and are the door gaskets being sold replacements or old stock that might have the same problem?
Thanks,
Brian
Blackout light fixtures
-
4x4M38

- Jeep Legend

- Posts: 3487
- Joined: Thu May 29, 2014 6:00 pm
- Location: Texas Hill Country
-
wesk

- Site Administrator

- Posts: 16467
- Joined: Sun Apr 03, 2005 6:00 pm
- Location: Wisconsin
- Contact:
The top seven military M series jeep vendors are where you need to spend some time.
Midwest Military http://www.midwestmilitary.net/parts.html
Ron F jeep parts http://g503.com/parts/
AJP (Army Jeep Parts) https://www.armyjeepparts.net/
RAPCO http://www.rapcoparts.com/
BMJP Brent Mullin's http://www.mullinsjeepparts.com/
DeBella's http://www.debellajeepparts.com/
Saturn Surplus http://www.saturnsurplus.com/
Yes there are a few more but if you at least click on these seven sites armed with a part number form your ORD 9 you will usually find what you need.
What those of us find at any one dealer last year may well not be there this year.
This is where I go the instant I need a light part:
http://www.saturnsurplus.com/lights/lights.htm
Midwest Military http://www.midwestmilitary.net/parts.html
Ron F jeep parts http://g503.com/parts/
AJP (Army Jeep Parts) https://www.armyjeepparts.net/
RAPCO http://www.rapcoparts.com/
BMJP Brent Mullin's http://www.mullinsjeepparts.com/
DeBella's http://www.debellajeepparts.com/
Saturn Surplus http://www.saturnsurplus.com/
Yes there are a few more but if you at least click on these seven sites armed with a part number form your ORD 9 you will usually find what you need.
What those of us find at any one dealer last year may well not be there this year.
This is where I go the instant I need a light part:
http://www.saturnsurplus.com/lights/lights.htm
Wes K
45 MB, 51 M38, 54 M37, 66 M101A1, 60 CJ5, 76 DJ5D, 47Bantam T3-C & 5? M100
Mjeeps photo album: http://www.willysmjeeps.com/v2/modules. ... _album.php
45 MB, 51 M38, 54 M37, 66 M101A1, 60 CJ5, 76 DJ5D, 47Bantam T3-C & 5? M100
Mjeeps photo album: http://www.willysmjeeps.com/v2/modules. ... _album.php
-
wesk
- Site Administrator
- Posts: 16467
- Joined: Sun Apr 03, 2005 6:00 pm
- Location: Wisconsin
- Contact:
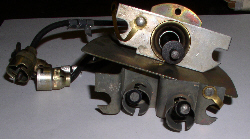
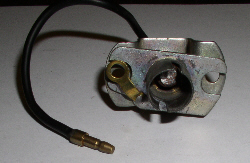
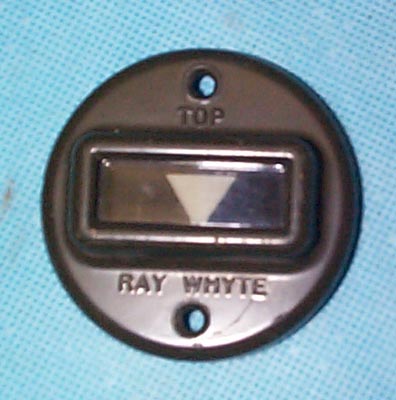
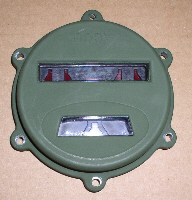
Here's about 5 minutes of shopping the Saturn web site.
Wes K
45 MB, 51 M38, 54 M37, 66 M101A1, 60 CJ5, 76 DJ5D, 47Bantam T3-C & 5? M100
Mjeeps photo album: http://www.willysmjeeps.com/v2/modules. ... _album.php
45 MB, 51 M38, 54 M37, 66 M101A1, 60 CJ5, 76 DJ5D, 47Bantam T3-C & 5? M100
Mjeeps photo album: http://www.willysmjeeps.com/v2/modules. ... _album.php
-
4x4M38
- Jeep Legend
- Posts: 3487
- Joined: Thu May 29, 2014 6:00 pm
- Location: Texas Hill Country
Thank you Wes.
I have surfed several of the usual suspects sites, but probably in error, if I don't see a listing for a part I assume they don't have it.
I'll hit up Saturn.
Any words of wisdom on the gaskets? Have you ever had that problem before?
Thanks,
Brian
PS. I found out why my stay cable wasn't attached at the frame and appeared to be a couple of inches short. Bubba had it bolted into the next hole up on the bell housing. ?
I have surfed several of the usual suspects sites, but probably in error, if I don't see a listing for a part I assume they don't have it.
I'll hit up Saturn.
Any words of wisdom on the gaskets? Have you ever had that problem before?
Thanks,
Brian
PS. I found out why my stay cable wasn't attached at the frame and appeared to be a couple of inches short. Bubba had it bolted into the next hole up on the bell housing. ?
-
wesk
- Site Administrator
- Posts: 16467
- Joined: Sun Apr 03, 2005 6:00 pm
- Location: Wisconsin
- Contact:
When I find a gasket too hard to find or too much I make them.
If the gasket is rubber lube it.
If the gasket is rubber lube it.
Wes K
45 MB, 51 M38, 54 M37, 66 M101A1, 60 CJ5, 76 DJ5D, 47Bantam T3-C & 5? M100
Mjeeps photo album: http://www.willysmjeeps.com/v2/modules. ... _album.php
45 MB, 51 M38, 54 M37, 66 M101A1, 60 CJ5, 76 DJ5D, 47Bantam T3-C & 5? M100
Mjeeps photo album: http://www.willysmjeeps.com/v2/modules. ... _album.php
-
Bretto
- Jeep Legend
- Posts: 1390
- Joined: Tue Nov 23, 2010 6:00 pm
- Location: Orem, UT
-
4x4M38
- Jeep Legend
- Posts: 3487
- Joined: Thu May 29, 2014 6:00 pm
- Location: Texas Hill Country
-
wesk
- Site Administrator
- Posts: 16467
- Joined: Sun Apr 03, 2005 6:00 pm
- Location: Wisconsin
- Contact:
Have you ever heard of a WET SEAL?
It is the simple way to fabricate your own molded seals. I have used this process for at least 45 years. It takes a little bit of common sense and eventually after using the system for a few years you'll get adept at gauging just how much sealant to use in each case.
You need a tube of RTV adhesive sealant and a tube of plain silicon grease.
You decide which half of the assembly you prefer the adhesive to adhere to and where exactly you want it to adhere on that half.
You apply a thin coat of the silicon grease to the areas of that half that you do not wish the adhesive to permanently bond to.
Apply silicon grease to all faces of the other half where you do not want the adhesive to permanently bond to. That would be those areas opposite of the bead you will put on the other half and the areas that bead may expand into as you squeeze the two halves together.
Then use the tapered cone type cap that comes with the adhesive tube and cut it's opening only large enough to develop the bead size you want when you squeeze the tube.
Apply the bead of adhesive/sealant to the un-greased areas of the host half.
Now fasten the halves together. Leave them together for the length of time posted as the cure time on the tube's directions.
Separate the halves and clean up any excess adhesive and wipe the silicon grease from the areas you applied it to. Now let the two halves set overnight and voila you now have a very useable molded type seal that will remain fastened to one half and will be re-useable for many years.
I have worked on old classic aircraft for more than 20 years now and there has never been a gasket or seal that I could not reproduce well enough to get the job done.
It is the simple way to fabricate your own molded seals. I have used this process for at least 45 years. It takes a little bit of common sense and eventually after using the system for a few years you'll get adept at gauging just how much sealant to use in each case.
You need a tube of RTV adhesive sealant and a tube of plain silicon grease.
You decide which half of the assembly you prefer the adhesive to adhere to and where exactly you want it to adhere on that half.
You apply a thin coat of the silicon grease to the areas of that half that you do not wish the adhesive to permanently bond to.
Apply silicon grease to all faces of the other half where you do not want the adhesive to permanently bond to. That would be those areas opposite of the bead you will put on the other half and the areas that bead may expand into as you squeeze the two halves together.
Then use the tapered cone type cap that comes with the adhesive tube and cut it's opening only large enough to develop the bead size you want when you squeeze the tube.
Apply the bead of adhesive/sealant to the un-greased areas of the host half.
Now fasten the halves together. Leave them together for the length of time posted as the cure time on the tube's directions.
Separate the halves and clean up any excess adhesive and wipe the silicon grease from the areas you applied it to. Now let the two halves set overnight and voila you now have a very useable molded type seal that will remain fastened to one half and will be re-useable for many years.
I have worked on old classic aircraft for more than 20 years now and there has never been a gasket or seal that I could not reproduce well enough to get the job done.
Wes K
45 MB, 51 M38, 54 M37, 66 M101A1, 60 CJ5, 76 DJ5D, 47Bantam T3-C & 5? M100
Mjeeps photo album: http://www.willysmjeeps.com/v2/modules. ... _album.php
45 MB, 51 M38, 54 M37, 66 M101A1, 60 CJ5, 76 DJ5D, 47Bantam T3-C & 5? M100
Mjeeps photo album: http://www.willysmjeeps.com/v2/modules. ... _album.php
-
4x4M38
- Jeep Legend
- Posts: 3487
- Joined: Thu May 29, 2014 6:00 pm
- Location: Texas Hill Country
-
wesk
- Site Administrator
- Posts: 16467
- Joined: Sun Apr 03, 2005 6:00 pm
- Location: Wisconsin
- Contact:
Trouble with trying to make the seal removable is that when forming the seal with all sides slippery the adhesive/sealant usually migrates way too much. You can always try and see what you get in your application. The thinner the molded adhesive bead is the harder it is to control it's migration.
Wes K
45 MB, 51 M38, 54 M37, 66 M101A1, 60 CJ5, 76 DJ5D, 47Bantam T3-C & 5? M100
Mjeeps photo album: http://www.willysmjeeps.com/v2/modules. ... _album.php
45 MB, 51 M38, 54 M37, 66 M101A1, 60 CJ5, 76 DJ5D, 47Bantam T3-C & 5? M100
Mjeeps photo album: http://www.willysmjeeps.com/v2/modules. ... _album.php
-
southpw
- Jeep Enthusiast

- Posts: 268
- Joined: Sat Jun 14, 2014 6:00 pm
- Location: Cambridge, Ontario, Canada
When Ihave done this method iIhave made sure not to tighten the 2 halves to final seated position(but close). Then after curing, cleaning and resealing, I have found I can feel the Silicon compressing tighter so I know it is a good seal.
I do it this way only because my first attempt was a failure and moisture entered the seal. Could have been that I was a rookie at it though.
Brad
I do it this way only because my first attempt was a failure and moisture entered the seal. Could have been that I was a rookie at it though.
Brad
1952 M38 project
Brad
Brad
-
4x4M38
- Jeep Legend
- Posts: 3487
- Joined: Thu May 29, 2014 6:00 pm
- Location: Texas Hill Country
-
jimm

- Active Member

- Posts: 202
- Joined: Mon Oct 31, 2011 6:00 pm
- Location: Escondido, CA
That makes perfect sense to me. All elastomeric seals are designed with some amount of compression figured in, usually somewhere between 25 and 50%.southpw wrote:When Ihave done this method iIhave made sure not to tighten the 2 halves to final seated position(but close). Then after curing, cleaning and resealing, I have found I can feel the Silicon compressing tighter so I know it is a good seal.
I do it this way only because my first attempt was a failure and moisture entered the seal. Could have been that I was a rookie at it though.
Brad
Jim McKim
1952 M38 son-father project
Slowly turning rusty parts into OD parts
1952 M38 son-father project
Slowly turning rusty parts into OD parts