T 90 Synchroniser Question
-
oilleaker1

- Jeep Enthusiast

- Posts: 973
- Joined: Wed May 13, 2009 6:00 pm
- Location: South Dakota
T 90 Synchroniser Question
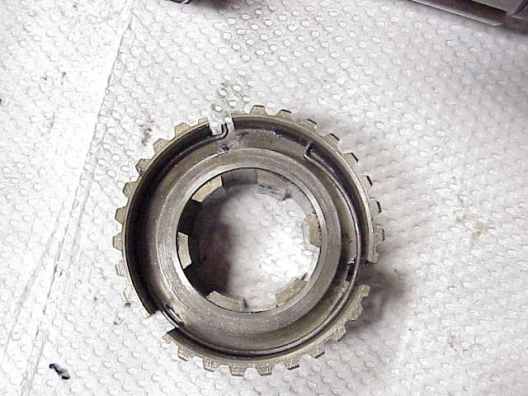
I have a NOS synchroniser coming. What I want to know is how the internal synchroniser plates and springs are correctly installed. It is said the NOS springs are square and have a smaller angled end. The aftermarket ones are round and have a longer end to them. I believe that one end of the spring is to go into one of the 3 plates , and the opposite side goes into the same plate. Wolfman over on the 503 says he has found this to be a problem. He says one end of the spring should be cut off in order for it to provide more spring pressure on the 3 plates. I'm at a total loss right now. Anyone have a opinion on this? Before Wes kills me, I did do a search in downloads, technical section and general search typing in Synchroniser assembly . Nothing pops up. I'm ready to learn-------  John
John
-
Bretto
- Jeep Legend

- Posts: 1390
- Joined: Tue Nov 23, 2010 6:00 pm
- Location: Orem, UT
One end of the spring will fit into the pawl recess but won't make it all the way around so it's other end will fit in. That other end will rest inside against the synchro hub's wall. Then on the other side (hub flipped over) lay it in the same exact way, and into the same pawl.
I never cut mine and the ones I took out weren't cut.
Brett
I never cut mine and the ones I took out weren't cut.
Brett
-
Bobber

- Active Member

- Posts: 178
- Joined: Sat Feb 08, 2014 6:00 pm
- Location: Tri Cities, Washington
-
wesk

- Site Administrator

- Posts: 16464
- Joined: Sun Apr 03, 2005 6:00 pm
- Location: Wisconsin
- Contact:
Don't overlook the Willys Tech rebuild guides:
http://www.willystech.com/wt/Model18TCa ... rCase.html
http://www.willystech.com/wt/T90Rebuild ... ebuild.htm
The spring ring is shown this way in Rick Stiver's rebuild guide.
Novak has packaged their guide as a PDF doc.: https://www.novak-adapt.com/files/5014/ ... ebuild.pdf
Here's another rebuild guide: http://www.cgoodwin.com/Old-Site/Willys ... ebuild.htm
Wes K
45 MB, 51 M38, 54 M37, 66 M101A1, 60 CJ5, 76 DJ5D, 47Bantam T3-C & 5? M100
Mjeeps photo album: http://www.willysmjeeps.com/v2/modules. ... _album.php
45 MB, 51 M38, 54 M37, 66 M101A1, 60 CJ5, 76 DJ5D, 47Bantam T3-C & 5? M100
Mjeeps photo album: http://www.willysmjeeps.com/v2/modules. ... _album.php
-
oilleaker1
- Jeep Enthusiast
- Posts: 973
- Joined: Wed May 13, 2009 6:00 pm
- Location: South Dakota
Gentlemen, thank you for the info. and guides. They say for the round springs, one end goes in the pawl on each side of the same pawl. For the square ones, simply insert it in the recess. The square ones have a small tail on them and this makes more sense. I've also learned from Five T-90's and two T84's that end float and 2nd gear bushing wear are paramount in getting it to stay in gear. The transmission I'm currently working on was built by a automatic transmission shop that helped me with it, but admitted they really didn't have "Willys" experience. He made a homemade mainshaft spacer that gave it endfloat. So much, that the rear gear on the mainshaft inside the transfercase had float with the hardened washer and retaining nut pulled up tight. I had unusual noise and 2nd gear popping out, no wonder. They were worried it would heat up and be too tight and burn things up. I didn't have any damage on the parts, but the synchroniser was assembled with some new, some old parts. It's too much work to not replace it this time. Onward and upward! John