Page 2 of 3
Posted: Thu Jul 06, 2017 5:16 pm
by DanS
Don't rule out the oil pumper either. I had the same issue, the original pump spec'd out correctly, but did not provide adequate lubrication to the bearings. I had to rebuild my newly re-built engine because of this. As a result, I will NEVER use a "used" oil pump again. Very expensive lesson.
Dan
Posted: Thu Jul 06, 2017 5:45 pm
by johnpstoll
I don't have a photo gallery and haven't figured how to upload a pic to my post. Still looking.
Posted: Thu Jul 06, 2017 6:49 pm
by wesk
How much of the overhaul did you do yourself?
Was the block hot tanked?
Were all the oil passageways checked with air pressure before the engine was assembled? Not just the main galleries. Each individual passageway?
The normal culprit in #1 rod bearing accelerated wear is the 0.070 oil jet for the timing gears but you said you installed a .040 jet.
Posted: Thu Jul 06, 2017 6:55 pm
by wesk
Posted: Thu Jul 06, 2017 7:56 pm
by johnpstoll
All the machining was done by the shop. I assembled the engine myself. The pistons, bearings and valves were all new. I checked and blew out all the galleries. I may have missed something. I believe it was hot tanked. I've used this shop before and had no problems. He's an older gentleman and is well known for the work he does.
I did a quick measurement of one of the rod end journals and it doesn't seem to meet the minimum criteria. I'll have to check again after I get the crank out to be sure.
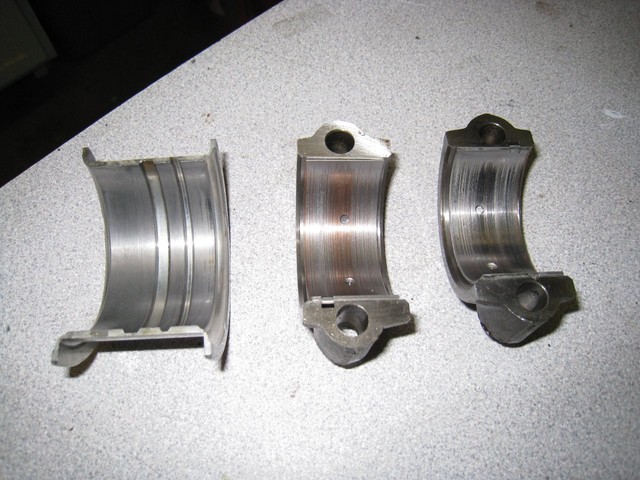
Here's a pic of the front end crank, #1 and #2 rod end bearings. I haven't checked #3 or #4 yet. I've seen enough.
You used the wrong brackets for your photo link:
use these:
![Image]()
Then per the instructions I included with your album select the size photo you want to post from your album (thumb nail, middle and original full.), right click on it and post the url between the
![Image]()
brackets.
This was the link at the top of the page in your photo album that the photo you wanted to post was on and it was the link you tried to place between the brakets..
http://willysmjeeps.com/v2/modules.php? ... _photo.php
When you right click the photo and click on "Copy image address" you will get this link:
http://willysmjeeps.com/v2/modules/gall ... .sized.jpg This is the link I placed between the
![Image]()
.
Posted: Thu Jul 06, 2017 8:23 pm
by 4x4M38
Ah, Man.......
Posted: Thu Jul 06, 2017 8:53 pm
by wesk
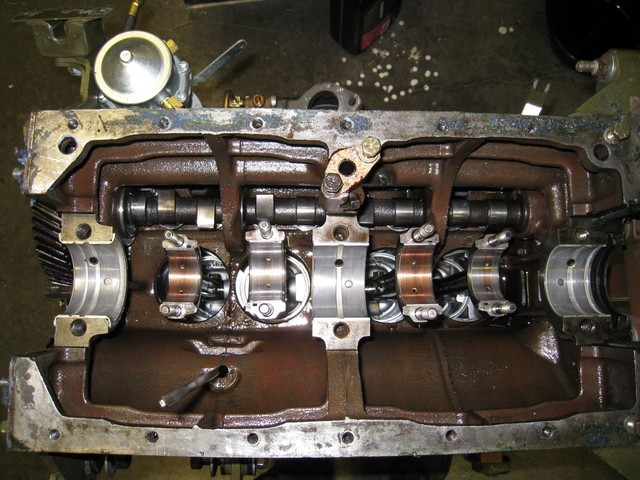
Give us a photo of the upper bearing halves while they are still installed in the block.
Beautiful job on the M38! Are you still missing the tranny cover and lower half of the windshield latches?
Posted: Thu Jul 06, 2017 9:14 pm
by johnpstoll
Thanks for the help Wes. Give me day or two and I'll post a pic of the upper bearings. I'm going to start taking it apart tomorrow.
I've got the tranny cover installed and the latches on. I couldn't get the latches to reach with a new cowl rubber so I had to manufacture new latches to fit.
Was going to drive it in a parade this weekend, maybe next year. Got a few more bugs to work out any way.
Posted: Fri Jul 07, 2017 6:45 am
by oilleaker1
I hate to admit it, but on my first engine re-build, I installed all the rods with the offset backwards. It took out the rod bearings in 105 miles. They looked like yours and there was a pile of bearing material in the oil pan under each rod. I then did as you are doing. It was a 300.00 education. the machinist said: Education is expensive.

My oil pressure did as yours did. Check it out. Oilly
Posted: Sun Jul 09, 2017 11:11 am
by johnpstoll
Here's a look at the crank case. The mains look oK.
John this is the wrong link to put between the bracketed
![Image]()
.
http://willysmjeeps.com/v2/modules.php? ... _photo.php
You clivk on the photo you want to use and open it. Then you right click on that photo and select "Copy image address" from the drop down menu then you paste that URL between the
![Image]()
brackets.
Posted: Sun Jul 09, 2017 11:20 am
by wesk
All 4 rods show evidence at varying levels of overheating of the bearings.
Posted: Sun Jul 09, 2017 11:29 am
by johnpstoll
Sorry Wes, When I right click on the photo I get the option of "copy link" so that's what I've pasted. I'll figure it out one of these days.
The rod ends all show wear, but the mains all look good and I can feel that main bearings are smooth. I'll see what the machine shop can tell me this week.
Posted: Sun Jul 09, 2017 5:12 pm
by 4x4M38
Oilly,
Can you explain what you mean by installing the rods with the offsets backwards? I'm not dense, just haven't ever assembled an engine before
Thanks,
Posted: Sun Jul 09, 2017 8:05 pm
by wesk
I can't resist Brian!!
The answer to your question is illustrated and explained on pages 88 & 91 of TM 9-1804A M38 Engine & Clutch Manual
Posted: Sun Jul 09, 2017 8:09 pm
by wesk
John,
Then I'll assume the web browser you are using is MS's Internet Explorer.
They make it tougher. You must right click on the photo you wish to use and click on "Properties" then copy the URL shown in the pop up box and paste that URL between the
![Image]()
.