Page 2 of 3
Posted: Mon Apr 15, 2013 7:07 pm
by wilfreeman
Have you seen any explanation of how to modify the rotor Wes (or anyone else that has done it)? The threads that I read stopped short of this. She is running a lot smoother already, but getting it done right would be great!
Also, while I was in there, I discovered that the weights were sticky, the shaft was a little sticky (from varnish or old oil) and the points were bad. And when I pulled the coil out there was oil in the housing, so it might have a hole in it. I replaced it with a spare that I had.
Posted: Tue Apr 16, 2013 4:52 am
by wesk
In Erik's earliest explanation he described a window mod and I don't seem to be able to find it yet.
Posted: Tue Apr 16, 2013 7:03 am
by wilfreeman
Hi Wes,
I read back through the pages I had bookmarked but also didn't find it. So I emailed Erik and asked if he could explain. I will update here if he can remember (and I successfully complete the mod).
Posted: Tue Apr 16, 2013 7:06 am
by wesk
I also emailed him a couple of hours ago.
Posted: Tue Apr 16, 2013 8:50 am
by wilfreeman
Here's the video that I recorded. It is NOT a professional video. It does not show everything - just the main points of the conversion. It was shot with my phone, but is ok.
http://www.youtube.com/watch?v=t4XAcYvVJQs
Posted: Tue Apr 16, 2013 11:40 am
by wilfreeman
I got my starter fixed and set my timing. She runs a lot smoother, but still not perfect. I think I will need to cut the rotor if I can find out how. She also has more power, but that is more than likely due to the points being worn out/not set right. She runs good enough for now, but like Wes said - will run better with the rotor cut right.
I'll keep this post (and my video) alive and updated until we all get a good understanding about the conversion.
Posted: Tue Apr 16, 2013 12:22 pm
by maeserik
Here are a few pics from july 2007, the module still works 6 years !ine:
first pic, testing ( sorry for using temprarely tape..)
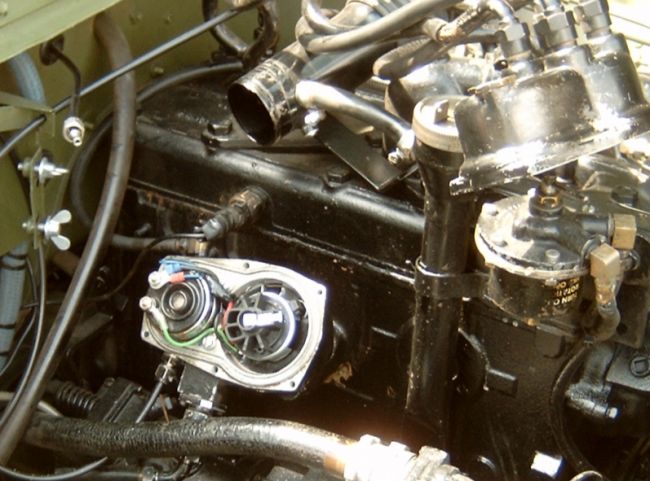
second pic, installed !
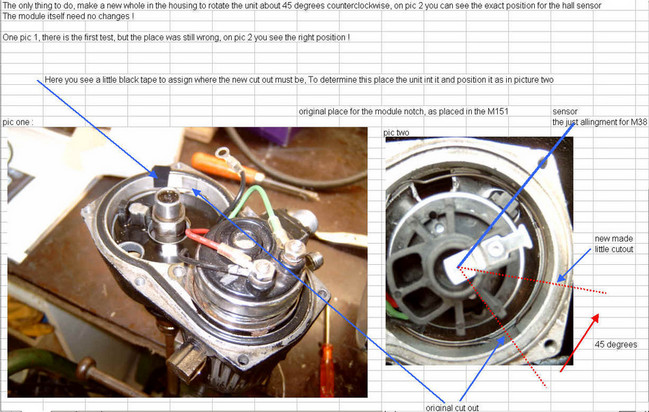
After instaliling the kit, i never touched anything !
Every year new engineoil, and lubricating all moving parts, thats all.
Erik, a hapy jeeper
Posted: Tue Apr 16, 2013 12:25 pm
by wesk
Erik,
Then you never had to cut any material from the rotor skirt area?
The new slot in the housing solved all issues with the opposite rotor rotation between the M151 and M38?
Posted: Tue Apr 16, 2013 3:21 pm
by Bill_F
I have an early m151 pointless setup. What would I need to do to make that work with my m38?
Posted: Tue Apr 16, 2013 3:57 pm
by wilfreeman
I think they said the early version was a drop in - no mods needed
Posted: Tue Apr 16, 2013 4:40 pm
by wesk
Bill,
The early Prestolite unit comes with a new cam/flyweight mount so there's should be nothing else to do. I have heard it mentioned over the years that it was a painless switch but never heard anyone describe the switch.
Posted: Tue Apr 16, 2013 5:58 pm
by Bill_F
The only think I really noticed on it is the part the rotor goes on, it has the rotor point in a different direction. I can't remember how far different at this time.
Posted: Tue Apr 16, 2013 7:17 pm
by wesk
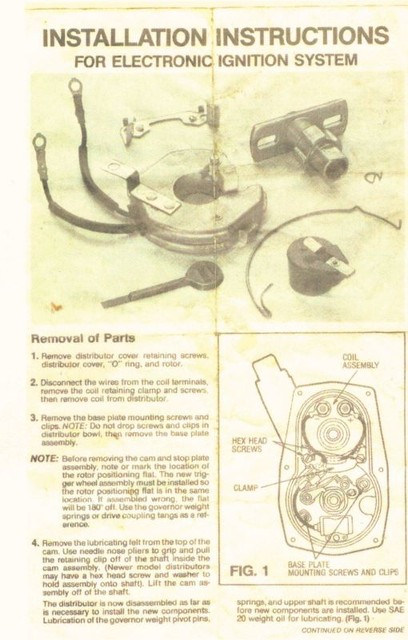
The cam assy upper right goes on the drive shaft plate two ways.
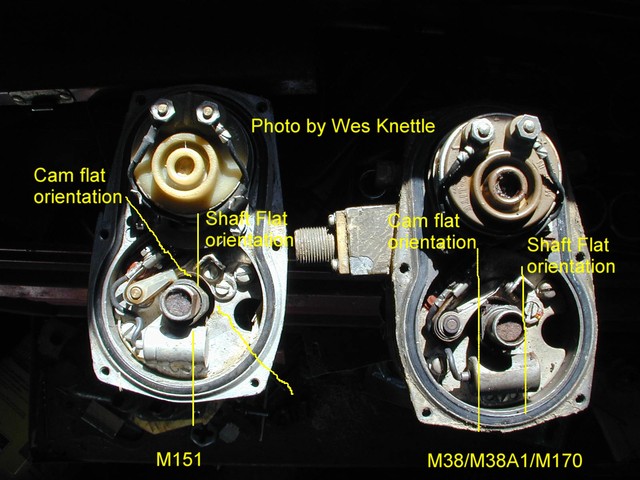
In this photo the flat drive tip at the bottom of each distributor is oriented the same way. Thus the rotor flat at the top of the shats face the same way. The cam flats are 45 degrees away from each other. So this may mean you may have to re-orient the cam assy in the M38 distributor as Erik did with the Swiss controls kit.
Posted: Tue Apr 16, 2013 8:05 pm
by Bill_F
I was looking for the kit I have tonight. Cant find where i put it right now.
Posted: Wed Apr 17, 2013 12:35 am
by maeserik
I only made a small 'cut out' in the distributiorhousing, no changes at the rotor however. The distributor in the m38 turns counterclock, in the m151 clockwise, as i read in prevouis posts on the M151 forums. Therefore I had to realign the sensor/solidstate unit 45 degrees to use the exact gap in the rotor to fire the exact moment.
Erik