Page 3 of 11
Posted: Sat May 18, 2024 6:18 am
by HodakaguyTom
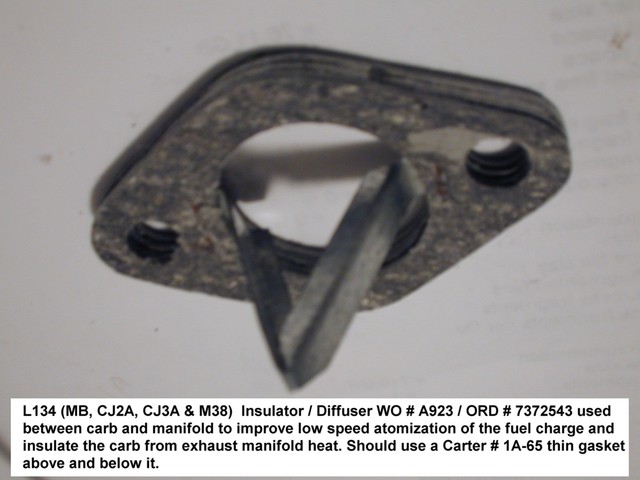
RonD2 wrote:Also happened to notice the thick carb base gasket you have isn't the M38 "diffuser" type called for in the September 1955 edition of the ORD9 Manual (page 68, WO-A923, G740-7372543), designed to help atomize fuel flow to the intake and insulate the carb from manifold heat.
Shown here:
Thanks Mate! I'll snag one and get it installed. Appriciate the assistance.
Hodakaguy
Posted: Sat May 18, 2024 6:18 am
by HodakaguyTom
Posted: Sat May 18, 2024 2:07 pm
by RonD2
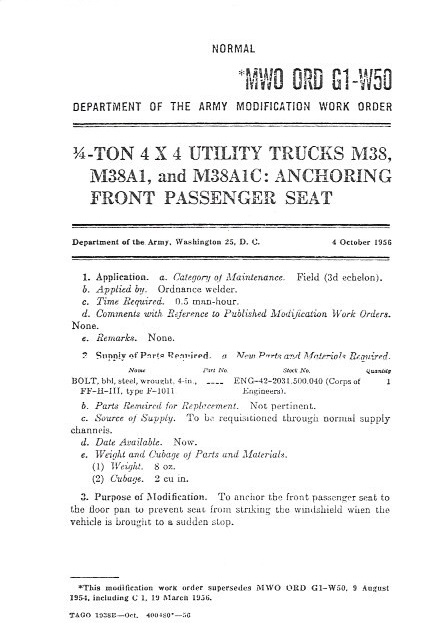
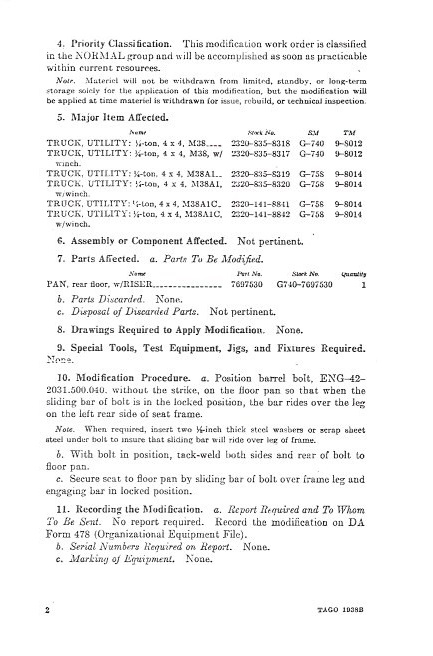
Another Army MWO-TB that might be of interest:
https://forums.g503.com/viewtopic.php?t=192723
Posted: Sat May 18, 2024 10:32 pm
by wesk
That MWO is loaded in my Photo album:
The PS Magazine TB, MWO listing mentioned in the referenced G503 post is in our downloads pages:
http://www.willysmjeeps.com/v2/modules. ... tit&lid=96
If you have seat belts installed and anchored to the floor there is no need for the slide bolt mod.
Posted: Sun May 19, 2024 6:08 am
by RonD2
wesk wrote:If you have seat belts installed and anchored to the floor there is no need for the slide bolt mod.
Unless you want to faithfully replicate your M38 as used during Army service?
Posted: Sun May 19, 2024 9:34 am
by HodakaguyTom
Thanks Guys
...a huge help as always!
Hodakaguy
Posted: Sun May 19, 2024 9:35 am
by HodakaguyTom
Cowl seal revisit. I had ordered the replacement cowl seal from Army Jeep Parts and had contacted them after the first test fit. They said the new seal is the correct seal and that our old seal is a cheaper incorrect reproduction. After looking at some pics it does look like the new one is correct and follows the windshield frame correctly.
With new information in hand I set to swapping seals again.

I warmed the seal up in the sun and it allowed the screw holes to line up correctly.


I used a bit of lighter fluid on a paper town to wipe off the white molding residue, leaving a nice black seal.


Very happy with the results. If you need a seal I would recommend this one from. Army Jeep Parts.


Note: With the old seal the latches were almost impossible to close (like the seal was to thick), with the new seal I can snap the latches down by hand now with good tension on the latch...perfect!
Hodakaguy
Posted: Sun May 19, 2024 9:46 am
by RonD2
HodakaguyTom wrote:Note: With the old seal the latches were almost impossible to close (like the seal was to thick), with the new seal I can snap the latches down by hand now with good tension on the latch...perfect!
If or when necessary, tension on the windshield latches is adjustable with the slots on the pivot brackets.
Posted: Sun May 19, 2024 6:43 pm
by HodakaguyTom
RonD2 wrote:HodakaguyTom wrote:Note: With the old seal the latches were almost impossible to close (like the seal was to thick), with the new seal I can snap the latches down by hand now with good tension on the latch...perfect!
If or when necessary, tension on the windshield latches is adjustable with the slots on the pivot brackets.
Thanks Ron.
Hodakaguy
Posted: Sun May 19, 2024 6:44 pm
by HodakaguyTom
Posted: Sun May 19, 2024 8:32 pm
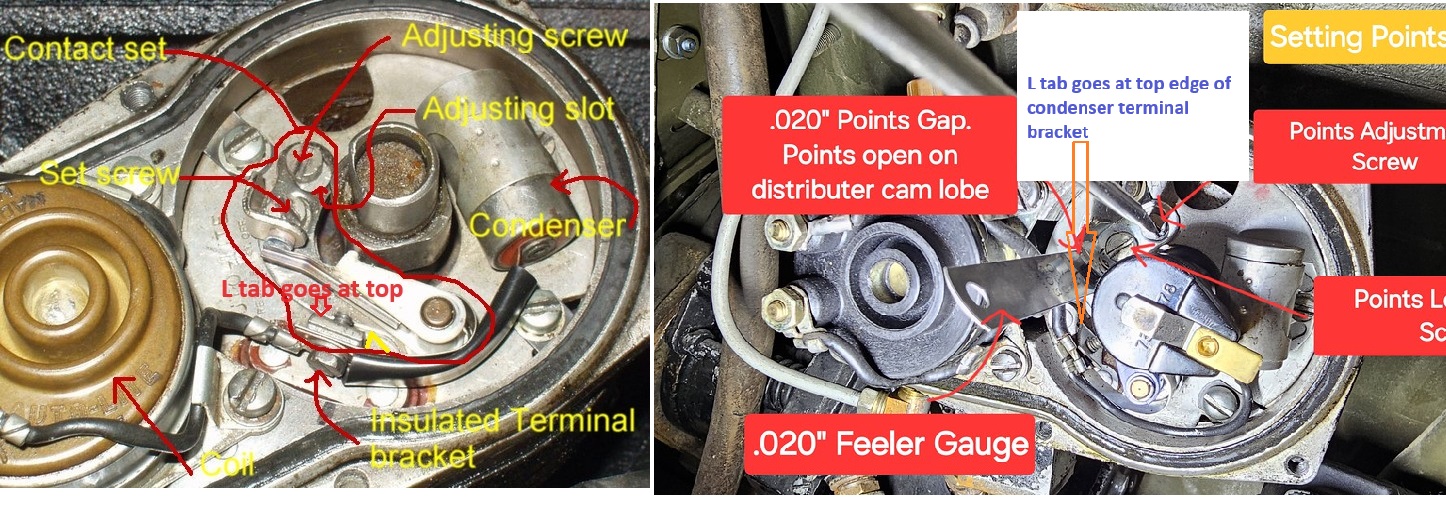
by wesk
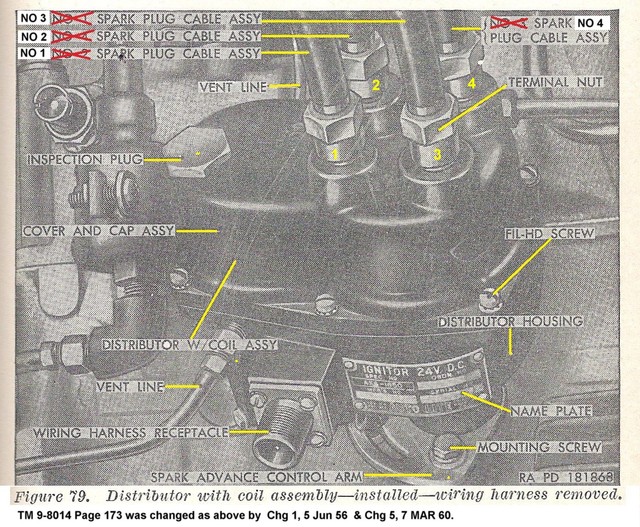
On the condenser lead there is a flat "L" sahped retainer that should be alligned with the tab at the top. Check your distributor cap firing order wiring. Should be clockwise 1, 4, 3, 2 with 1 being at the 7:00 o'clock position on the cap. When other orders are used the distributor becomes very difficult to rotate far enough to get an accurate ignition timing setting.
Posted: Mon May 20, 2024 4:37 am
by whydahdvr
Reading through these posts and seeing your pictures you've done an awesome job documenting and detailing your jeep, the work your doing, and the exact changes - and techniques used - that you've made. Very impressive!
Posted: Mon May 20, 2024 7:00 am
by pacho
Hi Hodakaguy,
Congratulation for your jeep, looks very very nice.
I am learning from yours photos, I have to make this kind of job too, please continue.
I saw in your post a spark plug adaptor. I have a m38a1 and i not sure if work good. I will appreciate the diferent opinions about this device.
COngratulations again and enjoy it.
Regards
Pacho
Posted: Mon May 20, 2024 7:08 am
by HodakaguyTom
wesk wrote:On the condenser lead there is a flat "L" sahped retainer that should be alligned with the tab at the top. Check your distributor cap firing order wiring. Should be clockwise 1, 4, 3, 2 with 1 being at the 7:00 o'clock position on the cap. When other orders are used the distributor becomes very difficult to rotate far enough to get an accurate ignition
As always Wes your info and knowledge is much appreciated. I did notice that the distributor is about at the max travel to get the correct timing so this does explain that. I will fix this next weekend and get the wiring in the correct order.
Thanks again!
Hodakaguy
Posted: Mon May 20, 2024 7:09 am
by HodakaguyTom
whydahdvr wrote:Reading through these posts and seeing your pictures you've done an awesome job documenting and detailing your jeep, the work your doing, and the exact changes - and techniques used - that you've made. Very impressive!
Thanks Mate, I'm glad your enjoying the posts. I enjoy making them

Hodakaguy


