Page 5 of 13
Posted: Fri Jul 17, 2015 8:45 am
by wadefreedomvehicles
I sprayed it down into the hole, I don't know how to get it directly into the spark plugs.
Posted: Fri Jul 17, 2015 9:39 am
by 4x4M38
Hi Brett,
Understand the plugs are offset from center, but they are above
part of the pistons, right?
As long as he puts enough liquid in there to run across
the pistons and into the cylinder bore, and down at least
to the rings he should be good, right?
A short spray won't cut it.
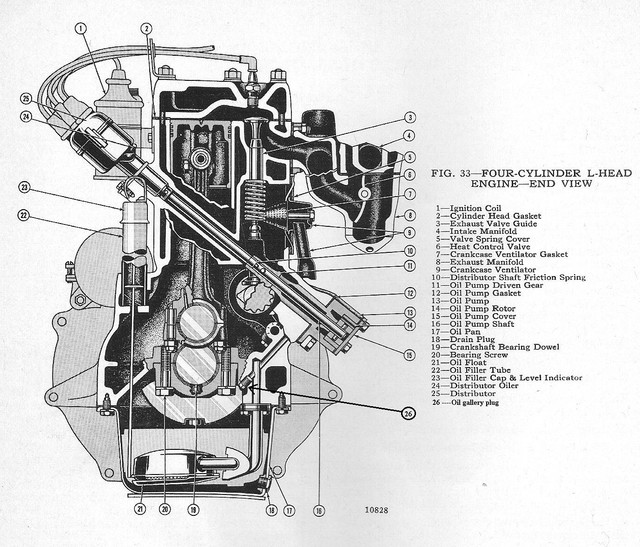
Posted: Fri Jul 17, 2015 10:17 am
by RICKG
Posted: Fri Jul 17, 2015 11:59 am
by 4x4M38
Thanks for that Rick.
That is a good diagram.
Posted: Fri Jul 17, 2015 10:07 pm
by wesk
You don't have to have the civvy CJ manual that illustration came from. It is also in the TM 9-1804A M38 engine manual pages 45 and 112.
Get a short piece of 3/16" copper tube and bend it into a "U" so you can slip it in the plug hole and have it end up facing the piston side of the head then squirt or pour thru it.
Posted: Thu Aug 06, 2015 3:19 pm
by wadefreedomvehicles
So how do I get the footrest off? I am having troubles getting that off. I would like to get the tub off by weekend.
Posted: Mon Aug 10, 2015 5:05 pm
by wadefreedomvehicles
Ok so I got it off finally. It was really tough though. Also I was wondering where I can get a paint color match, I want to match the paint I have on my Gerry can to my jeep.
Posted: Mon Aug 10, 2015 5:22 pm
by wesk
Take your Gerry can to your local paint supplier and have them match it. The really good shops can match it to the nearest existing paint code and /or custom match it to a product they custom mix for you and often can supply it to you both bulk and spray bombs.
Don't waste your time trying to post photos and ask for possible paint codes. Every computer displays every color with very subtle differences in hue or shade.
Posted: Mon Aug 10, 2015 5:27 pm
by wadefreedomvehicles
Ok cool thanks, and any tips on how to disconnect my wiring harness so when I put it back i don't get confused on what goes where?
Posted: Mon Aug 10, 2015 5:44 pm
by wesk
1-Get copies of the wiring diagrams from the manual and put them on your work bench.
2-Photograph every connection and clamp position with a digital camera before you disconnect them. If you don't yet own a good digital camera, now is the time to buy one. You can pick up a nice Sony cyber-shot for $80 to $100 that will do one heck of a nice job.
3-Get a small notebook dedicated to recording harness data/information. Record any special routings or add-on equipment connections. Record any discrepancies found.
4-Make a complete overall harness inspection first. Look for missing tape areas and mark them with a piece of green or blue masking tape. Look for any damaged or exposed wires and mark them. Check for a wire marker metal ring on each wire end. If you find one missing mark it with a piece of green or blue masking tape and write on the tape what circuit it was connected to.
5-As you disconnect each wire check again for a wire # tag. Inspect the wire for brittle areas, exposed areas of bare wire (especially where the wire can contact the small metal cup or the metal bowl type connector half. If the wire was connected to a component mark that wire with masking tape and write the component's name on the tape.
7-As you remove each clamp mark the harness with masking tape with the word clamp on the tape. Try to leave clamps bolted with their original hardware loosely at the point they were found on the jeep.
8-With the harness removed I prefer to hang it on the wall in the garage taping or tacking it up to resemble it's layout on the jeep. Take a break and in a couple of days or so come back and re-inspect it. You will be surprised how much more you will find.
Posted: Mon Aug 10, 2015 5:48 pm
by 4x4M38
Wade,
If your jeep is 24 volts and appears to be, and if the wiring harness
is reasonably intact....
The military and army in particular had a wiring system that was
standard across all M series vehicles. On this website under downloads
is a document that shows what every connection was labeled.
The left headlight on an M38 has the same wire terminal number
as say an M37. On Wes' photo pages you can find the wiring
diagrams for M38's and A1's.
If you look at one of your headlight wires at the terminal you will
find an aluminum ring with the wire number on it. That number
corresponds to the wiring diagrams on Wes' photo pages
as well as the M series wire standards in the downloads
So, easy-peasy!
Brian
Posted: Wed Aug 12, 2015 2:33 pm
by wadefreedomvehicles
Ok cool thanks. That will help, I am going to work on getting the tub off this week. Would you guys recommend to get it sandblasted?
Posted: Thu Aug 13, 2015 12:20 pm
by wadefreedomvehicles
Ok so I was trying to get my steering column and box and stuff off so I can get the tub off, I took the box off and then I couldn't get the arm disconnected from the box. Any pointers?
Posted: Thu Aug 13, 2015 12:43 pm
by wesk
A late pointer is the tub comes off with the column left installed. Only the steering wheel needs to be removed. Then with the tub off the steering gear is much easier to work on.
The sector arm is a snug fit on the splined shaft. If you are on pages 275 & 276 of your TM 9-8012, then you will see that the pitman arm does not need to be removed to get the gear box up through the floor. The drag link needs to be disconnected from the pitman arm.
Posted: Thu Aug 13, 2015 1:47 pm
by wadefreedomvehicles
Yeah, ok. So I can't get the pitman arm disconnected from the drag link. I got the nut off, but I don't have enough room to slide them apart.