Page 6 of 8
Tub
Posted: Sat Sep 18, 2010 7:49 am
by ocwd
Nice work on the tub Dave. Did you use a lot of filler?
Posted: Sat Sep 18, 2010 8:49 am
by 53a1
Thanks Dave.
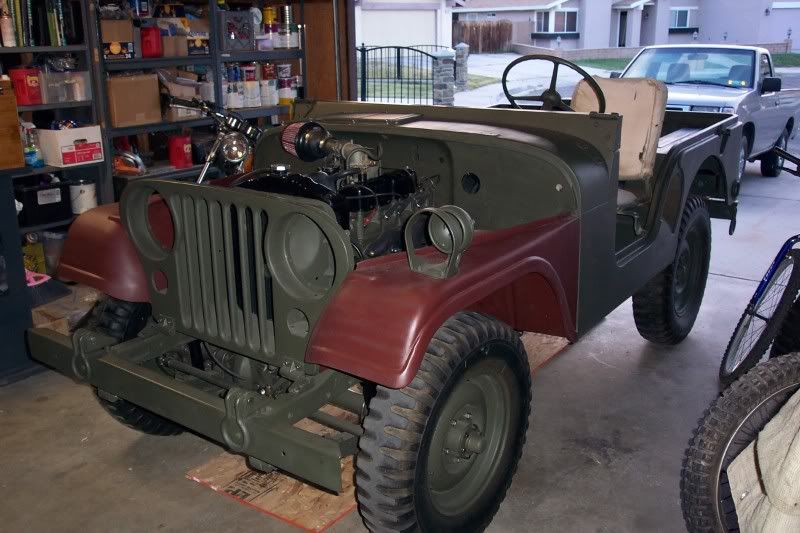
Yes I have filler all over the jeep but I used far less than what was on there before. I pounded out the dents so there is less than 1/8'' Bondo in most places. Plus I had to add several sheet metal patches and they are very hard to get smooth. The spot I repaired next to the hood hinge had a pound of Bondo before I made a new patch. After I finished it just needed a skim to fill the imperfections in my welding and grinding.
Personally I have no problem with Bondo as long as there is a solid repair underneath.
How is the tub for yours? Does it need body work?
Tub
Posted: Sat Sep 18, 2010 10:41 am
by ocwd
I am not sure what is needed on my tub. One of the previous owners started cosmetic restoration. He finished the driver's side and it looks pretty good but I can tell that it's just not quite right. I will start the tub pretty soon. The rear corners need some serious help but I won't know for sure until I strip off the old paint and filler.
I am still struggling with the fuel pump installation. I know it's the right pump but it just seams like it's not. The top bowl hits the front engine plate when I try to install it.
Posted: Sun Sep 19, 2010 9:57 am
by 53a1
Dave,
If it were me I would strip the paint off and look for rust stains or cracking in the Bondo. If it looks clean and they didn't use too much I would keep it. I've found that if you get fanatical with the body work it will take way to much time and skill to finish.
My rear corners must have been wasted at some point bad but the previous owner pounded them out and welded them. I stripped his repair down to metal, sanded, treated with Phosphoric Acid then re-Bondo.
I would check the usual suspect areas like behind the brace at the kick board, tool box and under hat channels. If you don't have to fix these areas you have a very nice tub.
Tub
Posted: Sun Sep 19, 2010 9:50 pm
by ocwd
I am planning on having the entire tub sand blasted. I can see that someone repaired the area around the gas tank neck and the tank does not line up properly in that area. I can also see damage to both wheel houses directly behind the seats and in both rear corners. I would like to also construct a turn table so I can work on the tub and rotate it easily with out help.
Posted: Tue Dec 14, 2010 11:50 pm
by aaron92685
I love this build. I can't wait for mine to get to this point. Good job!
Posted: Wed Dec 15, 2010 7:09 pm
by 53a1
Thanks Aaron.
It's been on hold for a couple months because I moved to a new house. I'm pretty much ready to finish it up. I've been side tracked with a '74 Yamaha Enduro DT250 that was given to me that needs a rebuild.
I have a sickness for machines and machinery.
Posted: Wed Feb 16, 2011 6:30 pm
by 53a1
I finished my Yamaha and started back on the Jeep. Wanted to get the floor pan in place so I could start driving it a little. My son is having a blast driving on my lap around the block. Took him on the Yamaha also.
http://www.youtube.com/watch?v=bUEf_QDbmhQ
Pictures
Posted: Thu Feb 17, 2011 8:28 am
by ocwd
Post some more pictures Dave. It helps to motivate me.
Re: Pictures
Posted: Thu Feb 17, 2011 5:28 pm
by aaron92685
ocwd wrote:Post some more pictures Dave. It helps to motivate me.
I agree!
Posted: Thu Feb 17, 2011 5:36 pm
by Balvar24
Are those new screws holding down you're floor panels? Where'd you get them?
Posted: Thu Feb 17, 2011 11:11 pm
by 53a1
I ran out of OD so the bolts only got primer for now.
I sand blasted these bolts in my Harbor Freight setup. I stick them in a piece of cardboard thread first, sand blast all the heads at once then wire wheel the rest. It takes about 10 minutes to do them this way. I then soak them with phosphoric acid and rinse them prime.
Not a lot of new pictures becuase progress has been slow.
Posted: Fri Feb 18, 2011 8:29 am
by GIJOE290
Wow, really nice job! My glasses are starting to fog up.

Posted: Sat Apr 09, 2011 10:12 pm
by 53a1
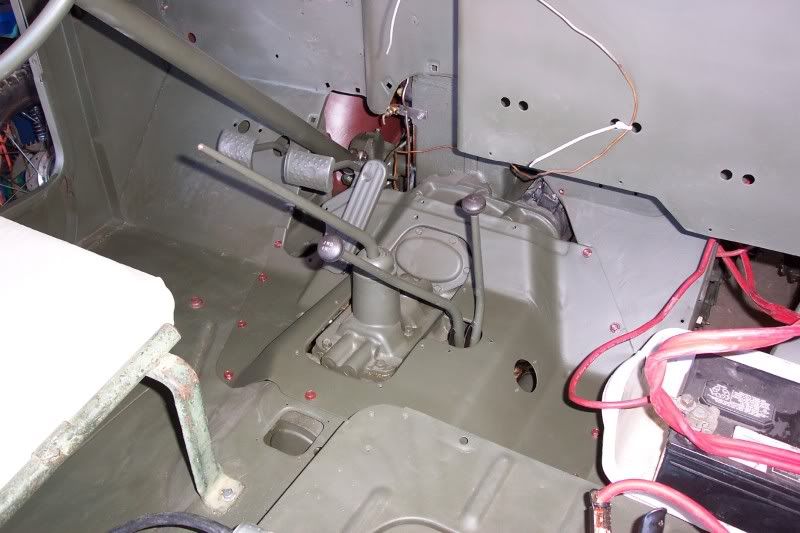
I couldn't figure out why my ground strap had three holes but John at Midwest explained it. It loops from the generator bolt under engine mount plate, center hole bolts to the engine mount plate, then it bolts to the motor mount. I used external tooth washers to dig into the metal. Tested Ohms at various points and it is well grounded.
I had trouble digging up info on this so hope this helps someone out.

Posted: Mon Apr 11, 2011 8:19 pm
by 53a1
Finished the fenders. Passenger side needed some welding, hammering and bondo but was in otherwise solid condition. I'm going to paint them when I finish the hood, dash & seats.
Installed hub caps, battery box screws and ground wire from Midwest.
Had trouble aligning the seams on fenders and had to raise the tub in the rear to take the strain off the seams. You can see the light comming between the rear bumper and tub - about and inch. I don't think this is correct.