Page 1 of 1
studs for unversal joint
Posted: Sun Aug 12, 2012 5:49 pm
by Texbillhs
Does anyone have a drawing or photo of the handbrake drum and the 4 studs for the universal joint mounting? I was checking found one of my hex nuts loose - went to tighten and the stud just spins - tried backing off and it spins . I thought maybe it is a bolt, but if so I can't get to the head end. Then I am guessing it is a stud and it must be one like a wheel stud - reason if it was like a engine block stud, with the nut frozen I should be able to back it out - it just spins. I am guessing it has a v flat head and knurled shaft and was pressed in from the other side of the drum. The knurl is gone and it spins. It is 1/8" from being tight so I wrecked a vise grip, ground it down it 1/8", got it in behind the nut, but I took too much temper out grinding, the tool wouldn't hold. I am going to try again with another pair (good thing there is a cheap Harbor Freight) and if I can back the nut off the plan is to double washer and hope I can snug it up on the good threads.
Bolts?
Posted: Sun Aug 12, 2012 8:22 pm
by capescw
Every document I have indicates a 3/8-24 bolt and nut! Why not pull the drum off and make your tool replacement (Harbor F) costs go away?

Posted: Sun Aug 12, 2012 10:06 pm
by wesk
Yes it is a bolt but you won't get the drum off until you clean the crud from the heads of the 4 bolts between the back plate and the transfer case and get a long wrench on the bolt heads and remove the nuts.

Had you read thru the removal and installation directions in the TM 9-8012 you would have seen that they are bolts and are called that in Par C(2) of the installation directions.
TM
Posted: Mon Aug 13, 2012 5:10 am
by Texbillhs
The only picture I found is Fig 31 on page 123 - shows a "companion flange" - sure would be nice to have exploded drawings. I'd like to find a TM9-8012 on paper someday. Anyway the next day I have to work I'll see if I can get a wrench behind that flange. I looked to be right up tight to the drum with no space between. There is a sump on the drum - it was hard enough to get the vise-grip in behind the nut, let alone get a wrench behind the flange. Thanks - now I know what to go after.
Posted: Mon Aug 13, 2012 8:05 am
by wesk
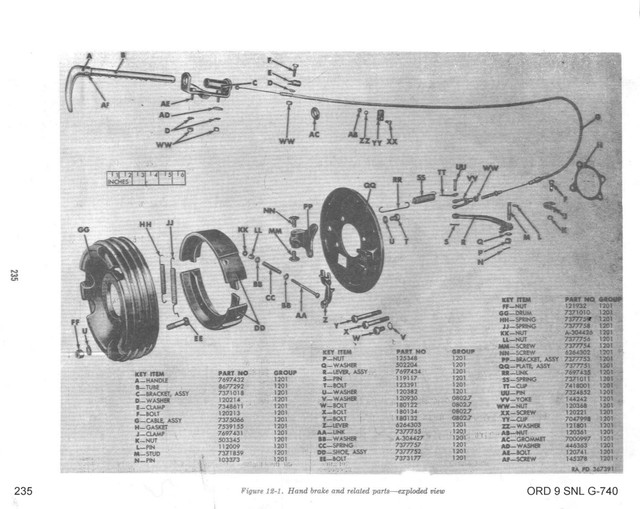
M38 ORD 9 SNL G-740 Page 235 fig 12-1
You are working on items: T, U, FF x 4 ea.
thanks
Posted: Mon Aug 13, 2012 5:22 pm
by Texbillhs
The next day I have free to mess with it I'll drop the skid plate and get up back of that plate - This forum is worth its weight in gold - Thanks
As I travel swap meets I will be looking for a TM9-8012 and shop manuals. I do have a TM9-8012 PDF (after many tries to download), the computer is up in the office and the jeep is down in the shop - paper is best.
Posted: Mon Aug 13, 2012 6:17 pm
by wesk
The swap meet route will take you another year or two. You can buy them in paper today at Portrayal Press. Or you can download all of them here to a CD and take them to your local Kinko's or whatever printing shop and voila paper manuals.
manual sources
Posted: Mon Aug 13, 2012 9:13 pm
by jimm
Army Jeep Parts, Debellas, Midwest Military, and Walck's also carry most or all of the M38 manuals, and Walck's has the CJ manual that Wes often recommends. Handy to know if you are also going to be ordering parts.
Posted: Tue Aug 14, 2012 12:29 am
by wesk
Keeping in mind that they get there manuals from Portrayal Press as well.
Posted: Tue Aug 14, 2012 10:07 am
by MODIFIED
Posted: Tue Aug 14, 2012 10:20 am
by wesk
Not shown in that series of photos were the companion flange attaching hardware (3/4" nut and washer) which would be hidden beneath the rear drive shaft's front yoke section.
To remove the driveshaft you simply remove the four nuts while holding the bolt heads.
To remove the drum you must first remove the 3/4" nut and washer that retains the companion flange. Then pull the companion flange which if it was installed correctly will still have RTV in it's splines that make pulling it a wee bit difficult.
Posted: Tue Aug 14, 2012 11:05 am
by MODIFIED
woops, just added the pic with 3/4" nut and washer placement


 [/img]