Page 1 of 1
Body shims placement
Posted: Wed Aug 29, 2012 11:03 am
by davem201m38
Hi all,
just putting the body back on the chassis and I can't remember which of the reinforced rubber shim pads go on which mounting point.
I've got about three thicknesses of shim.
TM 9-1084B says to make sure the body shims are the right ones but doesn't give any thicknesses? The other TM's don't help either.
Thick... Thin.... where?
Thanks,
Dave.
Posted: Wed Aug 29, 2012 1:08 pm
by Bretto
Go dig thru Wes's photo album on tub mounting or visit pages 292-293 of the ORD 9. Some or most of the time you have to use what ever fits. Hence the name shim.
Posted: Wed Aug 29, 2012 4:53 pm
by frankthecrank58
hi Brett. going through your pics and realising what i'm upfor in the next while. you've done a great job. my question is; what is the liquid you're using to make your parts all shiny and new? where is it available?
Posted: Wed Aug 29, 2012 5:45 pm
by Bretto
Thanks, sent you a PM
Brett
Posted: Wed Aug 29, 2012 7:04 pm
by wesk
The ORD 9 list of rubber pads and their thicknesses are for the factory installation of the tub. In the field those parts are the starting point. Once you have the correct thickness rubber pads at each point you then align the rear of the tub with the rear crossmember and fasten it finger tight. Then you go to the front (#1 mounts) and fasten those finger tight. Then you examine the fit of the tub looking first at steering and pedal shaft alignment then at kick start plunger alignment with the starter. Make the necessary adjustments using your own fabricated shim stock (metal). Now review the clearance if any at each mount and fill the gaps with your metal shim stock. Now attach the front sheet metal and check for alignment of the fenders with the hood and grill. Make any necessary adjustments with your fabricated shim stock as needed under the tub and at the fender attach points. Now secure the tub with all mounting hardware.
Here's my photo album page for the tub mounting:
http://www.willysmjeeps.com/v2/modules. ... _album.php
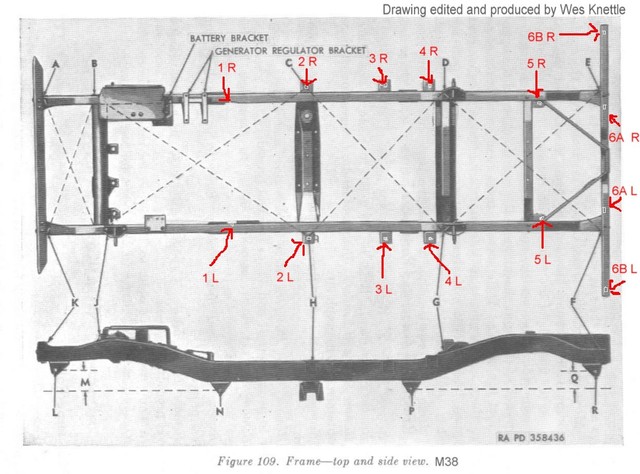
If you look this drawing up in the TM you'll see the numbers are there to measure up the frame to check it's alignment.
Posted: Wed Aug 29, 2012 9:52 pm
by wilfreeman
Also, make sure your frame is straight BEFORE you start! I worked with mine for hours before I gave up and told my brother to come get it and take it back to his body shop. He looked at it for about 5 minutes and saw that the frame was diamond shaped by about 1"! He said a few minutes on the frame machine will take care of the problem. Hopefully he will have her done in the next couple of days day I can do final paint and markings!
Posted: Thu Aug 30, 2012 3:08 am
by davem201m38
Ah... thanks,
been a couple of years since I stripped it down and I'd forgot where and what and how.
Thanks, Dave.