

My weekend project
-
ecurb_1160

- Member
- Posts: 37
- Joined: Fri Dec 14, 2012 6:00 pm
- Location: franklin,pa.16323
My weekend project
My latest weekend project!!!!

-
wilfreeman
- Jeep Legend

- Posts: 1079
- Joined: Sun Mar 12, 2006 6:00 pm
- Location: Richburg, SC
- Contact:
Thats pretty! I need to get mine rebuilt for my spare engine (need to get started on rebuilding that too!) Good luck!
Matt
1953 M38a1
1964 USMC M38a1
'51 USMC M100 trailer, '54 M100 trailer, '90 M101a1 trailer
Http://wilfreeman.wordpress.com (M38a1 build blog)
http://m38a1usmc.wordpress.com (USMC M38a1 rebuild blog)
1953 M38a1
1964 USMC M38a1
'51 USMC M100 trailer, '54 M100 trailer, '90 M101a1 trailer
Http://wilfreeman.wordpress.com (M38a1 build blog)
http://m38a1usmc.wordpress.com (USMC M38a1 rebuild blog)
-
ecurb_1160
- Member
- Posts: 37
- Joined: Fri Dec 14, 2012 6:00 pm
- Location: franklin,pa.16323
-
wilfreeman
- Jeep Legend
- Posts: 1079
- Joined: Sun Mar 12, 2006 6:00 pm
- Location: Richburg, SC
- Contact:
Yeah, post up after you're done with it and tested it out on the Jeep - I'm sure I'm not the only one interested in the outcome. You can even write a review on the kit in the product review section if you want.
Matt
1953 M38a1
1964 USMC M38a1
'51 USMC M100 trailer, '54 M100 trailer, '90 M101a1 trailer
Http://wilfreeman.wordpress.com (M38a1 build blog)
http://m38a1usmc.wordpress.com (USMC M38a1 rebuild blog)
1953 M38a1
1964 USMC M38a1
'51 USMC M100 trailer, '54 M100 trailer, '90 M101a1 trailer
Http://wilfreeman.wordpress.com (M38a1 build blog)
http://m38a1usmc.wordpress.com (USMC M38a1 rebuild blog)
-
wesk

- Site Administrator

- Posts: 16467
- Joined: Sun Apr 03, 2005 6:00 pm
- Location: Wisconsin
- Contact:
A two page instructions sheet will help but won't even come near the wealth of information we have here for free:
http://www.willysmjeeps.com/v2/modules. ... it&lid=109
http://www.willysmjeeps.com/v2/modules. ... it&lid=109
Wes K
45 MB, 51 M38, 54 M37, 66 M101A1, 60 CJ5, 76 DJ5D, 47Bantam T3-C & 5? M100
Mjeeps photo album: http://www.willysmjeeps.com/v2/modules. ... _album.php
45 MB, 51 M38, 54 M37, 66 M101A1, 60 CJ5, 76 DJ5D, 47Bantam T3-C & 5? M100
Mjeeps photo album: http://www.willysmjeeps.com/v2/modules. ... _album.php
-
ecurb_1160
- Member
- Posts: 37
- Joined: Fri Dec 14, 2012 6:00 pm
- Location: franklin,pa.16323
SUCCESS!!!!! Pump went back together pretty easy,just have to watch you keep shafts lined up with holes in gaskets when you stake shafts to diaphams. Put it back on jeep, fired it up, it now idles better and at a slower rpm. I'm very happy with it. Anyone need one rebuilt? LOL,I would do it again,not a bad job at all.Now if this snow would go away, I could get out on the roads for some fun!!!! Bruce
[/url]

[/url]

-
wilfreeman
- Jeep Legend
- Posts: 1079
- Joined: Sun Mar 12, 2006 6:00 pm
- Location: Richburg, SC
- Contact:
Nice - good job!
Matt
1953 M38a1
1964 USMC M38a1
'51 USMC M100 trailer, '54 M100 trailer, '90 M101a1 trailer
Http://wilfreeman.wordpress.com (M38a1 build blog)
http://m38a1usmc.wordpress.com (USMC M38a1 rebuild blog)
1953 M38a1
1964 USMC M38a1
'51 USMC M100 trailer, '54 M100 trailer, '90 M101a1 trailer
Http://wilfreeman.wordpress.com (M38a1 build blog)
http://m38a1usmc.wordpress.com (USMC M38a1 rebuild blog)
-
Beast

- Contributor

- Posts: 125
- Joined: Sat Sep 24, 2011 6:00 pm
- Location: Silver Lake Mi.
Good job. I was going to rebuild mine when it was giving me problems this past summer, but ended up just getting one from John at Midwest Mil. because I was short on spare time and didn't want to fiddle with it. But it looks like it went easy for you.
Dave
53' M38a1, 53' M37, 67' M715, 67' M725, 67' M35a2
http://www.davidallenracing.com/motorpool.htm
Delta Team Decals http://www.deltateamdecals.com/
53' M38a1, 53' M37, 67' M715, 67' M725, 67' M35a2
http://www.davidallenracing.com/motorpool.htm
Delta Team Decals http://www.deltateamdecals.com/
-
Hawkshadow

- Jeep Enthusiast

- Posts: 310
- Joined: Tue Oct 09, 2012 6:00 pm
- Location: Toronto, Ontario, Canada
Great job! I'm in the middle of rebuilding mine right now with a parts kit purchased from Then And Now. I have everything disassembled, bead-blasted, and painted. Now it's time for reassembly.
Everything looks good with my kit, the only part that I am unsure where it should go is a piece of mesh that came in the kit.... did yours come with this mesh as well?
Everything looks good with my kit, the only part that I am unsure where it should go is a piece of mesh that came in the kit.... did yours come with this mesh as well?
Jordan
M38 CDN
52-30718
M38 CDN
52-30718
-
ecurb_1160
- Member
- Posts: 37
- Joined: Fri Dec 14, 2012 6:00 pm
- Location: franklin,pa.16323
Hawkshadow, Mine didn't have the mesh but reading the manual wes posted, it was a filter on the vaccum side but is not needed,I'll see if I can find where it states that and post it in a bit. I never saw one painted, when you get it done how about a pic. BruceHawkshadow wrote:Great job! I'm in the middle of rebuilding mine right now with a parts kit purchased from Then And Now. I have everything disassembled, bead-blasted, and painted. Now it's time for reassembly.
Everything looks good with my kit, the only part that I am unsure where it should go is a piece of mesh that came in the kit.... did yours come with this mesh as well?
Here it is from manual,e. Disassemble Vacuum Cover. (Superseded) Remove valve and
cage retainer screw. Lift out retainer, two valve and cage assemblies,
and two gaskets. Remove cover screw and its gasket. Lift off
cover, cover gasket, screen retainer, and screen. Discard screen and
screen retainer. The vacuum section screen serves no useful purpose
and has been eliminated from later production pumps
-
Hawkshadow
- Jeep Enthusiast
- Posts: 310
- Joined: Tue Oct 09, 2012 6:00 pm
- Location: Toronto, Ontario, Canada
Ahh that makes perfect sense. So I don't have to worry about it. I am hoping to do my re-assembly within the next couple of days and will upload the pictures as soon as possible.ecurb_1160 wrote: Hawkshadow, Mine didn't have the mesh but reading the manual wes posted, it was a filter on the vaccum side but is not needed,I'll see if I can find where it states that and post it in a bit. I never saw one painted, when you get it done how about a pic. Bruce
Here it is from manual,e. Disassemble Vacuum Cover. (Superseded) Remove valve and
cage retainer screw. Lift out retainer, two valve and cage assemblies,
and two gaskets. Remove cover screw and its gasket. Lift off
cover, cover gasket, screen retainer, and screen. Discard screen and
screen retainer. The vacuum section screen serves no useful purpose
and has been eliminated from later production pumps
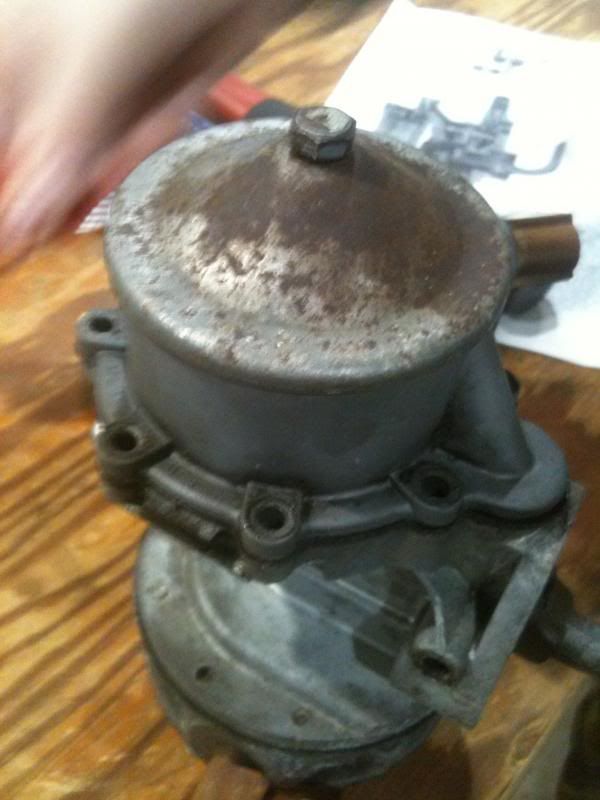
While I haven't seen one painted before, I ended up doing mine the same colour as the engine. I started just doing the topper on the vacuum which had rust spots, but then that would've looked strange, so I ended up blasting and doing the whole thing.
Any pointers to pass along before I start the reassembly?
Jordan
M38 CDN
52-30718
M38 CDN
52-30718
-
wesk
- Site Administrator
- Posts: 16467
- Joined: Sun Apr 03, 2005 6:00 pm
- Location: Wisconsin
- Contact:
Actually they were not painted. They were anodized and you can still replicate that coating with the use of Alodine today.
Wes K
45 MB, 51 M38, 54 M37, 66 M101A1, 60 CJ5, 76 DJ5D, 47Bantam T3-C & 5? M100
Mjeeps photo album: http://www.willysmjeeps.com/v2/modules. ... _album.php
45 MB, 51 M38, 54 M37, 66 M101A1, 60 CJ5, 76 DJ5D, 47Bantam T3-C & 5? M100
Mjeeps photo album: http://www.willysmjeeps.com/v2/modules. ... _album.php
-
ecurb_1160
- Member
- Posts: 37
- Joined: Fri Dec 14, 2012 6:00 pm
- Location: franklin,pa.16323
-
Hawkshadow
- Jeep Enthusiast
- Posts: 310
- Joined: Tue Oct 09, 2012 6:00 pm
- Location: Toronto, Ontario, Canada
I am working through the re-assembly and have hit a couple of bumps along the way. I am taking detailed pictures and hope to post a step-by-step for members here.
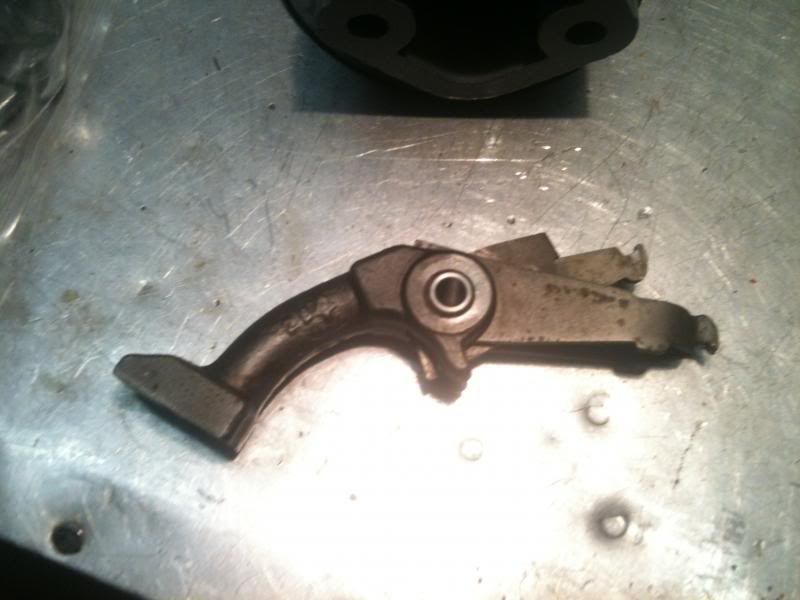
Bruce, Do you recall which way the linkages for the diaphragms were positioned? I had it pictured at dis-assembly, but the picture didn't turn out well enough to be as helpful as I expected and they were mixed around when the bushing fell out in the bag
Picture from dis-assembly:
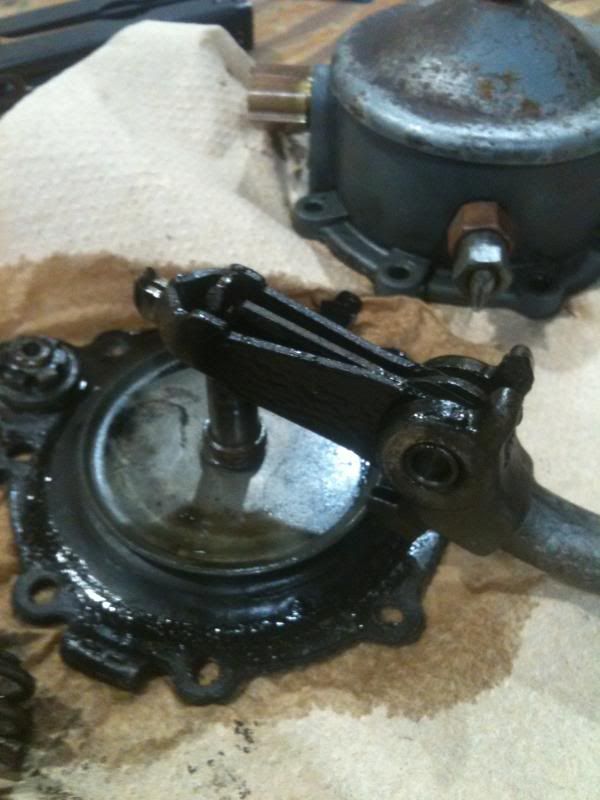
Which way should these sit and point?
Re the requirement for paint, here is what I had to start with. It appeared to have been painted the same colour as the engine at some point.
Thanks in advance!
Bruce, Do you recall which way the linkages for the diaphragms were positioned? I had it pictured at dis-assembly, but the picture didn't turn out well enough to be as helpful as I expected and they were mixed around when the bushing fell out in the bag
Picture from dis-assembly:
Which way should these sit and point?
Re the requirement for paint, here is what I had to start with. It appeared to have been painted the same colour as the engine at some point.
Thanks in advance!
Jordan
M38 CDN
52-30718
M38 CDN
52-30718
-
ecurb_1160
- Member
- Posts: 37
- Joined: Fri Dec 14, 2012 6:00 pm
- Location: franklin,pa.16323