Page 1 of 1
ball seat adjusting plug - drag link
Posted: Wed Dec 17, 2014 6:09 pm
by 4x4M38
Ok,
I've spent nearly five hours today trying to thread the gear end ball seat adjusting plug into the drag link. I know it was a pain to get the thing loose and out when I removed it, but had no idea the problems I'd have going back in.
I've cleaned the external threads, wire brushed, touched up with a thread file where damaged, and done as much as possible with the internal threads. Access to the internal threads is a pain.
I then spent the rest of the day with Liquid Wrench (after the WD40 ran out), threading the thing in, touching up threads, threading in, cleaning threads, oil, threading in, ad nauseum.
I still have not covered the cotter pin holes in the plug yet.
My next plan is to go to NAPA tomorrow with the whole thing and see if they have a thread tap. I shudder to think what that might cost.
Does anyone have any ideas?
Thanks,
Brian
(nursing an adult beverage and handful of aspirin)
Posted: Wed Dec 17, 2014 6:50 pm
by wesk
If threads don't want to thread and you are sure they are matched then you have headed in the right direction. If you don't wish to compound your problem you need to re-thread both male and female or you will end up with threads that still are not perfectly matched. Try stopping at your local machine shop if you don't want to pop for the price of both a tap and a die of such large size. It will only take a machinist about 10 minutes to solve your problem.
Posted: Wed Dec 17, 2014 7:27 pm
by 4x4M38
Hi Wes, I have managed to get 2/3 of the plug into the drag link.
It acts like paint in the threads. I oil, thread in, back out ,
clean, and start over. It threads in just fine until it stops.
Then the fun begins.
Machine shop. Now that is an excellent idea.
Tks,
Brian
drag link
Posted: Thu Dec 18, 2014 10:52 am
by buzzk
Make sure you have it put together right. The end caps where the cotter pin goes make sure it is flat across where the pin slides thru it. I had a repop on my WWII jeep and when they cut the slit in the end caps it was rounded so the cotter pin would not slip thru when it was set proper. I took a grinder w/a cut off wheel and made them flat all the way across buzz
Posted: Thu Dec 18, 2014 9:33 pm
by 4x4M38
Hi Buzz,
Original takeoff items. The crosses are nice and square
and flat across the bottom.
Another long day. The wife is getting cranky as I'm doing
this instead of helping with Christmas stuff.
Local machine shop did not have the tap. Thinks it is a
special 15/16 x 24 NF. I stopped at the local hot rod/restoration
spot remembering they had just restored a CJ for a guy.
They tried bead blasting, then working in and out with
anti seize. Sent me home after a half hour telling me I can
do that and their guy can go back to work. Spent another
couple of hours lubing, twisting in and out, repeat. Got the
wire wheel out and really polished the external threads. Still
tight the further in I go. Nearly have a slot visible for the
cotter on one end. Can't write, my hands are a mess.
Of all the things that could give me grief on this thing
I didn't see this one coming. Going to have to put it down
and get ready for some company.
Posted: Sun Dec 21, 2014 3:43 pm
by 4x4M38
So after a couple of days of downtime with family and waiting for the next wave to arrive I was glancing through some bags of takeoff items.
And found "THE" takeoff adjusting plugs.
Tried them, and although a little snug near the bottom, threaded all the way in. As you can see what I was trying to thread in is somewhat different than the originals that are on the bottom.
 http://willysmjeeps.com/v2/modules/gall ... 2/NUTS.jpg
I am now wondering what these are for. Certainly not the drag link I have in hand. Still, one would think they would still thread in all the way.
Well, at least I can put this thing back together now.
Brian
Posted: Sun Dec 21, 2014 7:20 pm
by wesk
Here's my edited post based on additional info.
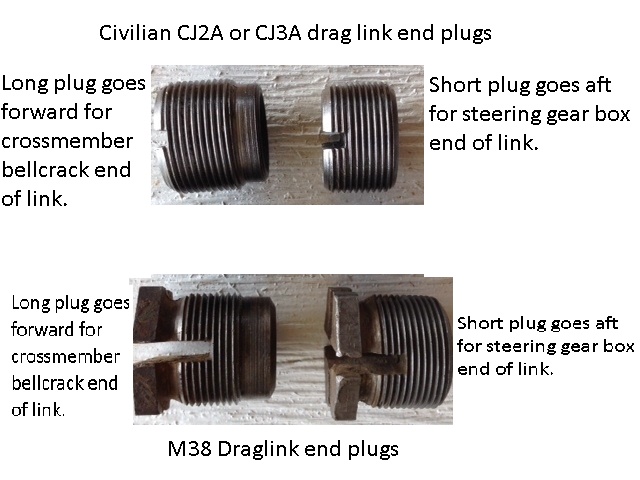
In this photo the two top plugs are as used on CJ draglinks and the bottom photo shows the hex end plugs found in the M38 parts manual. Note that the lower left plug appears to have had it's slot opened wider and deeper then original.
Here's a good illustration from the CJ manual SM-1002
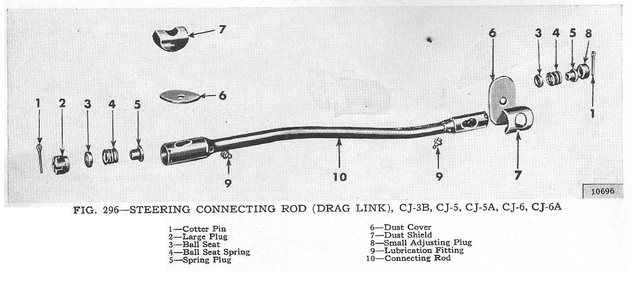
CJ's
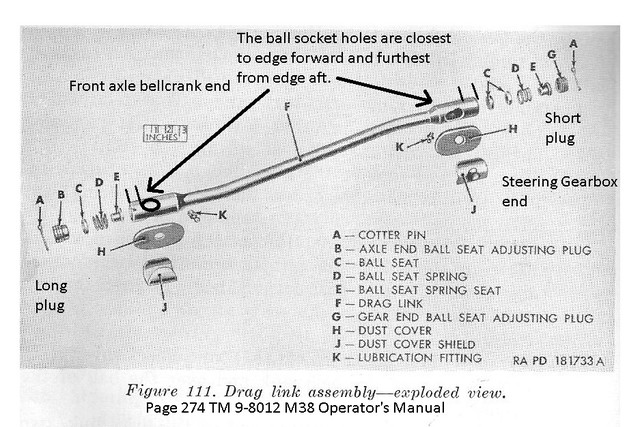
Note: This M38 TM 9-8012 figure shows same plugs as CJ manual.
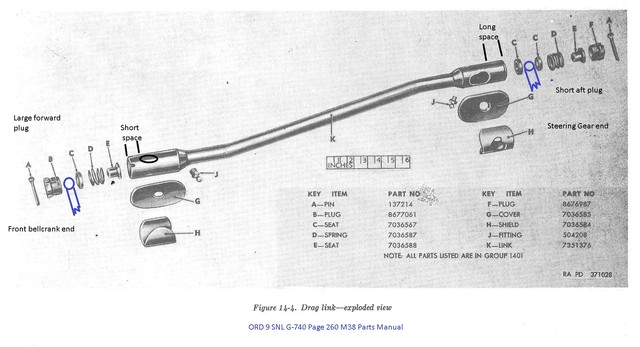
Note: This M38 Parts Manual shows the hex end plugs
Posted: Sun Dec 21, 2014 10:48 pm
by 4x4M38
Hello Wes,
The top two came in a new drag link rebuild kit. The bottom two
came off the jeep. The bottom left one has a machined concave
end where the ball goes that appears to be chrome plated.
The bottom right plug is flat on the bottom.
The threads on the bottom pieces are identical as I can swap
them to either end of the drag link and they thread right in.
Brian
Posted: Mon Dec 22, 2014 8:38 am
by 4x4M38
That's great information Wes.
Very much appreciated.
And that the ball goes between the two seats on the gear end.
Brian
