Page 1 of 2
Light switch test confirm.
Posted: Sun Aug 16, 2015 2:44 pm
by Hawkshadow
I didn't have luck in locating a specific test procedure but figured that there should be continuity between pin F and M or F and H while in Service Drive? Failing a continuity test between those points would indicate that a late model 3 lever switch needs replacement, correct?
Posted: Sun Aug 16, 2015 4:17 pm
by 4x4M38
Hawk,
Everything you need is in the Downloads section under M38/
Electrical:
http://willysmjeeps.com/downloads/M38-L ... Repair.pdf
The test procedures are after repair and reassembly.
Take care,
Brian
Posted: Sun Aug 16, 2015 5:13 pm
by Hawkshadow
Thanks Brian! I missed the download section. Instead of 14 lamps, I would think that an Ohm meter between the points would be sufficient?
Posted: Sun Aug 16, 2015 6:46 pm
by 4x4M38
Hopefully Wes will weigh in but I would think Ohming out the
pins would tell you what you want to know as long as you understand
the test procedures and what the correct end results are
supposed to be.
Take care,
Brian
Posted: Tue Aug 18, 2015 8:41 am
by Hawkshadow
Referencing the photos and label charts posted on here, when Service Drive is selected there should be continuity between F and J, A, M, and H. I worked the switch to try and work off any internal corrosion and could only get continuity with J and occasionally A. From this, the switch is defective and needs to be replaced.
Posted: Tue Aug 18, 2015 12:03 pm
by 4x4M38
Sadly, only the early two plug Bendix switches were designed to
be disassembled and serviced.
Having said that get ahold of Brett (Bretto). I believe he pulled
a later switch apart and rebuilt it. If you feel horsey maybe you
can get some tips from him and give it a go.
Not much to lose, right?
Take care,
Brian
Posted: Tue Aug 18, 2015 12:19 pm
by 4x4M38
Posted: Tue Aug 18, 2015 9:23 pm
by wesk
There were actually two early Bendix switches that are rebuildable and are shown parts wise in the ORD 9. The first one which was a two plug and the second which was a one plug with only the boss remaining for the rear harness plug. All the new switches after those two were throw away switches. Even today's push button switch is a throw away.
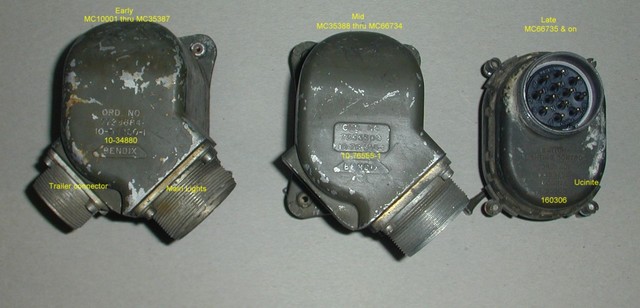
Both of the Bendix switches are rebuildable in the photo above. Even today they are still my preferred switch. Better quality, some repair parts availability and excellent technical data to repair them.
Posted: Sun Aug 30, 2015 10:40 am
by Jeff_Lee
The M38 Colored wiring diagram is great - a really nice reference.
I am, however having trouble reading the specific printing for the pin outs of the light switch - especially the M and N positions.
Is "N" 23 BO Stop Position, or is that an "M"??
I think "M" is shown for 16 Headlight Dimmer Sw.
Can someone in the know please clarify.
Thanks,
Jeff
Posted: Sun Aug 30, 2015 6:18 pm
by Bretto
M (16)= dimmer
N (23)= BO Stop
Posted: Sun Aug 30, 2015 9:48 pm
by Jeff_Lee
Thanks Bret.
I just reviewed your photo diary of your M38 build - it is a master class! I am impressed by the parts you fabbed, and what you did to restore your master light switch is amazing.
After opening mine up I found rust and dust and broken plastic. Not pretty:

My approach is to try to find a functioning used or NOS light switch, as I don't think I could pull off what you have done! I am running 12v, so I will use a headlight relay (behind the panel out of sight, as you did) to keep the amperage low through the switch.
Thanks and regards,
Jeff
PS: How did the Kiwi White Leather shoe polish hold up on the lettering on the light switch?
Posted: Mon Aug 31, 2015 6:26 am
by 4x4M38
Hi Jeff,
Yep, that looks like a write-off.
There are several switches on EBay at present, including
one of the two plug switches.
I'm sure a couple of the vendors have some as well.
I just finished painting my switch with self-etching primer,
AJP WWII semi-gloss, painted the lettering with white shoe
polish, and sealed everything with satin spar urethane.
Good luck!
Brian
Posted: Mon Aug 31, 2015 8:14 pm
by Hawkshadow
To bring it back for a minute for future record:
Evidently my switch wasn't functioning correctly. I ordered a new one from a supplier, tested it for the same continuity points and all worked with no problem. I am now having other light issues, but those will be sorted in another thread.
With regards to the old switch, I may try a couple of other suggested restoration methods at a later date.
Posted: Mon Aug 31, 2015 8:39 pm
by 4x4M38
Who's Jeff?
Sorry Jordan. Probably sniffing too much aerosol paint.
Yes, Brett is a Master Crafstman.
His treatise in creating missing pieces is a lesson to us all.
Brian
Posted: Mon Aug 31, 2015 8:48 pm
by 4x4M38
Now that's funny.
There really are two of you working on switches!
